MENU

The Largest Textile I’ve Blocked to Date: A Knit Lace Chuppah

detail of lace star in middle of chuppah
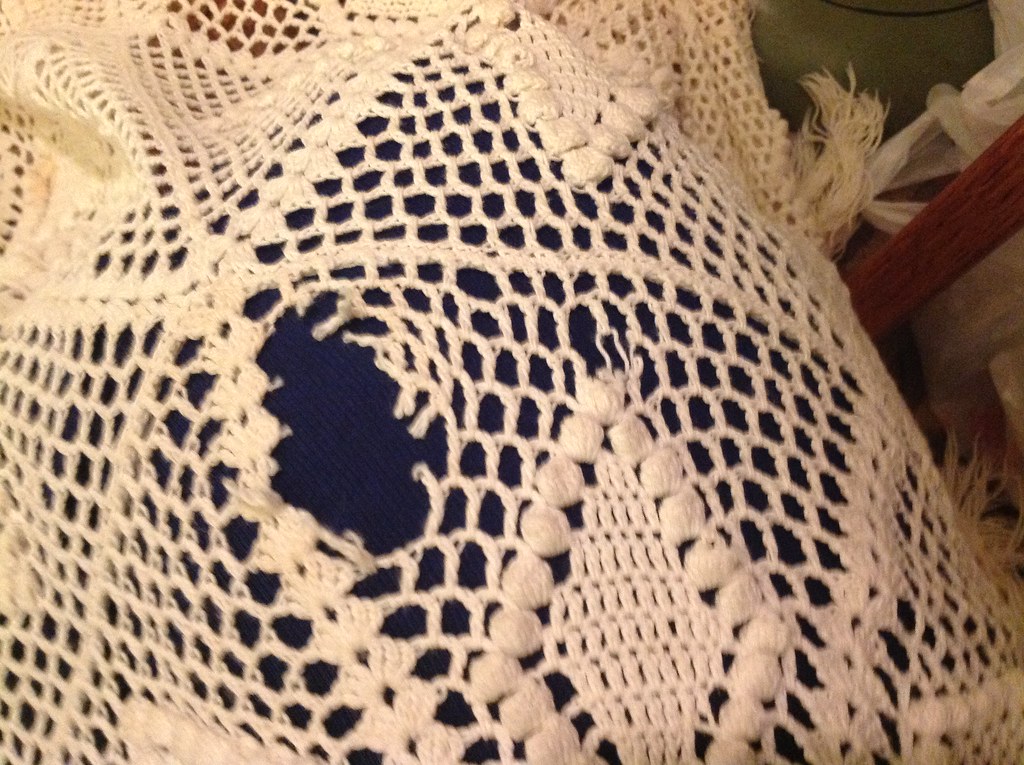
A while back I was contacted by a young woman getting ready for her wedding.  She had a rather unusal request: she needed a lace knit chuppah for her wedding blocked.  Part of a traditional Jewish wedding is the chuppah: a canopy under which the couple stands during the wedding cerenony.  The chuppah has a lot of symbolism.  Some chuppahs can be very plain, but many of them are passed through the family, and are elaborate family herilooms made of lace and embroidery are not uncommon.

When I first spoke to the young lady, she admitted that she had gotten in touch with a few other finishers, and none of them could take on an item so large.  She estimated that the finished piece would be about 10 by 10 feet.  I have to admit, I went through the house with a measuring tape, measuring each room in my house to see if I could fit something so large.  Luckily, our kitchen with all the furniture out would work.  It was 14×14 feet – which would give me just enough room to be able to walk around it when the piece was laid out.

[Read more…]

Progress Report: Tinking Turtle Post Baby

32195098356_fa3b4980bf_bI was once told by a friend that was proficient in email market that you should never acknowledge when you’ve been away from your blog for a while… merely you should continue as you mean to go on, and pick up blogging/tweeting/social networking as if you’d never been away.  But in this case, I think it’s worth a little note.

First a quick general life update: the Turtle household has been moving along at a fairly good clip.  We’ve managed to keep ourselves and our new child fed and alive, and got through the holidays with a minimum of drama.  But everything non-essential has been shunted to the side.

The state of things now looks like this: I’ve been wrapping up the last of my designs that I’ve had under contract, and contemplating how my business is going to pivot with Little Turtle’s needs growing and changing.  I knew, conceptually, that this business was going to change after a child, but the plan was rather vague.  We kept the plan vague on purpose.  I didn’t know what parts of the business I’d be able to work in and which parts I wouldn’t be able to.  Now, with nearly 8 months under our belts, I’ve come to some conclusions.

  1. I want to keep teaching. I love teaching students, and it is much more manageable to work teaching into post-baby life.  I can plan to have a weekend where I teach and Mr. Turtle takes Little Turtle.  I can plan to have every Wednesday night off so I can teach at local venues.  I can plan for fiber festivals and retreats and traveling to other locations.  I have a repertoire of classes, samples and worksheets, and can lean on all the work I’ve done the last couple of years to deliver classes that are great.
  2. I’ll keep up the repair and finishing. I like the challenge of working on different projects, and the repair and finishing provides a steady income, which helps.  I can also work on these projects around Little Turtle.
  3. I’ll be dialing back designing for magazines. I’m discovering that designing, for me, is really really difficult around Little Turtle.  Designing was always one of the things I did better when I had long stretches of times to work – to think out the math of a piece, to draw and sketch out proposals.  I need time to dream and think ahead, and that’s really really difficult to do these days.  My last two designs that I had due after Rebecca were born were really stressful, and I don’t think it’s the best return on investment right now.
  4. Instead, I’ll be working on some designs to support my teaching. I’ve found there are techniques I want to teach where I’ve had a hard time finding a design to teach off of that meets my needs.  Instead of making things work, I’m going to be working on self-publishing some pieces that will support the classes I want to teach.

… And meanwhile, Mr. Turtle will be making sure I blog more.

New Classes at Dances With Wool

wwl-allIt’s always exciting when a new yarn store comes to the area – what yarns are they going to carry?  So it was super exciting when a few months ago Debbie Floyd, the owner of Dances with Wool, got in contact with me.  She was opening a new yarn store in Midlothian, VA.  And she wanted to talk to me about classes.

I’m so excited about this new yarn store to the Richmond VA area, especially as the Knitting Basket is closing.  While I haven’t been by the store since they had their opening, what I did see was a store focused on good quality yarn, beautiful patterns, community and classes.

Starting in November I’ll be teaching a Skill Building class focused around my pattern, Wild Wood Leaves.  It’s a crib blanket with options of three different sizes, and is currently only available if you take the class.  The wonder of this series of classes is you can take the entire series of eight (and get a discount on all of them) or pick and choose which ones you need the most.

The classes are as follows:

  • Week 1, Nov. 2, 6-7 pm – Reading Patterns, Knits and Purls (middle left panel)
  • Week 2, Nov. 9, 6-7 pm – Increases, Decreases and Yarn Overs, Beginning Lace (bottom left panel)
  • Week 3, Nov. 16, 6-7 pm – Color Work With Duplicate Stitch (bottom right panel)
  • Week 4, Nov. 30, 6-7 pm – Color Work With Intarsia (middle right panel)
  • Week 5, Dec. 7, 6-7 pm – Beginning Cables (top left panel)
  • Week 6, Dec. 14, 6-7 pm – Slip Stitches (top right panel)
  • Week 7, Jan. 4, 6-7 pm – Bringing It All Together with Seaming and Finishing (all)
  • Week 8, Jan. 11, 6-7 pm – Picking Up Stitches and Borders (all)

You can sign up for the classes here.

I can’t wait to begin teaching locally again!  I’ve missed being able to do it since Rebecca was born, and I’m so pleased to be able to spend time with students while establishing good foundational knitting skills.

You should also check out Dances with Wool!

20161024_9879-small

News & Updates from Tinking Turtle

On Monday Mr. Turtle and I closed on a house we’ve been in the process of buying.  It seems like we’ve been in negotiations for months now.  Monday afternoon we signed the last of the paperwork, a large sum of money exchanged hands, and we got the keys to the house.  It’s official.

Over the next few weeks we’ll be moving our household from the house we rent to the house we own – over a distance just shy of seven miles.  We get to stay in an area we love.  We couldn’t be more pleased with our decision!

Next week I’ll try to get some pictures of the house and the property, but right now we’re busy with a number of tasks we want to get done before we move in… namely, some repairs, some tidying, and packing up our current household.  Big changes are afoot!


mattress stitch

Finishing: working the mattress stitch

Over the past weekend I was at Fibre Space teaching a full roster of classes.  It was a blast – some weekends you just luck out with the most amazing student.  It was the case of me being in the right mind-frame, all the students ready and prepared for the classes and… I think the fact that the store had rearranged the classrooms so there was noticeably more space.  Sometimes, when there were a lot of classes running in the store before, the noise and the room could get a mite bit squished.  With the way the store has been rearranged, the classrooms have more room to “breathe.”  It made a big difference.

I taught Finishing, and had a great group of students learn how to work the mattress stitch, weave in ends, and block like masters.  I also taught Ravelry 101 and Intarsia.

irish crochet motifs

Irish Crochet Motifs

But the class I’d been looking forward to teaching the most?  Irish Crochet.  A number of years ago I ran an Irish Crochet class that did well, but interest lagged and I wasn’t able to get another class off the ground.  Still, I pitched the class to Danielle and she thought it’d be a good idea to run it right before St. Patrick’s day.  It was a good decision.  I completely revamped the class, taking the best bits from the last time I did it and contextualizing it in a different manner.  This was definitely an unusual class: one part piratical hands-on reading charts and learning about Irish Crochet, one part how to read historical patterns, and one part planning and making Irish Crochet in the future.  the students were great, and the result was a class that blew me out of the water.

the Best Notions Box

the Best Notions Box

Meanwhile, one of my students brought to class the most epic notions box I’d ever had a pleasure to encounter.  Made by her husband from a fly fishing tackle box, it was amazing.  Above is the first side of the box, and below is the second side of the box.  Talk about a well-planned tool.

The other side of the best notions box

The other side of the best notions box

Parental Leave, Repair and Finishing

Sweater repair with guidelines.

Sweater repair with guidelines.

If you’ve been following the blog in the last few weeks, you’ll have noticed Michael is writing a series on Maternity and Parental leave.  You can read Parts 1 & 2, and there’ll be a third part coming out next week.  I’ve been enjoying reading about his perspective as Mr. Turtle.  While Michael and I came to deciding on Tinking Turtle’s policy together, our thought processes in some ways were very different.  I struggled with the day-to-day operations: how is this going to affect myself and the customers?  He thought more about the big picture: how are we going to match our leave policy to our values?  How have others handled parental leave in the industry?

One of the things we were both on the same page about was being transparent to our customers – I want to be clear about why we’re making the choices and decisions we are, with plenty of lead-time to accommodate changes.

As of yesterday, I made the decision to stop accepting submissions for Repair and Finishing until after Little Turtle arrives.  Over the weekend we took a hard look at my workload, due dates, obligations and commitments.  We came to the conclusion that I’m nearly at max capacity for designing, teaching and finishing/repair.

If I’ve accepted your piece and you’ve made arrangements to pick it up with me, you will not be affected.  If I have your piece already, you’ll be getting it back well before the baby comes.  But chances are, anything new that comes my way will have to be tabled until the end of June or the beginning of July.

If you are still interested in finishing or repair, you have a few options.  Right now, I have a signup list to be notified when I begin accepting repair work again (note: if you are on my mailing list, this list is completely separate).  If it is a true knitting or crochet emergency, drop me a note, as I have a very tiny bit of wiggle room for small and contained projects.  And for some types of finishing or repairs, I may have another resource to point you towards.

Got questions about what’s going on?  As always, ask away in the comments or drop me an email.  I always love hearing from customers!

Repairing a Puppy-Destroyed Blanket

New Year brought a small, temporary break in the designing workload – thank goodness!  I took the time to catch-up on some of the repair work that’s big and cumbersome, including repairing a puppy-chewed blanket.

Over New Year’s I was able to work on repairing a family blanket that had been “savaged” by a puppy.  This is a tricksy repair, with lots of patterning.  I’ve been working my way through it, taking the time to trace out the pattern in waste yarn before making the final repairs.


Take a look at some of my progress:


20160101_7104

Here I’ve got the tools of my trade: good solid waste yarn that’s smooth and not prone to breaking.  I’ve got a bent-tip needle, locking stitch markers, a crochet hook, and the project.  You can see the hole closed up now, with the yarn ready to be traced over.


20160101_7107

And here we have the final repair, the new yarn nearly invisible.  You can find the fixed area by looking at where the orange marker is poking through.

20160101_7109


Another hole, this one near the edge.  The repairs are made a bit more difficult because every other row the knitter worked is twisted.  Twisted stitches are NO FUN to repair because the top unraveled bit looks like a backwards loop cast on.  Every other row has to be manually detangled instead of just dropping things back to a good starting point.

20160101_7112

Here, working the pattern using a crochet hook.
20160101_7114

And now, the hole ready to be traced over with the new yarn!  Halfway finished!

Stay tuned, as this blanket has several more tricky holes that I’ll be tackling.

A Perfect Sweater Repair

As I mentioned earlier this week, I’ve been hopping, trying to wrap up finishing projects before Christmas is truly upon us.  I’ve nearly pushed through the projects that are due in the next two weeks (and then the rest aren’t due until the New Year!).  I had one repair in particular that I wanted to share – a sweater repair in the Irish Knit Style.  The owner, AM, discovered me through the Washington Post article, and got in contact with me shortly thereafter.  She had a hole right in the front of the sweater, and could I please repair it?

As always, I told her I’d do the best I was able, but I was concerned – the yarn she had, a cream flecked with bits of brown, looked to be tricky to match.

This week I sat down to start on her repair, and when I pulled her sweater out of my bag, I couldn’t help wincing – this yarn was going to be really tricky to match.  I have a number of different creams on hand, but all of them were too light, and with too much “yellow” undertone.  AM’s sweater was a cream with an almost grey undertone.  And again, it had flecks of brown it it – tricky to match.  I checked the sweater – there wasn’t a good place to “harvest” yarn without going to a lot of effort, and I knew AM wanted to keep the costs down.  So matching the yarn from somewhere else would be a better option.

The hole itself was a lucky one: a row higher and it would be in the middle of a cable – a repair that’s much more finicky and tedious to do.  Two rows down there was the same problem.  This hole happened in exactly the right place – the few rows between two cables.

Well, it’d been a while since I’d been to one of the local yarn stores.  I figured it was time for a visit.

The Knitting B is a local yarn store about 25 minutes from where I live.  It’s the longest drive to a LYS I’ve had since I left my parents’ house.  So I don’t get there as often as I feel I should, and it’s too bad.  It’s a great store with lots of natural light, a solid selection of yarns, and a good parking area (always a plus!). Elizabeth, the owner, had an LYS in Charlottesville, VA for 25 years.  She’s a savvy businesswoman who knows here stuff.

When I got to the Knitting B one of the employees began helping me out trying to get a match.  Everything we pulled was not right.  Many of my go-to’s weren’t working.  And then, I remembered a trick I’d used before to get a good match.  Color changing yarns often will have sections that shift between colors, which means you get a lot of “bang” for your buck – and in this case, a couple of yards of yarn that match a hard to match yarn.  In this case, Noro Silk Garden came to the rescue.

The repair was pretty standard after that.

Because the yarn was awfully fuzzy, and hard to see what I was doing, I did a step I sometimes skip.  I ran guidelines: a different color of crochet thread for each row.  Because it’s the holidays, I decided to go with red and green.  I then unpicked the old yarn, pulling it out of the way.

Sweater repair with guidelines.

Sweater repair with guidelines.

I began tracing the yarn with the Noro Silk Garden.  My only complaint about Noro is that it’s really easy to pull apart, being a single-ply.  It was also a fraction less lofty than the original yarn, but the color matching was so perfect I didn’t care, as the repair was only 4 stitches across.  I ran the first row of yarn, adjusting the stitches to make sure they matched the gauge of the stitches around them.  Then I pulled out the green guideline.  It’s one of the reasons I love crochet cotton: it pulls out REALLY easily, and is nearly unbreakable without scissors.

Sweater repair half done, only red guidelines remain.

Sweater repair half done, only red guidelines remain.

I then ran the second set of yarn, and pulled out the red yarn.

Sweater repair, needing ends woven in.

Sweater repair, needing ends woven in.

See how nice the color match is?  Just let me be geeky for a moment – the under-color is SO close, and the flecks of brown is SOOO close too.  You’d really have to be looking to notice this.

Then got down to the tedious part: weaving in the old ends and the new ends, tweaking things as I go.

Sweater Repair, finished.

Sweater Repair, finished.

Can you spot the repair?  Yes?  Well then, I ask you.

How about now?

Sweater Repair, big view

Sweater Repair, big view

As always, if you’re looking to have a knit piece repaired, get in touch with me on my Finishing Page.  Got questions?  I’d love to hear from you.  Comment, or drop me a note!

A Collection of Life Notes

Today’s a bit of a mishmash of life-notes and thoughts, being that I’m still working through the laundry from Thanksgiving and have all my deadlines looming right at the same time, mid-month.

Not much personal knitting/crocheting has been happening in the Turtle household lately, which makes me a very boring person indeed.

I’ve been working in a sweater made in a size small.  Working a size small sample always makes me nervous: even though I know my math is correct, and the piece is measuring out correct, when I look at the knitted piece I have a hard time believing it would actually fit a real live adult person.  I keep going over to my size small dress form and holding it up, reassuring myself it really is the right size, and then working myself up into a tizzy again a few hours later.

For some reason it doesn’t happen when I work a size medium.

Anyone else ever have this problem?


Being away from home means the cats have been very needy the last two days.  I suppose this is a good thing, as I’m doing 3-5 hours of knitting each day to meet a mid-month deadline.  They can sit on my lap and I can work, work, work.

Watson and Peake helping with the knitting

Watson and Peake helping with the knitting – if you look close you can see my current project!

Still, it’s grey and rainy out, and due to be the same weather until Thursday, which seems like such a long way away.  That meant yesterday my knitting time became my nap time for entirely too long.  It also means my needy white cat, Watson, has been in my face saying “pet me! pet me!” … with his claws.

Still, it’s good to be home for a little stretch, even if it’s just shy of two weeks before we’re off again.


Crochet lace about to be repaired

Crochet lace about to be repaired

I’m tearing through the last of the finishing that’s due before Christmas, and hoping to get it off a little before the holiday.  I’ve had a number of rather challenging projects: a fisherman’s sweater that had seen better days, and a crochet bedspread made a difficult repair simply because it was so LARGE.  If you’ve been waiting on your finishing to arrive before Christmas, it should be going off sometime around the 18th.

Meanwhile I haven’t started on Christmas cards, nearly any shopping, or cleaning the house.  I’ve been vibrating a little with holiday tension. If I wasn’t knitting for work, I’d be knitting for stress relief.

Still, I get to listen to as much of the holiday music as I can stand, which is a huge plus.


duplicate stitch on knitting

Foxes being embroidered

When off shopping with my mother and sister over the holiday, I noticed no fewer than five different shirts on adults and children (in different stores) featuring foxes.  One of my current designs has a fox on it.

I’m so excited for it to be out in the world.  Foxes are soooo in right now.  And it’s great – I think they’re adorable!


Changes: Pricing and Holiday Deadlines

Repair of a Shetland Lace Shawl

Repair of a Shetland Lace Shawl

It’s getting to be the end of October (where did all the time go?) and that means we’re starting to move into the Holiday season. This is the time of year where the amount of finishing and repair I do nearly triples!

I love doing finishing and repair work – I love being able to help you finish your projects and make them perfect!  I love helping you restore older pieces that have gotten loved on a little too much.

But the reality is that Finishing & Repair are the types of work I can only do so much of in a day before my well runs dry.  It’s also time (and very often space) consuming.  There’s a reason I get so many different large shawls, blankets and other large items to block!  I’m fortunate that Mr. Turtle and I have been able to dedicate a space in the house just for this type of work, and that he’s totally chill with finding a bunch of sweaters and other things drying on the guest bedroom bed.

Repairing a Crochet Blanket

Repairing a Crochet Blanket

What Changed?
Quite a few things have changed since I last changed my pricing-  nearly two years ago now!  And many of these changes have led to me concluding that prices need to increase.

  • I moved, and it became more costly for me to drive to my drop-off/pickup locations.
  • More individuals have opted to mail, and have me mail back, their items.  Postal prices have increased.
  • The type of projects I tend to get have become more complicated: most of my customers like to handle the “smaller items” themselves, and send me the more difficult projects.
  • My volume of projects has increased!  Now, don’t get me wrong – I’m happy about this.  BUT!  The reality is that knitting, crocheting, seaming, blocking, pinning, etc are all hand and arm heavy activities.  I’m relatively young, but I’d hate to find that 5 or 10 years down the road, I’ve given myself a repetitive stress injury.  Because of that, I limit the amount of hand-heavy activities I do during a day, and I make sure I have time to stretch in between.  This means I have a finite amount of time during the day I can devote to finishing and repair.
  • I’ve gotten better. As I practice more and learn more, the quality of my finishing and repair has increased, and I believe that my expertise is worth it!

Frankly, I’ve known I’ve had to raise my prices for nearly 6 months, but the reality of the holidays coming really drove the point home – my prices are not sustainable.

So what does this mean for you, my customer?

  1. Coming Sunday November 1st, my prices will be increasing on Finishing & Repair work.  My hourly rate will increase from $30 to $40.  Many of the categories in my Finishing line of services will also change – some won’t change as much as my hourly rate, and some won’t change at all.  But most things will be increasing by a little.
  2. On Monday November 30th, I will no longer be accepting Rush Service.  This will continue thru January 1st, and then Rush Service will return.  You may still request (and receive!) Express Service. That means if you want to get something finished or repaired before the Christmas Holidays – get it in sooner rather than later.
  3. There will be a new surcharge for oversized items.  Details are still being determined.  But the long and short of it is: I have cats.  I make sure all my finishing stays in places where it won’t get affected by cats.  This is fine for smaller items, but when I need to work on really large things, I have to rearrange my house to create a space where I can work that won’t also have cats laying all over it.  This extra effort needs to be taken into account – otherwise I’m going to get frustrated and grumpy every time I go to work on large items.  I don’t want that to happen.
  4. Note: for any of you that have gotten items to be before the November 1st deadline, don’t worry! Your projects will be charged under the old system.

Got questions about the changes?  As always, you can leave me a comment, or drop me an email, and I’ll be happy to answer them!

Thank you so much for being loyal customers!

How to Set a Zipper in a Sweater

The rights have reverted back to me for a number of blog posts I did for Jordana Paige’s blog a few years ago, and I’ve begun re-posting them on occasion to have them on my own website, and so students can reference them.  This particular tutorial about setting a zipper into a sweater, I’ve updated and refreshed, but much of the technique remains the same.


Setting in a zipper is a process that takes time, patience, and a certain amount of willingness to fiddle.  Not everyone likes to do that, which is why so many of the finishing projects I do involve setting in zippers.  But if you’re willing to take the time, setting in a zipper can be very satisfying!

To set in a zipper you will need: a zipper, yarn to match the garment, yarn (or embroidery floss) in a contrasting color, a sewing needle (with a sharp point!), pins, and the 2 sides that you are attaching to the zipper.

a sweater, matching yarn, a zipper, needle and red embroidery floss are shown on a white background.

It’s helpful to have all your materials available!

Please note: When purchasing a zipper, make sure you get the correct type!  You don’t want a zipper for a bag, as it is attached together at both ends – you’d never be able to get your garment off!  Same thing with double ended zippers.  Take time to read the package and know what you are getting.  Also pay attention to length.  As I explain below, get the right size zipper, or a little longer.

The first thing I do is block the two fronts to the garment I’m attaching the zipper to.  Make sure the front is blocked to the correct measurements, and that your zipper will match those measurements, or be slightly longer.  If you need to, you can trim the top of the zipper to the length you want.  Make sure you use a file to eliminate any rough edges, and sew a new stopper so your zipper tab doesn’t come off.

Next, pin the zipper into place on the inside of the garment.  Make sure that you are not pulling or distorting the knit fabric – at all.  If you pull the fabric to stretch to the zipper, it can cause the zipper to pucker or wave.  After you’ve gotten things in place, I like to run a basting stitch along the zipper, as I don’t like to get poked with pins.  It also makes super-sure your zipper doesn’t shift around.

To do a basting stitch, take some waste yarn or thread, and use a running stitch, sewing the zipper to the fabric with big stitches.  When you’re done attaching the zipper, you can remove the basting stitch, so don’t worry if the basting stitch isn’t perfect.

Using a running stitch to baste the zipper to the fabric.


After I’ve finished basting (and this is another good reason to baste your work, because you can’t do this if the zipper is pinned), I check to make sure that the zipper can zip up and down without catching on any fabric.  Better to find this out now than after I’ve sewed everything together!  This is your opportunity to make any adjustments.

The basting stitch on the wrong side of your work.

Finally, you can sew the zipper to the piece.  Depending on the piece, sometimes I use the yarn the sweater was worked in.  Other times, if the yarn is delicate, loosely plied, or extremely fuzzy, I’ll use sewing thread in a color that is close to the color of the yarn.  Either way, I use the same technique.

Working from the back, I secure the yarn.  When I sew, I make sure that each time I’m going over only a single strand of yarn between two stitches.  Basically go into the purl bump if viewing from the back.  Mostly, I choose the space between the first and second stitches against the edge.

Working very slowly, I sew my way up one side, then up the other.  Be patient. Take your time. Check your work often.  Use small stitches.  Because the zipper is located at the front of the sweater, I’m super careful to make sure that my sewing doesn’t show.  Sometimes, if the fabric is wide, I’ll run a second set of stitches further out along the zipper band, so it doesn’t flop and lies nicely down.  You can see I did this from the picture below.

The zipper, sewn to the sweater with two rows of stitches.


When you’ve finished attaching the zipper to both sides of the fabric, I check my work.  Check again to make sure the zipper moves smoothly along the track.  Then, and only then, if I’m happy with what I’ve done do I remove the basting stitches.  Finally, weave in your ends.

Zipper in sweater