MENU

Restoring Harmony to a Household with a Crochet Repair

I had a client get in touch with me a couple of weeks ago.  In my client’s words the situation was this:

I got your name from the local yarn store.  I have a blanket my wife made for my daughter.  My daughter’s dog put a hole in it (see photos) and now I need a repair to restore peace and civility to my family.  Is this something you could do (I hope)?

Clearly I had to help!

IMG_20170427_151351804

The hole was oriented across two of the different colors in the blanket, spanning 5-6 rows, depending on how you want to count it.  On a big plus, the person who crocheted the blanket had kept all the yarn that was leftover, giving me plenty to work with when making the repairs – a true luxury! I was able to dive into the repairs right away.

IMG_20170427_162743653_HDR

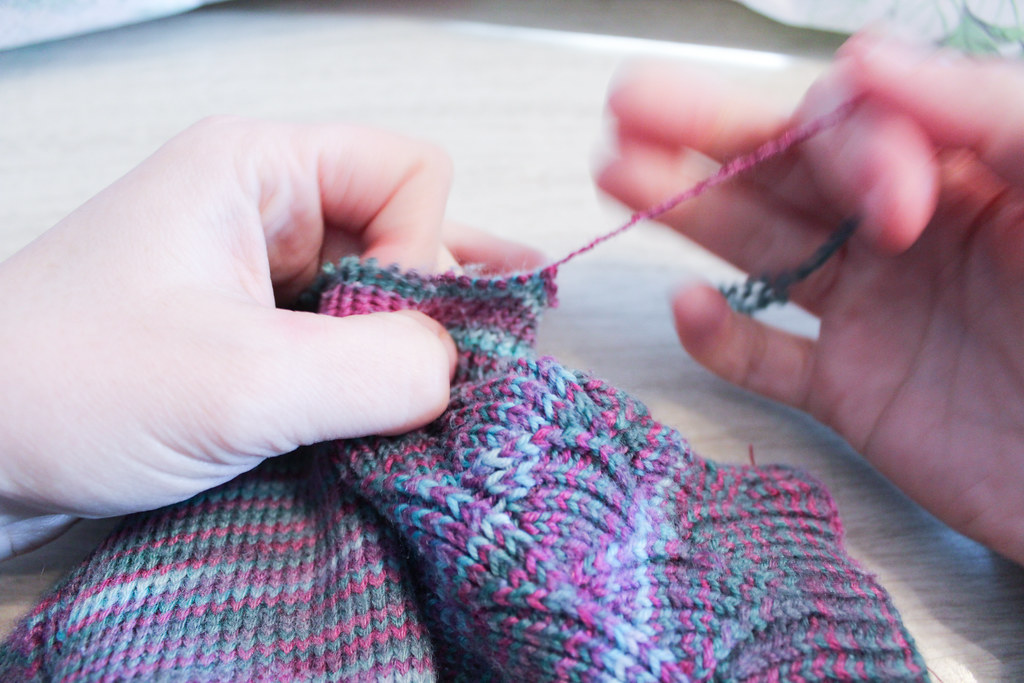
In most cases it’s better to make the hole bigger to make the repair, as long as you have a good amount of yarn to work with.  This way you aren’t working into damaged yarn, and you have enough of the ends to weave in.  Here, I’ve already worked the first row of the repair.  I like to pin my ends out of the way using locking stitch markers.  Because this was worked in rows and turned, I flip the entire blanket each time I repair a row, to work it in the direction of the repairs.  Re-crocheting each row isn’t the tricky part.  The tricky part is the last row when you have to connect the old rows with the new.  You’ll see I’m using stitch markers to hold the base of each of the half-double crochets that have been worked.


IMG_20170502_151107808_HDR

After working a couple of rows normally, it’s time to close up the hole and reconnect the old stitches to the new.  This takes some real patience, as each row you need to crochet a stitch, then take a needle and sew together the newly created stitch through the one above it.  I’m finding that the final row sometimes takes as much time as the entire rest of the repair, depending on how big the hole is!

IMG_20170502_151910461

Getting to the end with all the tools I use in play.  A smaller crochet hook for maneuvering things right where I want them, and the larger crochet hook so I can match gauge.

At this point Mr. Turtle wanders through and asks what I’m doing.  “I’m restoring peace and civility to a client’s home,” was my response.


IMG_20170502_152906802

Finally finished weaving things together!  I was so pleased with how the repairs came out!


IMG_20170502_155002822

Now it’s time to finish weaving in the ends and this piece can go back to its owner.


Plant Rooting Jars made with Crochet

I’ve set Rebecca’s sweater and sleeves aside until I have the space to give it more thought – hopefully this weekend when we’re going to be at the farm and have the inlaws around.  Instead I’ve embarked on another project that I’ve been meaning to get to for a while.  I’ve wanted a set of rooting jars to hang up in front of the window.  My sister has a model similar to this one from Vermont Nature Creations.  I’d intended to purchase one like it for a while, but always seem to have something better to spend my money on.  Meanwhile I don’t have anything to root my plants in that my cats can’t get to.

Well, that’s a lie. I have some winebottles held in socks that are hanging from a curtain rod, but they aren’t very sightly.

The beginnings of a crochet lace circleSo this weekend I’ve gotten busy with some crochet.

I started with a magic circle, size three crochet thread and a steel crochet hook (don’t ask me the size) and worked like this:

Round 1: 24 dc.

Round 2: V-stitch in every other stitch, 12 V stitches.

Round 3: 3 double crochets in each V stitch, with a chain in between each grouping.

Round 4, 5 and 6: Let’s rock the granny square pattern!

Round 7: Granny square pattern without the chains in between.  This is when i slip the bottle into the crochet piece, and the following rows are worked around the bottle… which is a pain, let me tell you.crochet lace around spice jar

Round 8: Only two double crochets in each of the spaces between the groups.

Round 9: a single crochet in each of the spaces between the clusters.

And then finally a chain to hang by: 60 chain stitches for the bottom two hanging, 100 chain stitches for the top one to hang off the railing.  Each of these little things takes me about 45 minutes – so they’re quite satisfying!

I decided that it was a good idea to only hang three in a row, since I don’t want them to hang too low… and I was concerned about how much weight a single row of chain stitches could take.  I mean, each of the jars doesn’t weigh that much… but I didn’t want to push my luck.

rooting jars before window

This is the final result – I love the way the sun streams through the stitches.  You can see in the background the original prototype of wine bottles in socks. The wine bottles in socks were nixed because the wine bottle with the water in it is quite heavy, and I’m not sure I want those hanging there long term.  I suppose I could have crocheted around a wine bottle, but that’s a lot of crocheting.

Tutorial: How to Unwind a Skein

20160212-0 Title Post

About a week ago I got a great question from Mary, one of my students and customers.  She wrote, “How do you unravel a twist of yarn? Made a mess and I am sure there is a correct way but I’m not privy it and I have three more to go….Mary.”  When Mary was talking about a twist of yarn, she was talking about a skein.  And this can be quite puzzling if you’ve never dealt with yarn stored this way.

I thought it was a great question, so I’ve put together a tutorial about it.  Since it’s a fairly picture-heavy post, I’ve put the rest of the post behind a cut so the photographs won’t slow down the loading time on the website.

But first, why is yarn stored in skeins, and not pre-wound for customers?  There are a couple of different reasons.  First, it’s generally agreed that keeping your yarn wound into balls for long periods of time can stretch out the yarn, especially if the yarn is wound up tightly. Keeping it in a skein allows the yarn to breathe a bit more.  Second, it’s easier for yarn companies to ship their yarn in skeins: they take up less space, squish better, and lie flatter in boxes.  Yarn that is in balls tends to be hard for LYS’s to store – I used to call a couple of different balled yarns “tribbles,” as they seemed to jump off the shelves whenever my back was turned.  Finally, for hand-dyed yarns, gradients and a few other yarns, skeins allow customers to see all the colors in the skein better, so they’re not surprised by a “mystery color.”

So that’s why you often may get your yarn in skeins from a Local Yarn Store.  Most stores offer balling services if you buy the yarn in the store or if you pay a small fee.  But do expect to wait – often sales clerks have to fit in the winding of yarn around their other duties!

[Read more…]

How to Set a Zipper in a Sweater

The rights have reverted back to me for a number of blog posts I did for Jordana Paige’s blog a few years ago, and I’ve begun re-posting them on occasion to have them on my own website, and so students can reference them.  This particular tutorial about setting a zipper into a sweater, I’ve updated and refreshed, but much of the technique remains the same.


Setting in a zipper is a process that takes time, patience, and a certain amount of willingness to fiddle.  Not everyone likes to do that, which is why so many of the finishing projects I do involve setting in zippers.  But if you’re willing to take the time, setting in a zipper can be very satisfying!

To set in a zipper you will need: a zipper, yarn to match the garment, yarn (or embroidery floss) in a contrasting color, a sewing needle (with a sharp point!), pins, and the 2 sides that you are attaching to the zipper.

a sweater, matching yarn, a zipper, needle and red embroidery floss are shown on a white background.

It’s helpful to have all your materials available!

Please note: When purchasing a zipper, make sure you get the correct type!  You don’t want a zipper for a bag, as it is attached together at both ends – you’d never be able to get your garment off!  Same thing with double ended zippers.  Take time to read the package and know what you are getting.  Also pay attention to length.  As I explain below, get the right size zipper, or a little longer.

The first thing I do is block the two fronts to the garment I’m attaching the zipper to.  Make sure the front is blocked to the correct measurements, and that your zipper will match those measurements, or be slightly longer.  If you need to, you can trim the top of the zipper to the length you want.  Make sure you use a file to eliminate any rough edges, and sew a new stopper so your zipper tab doesn’t come off.

Next, pin the zipper into place on the inside of the garment.  Make sure that you are not pulling or distorting the knit fabric – at all.  If you pull the fabric to stretch to the zipper, it can cause the zipper to pucker or wave.  After you’ve gotten things in place, I like to run a basting stitch along the zipper, as I don’t like to get poked with pins.  It also makes super-sure your zipper doesn’t shift around.

To do a basting stitch, take some waste yarn or thread, and use a running stitch, sewing the zipper to the fabric with big stitches.  When you’re done attaching the zipper, you can remove the basting stitch, so don’t worry if the basting stitch isn’t perfect.

Using a running stitch to baste the zipper to the fabric.


After I’ve finished basting (and this is another good reason to baste your work, because you can’t do this if the zipper is pinned), I check to make sure that the zipper can zip up and down without catching on any fabric.  Better to find this out now than after I’ve sewed everything together!  This is your opportunity to make any adjustments.

The basting stitch on the wrong side of your work.

Finally, you can sew the zipper to the piece.  Depending on the piece, sometimes I use the yarn the sweater was worked in.  Other times, if the yarn is delicate, loosely plied, or extremely fuzzy, I’ll use sewing thread in a color that is close to the color of the yarn.  Either way, I use the same technique.

Working from the back, I secure the yarn.  When I sew, I make sure that each time I’m going over only a single strand of yarn between two stitches.  Basically go into the purl bump if viewing from the back.  Mostly, I choose the space between the first and second stitches against the edge.

Working very slowly, I sew my way up one side, then up the other.  Be patient. Take your time. Check your work often.  Use small stitches.  Because the zipper is located at the front of the sweater, I’m super careful to make sure that my sewing doesn’t show.  Sometimes, if the fabric is wide, I’ll run a second set of stitches further out along the zipper band, so it doesn’t flop and lies nicely down.  You can see I did this from the picture below.

The zipper, sewn to the sweater with two rows of stitches.


When you’ve finished attaching the zipper to both sides of the fabric, I check my work.  Check again to make sure the zipper moves smoothly along the track.  Then, and only then, if I’m happy with what I’ve done do I remove the basting stitches.  Finally, weave in your ends.

Zipper in sweater


Padded Crochet Tutorial

Padded Crochet Tutorial

In honor of Rag-ety Rug coming out this week from Crochet World, and my recent post about it coming out, I thought it was appropriate to finally post this tutorial, which I’ve been saving for quite a while.

What you’ll need:

  • A crochet hook
  • Some scrap yarn
  • Rags, upholstery cord, or something else nice and thick but flexible to crochet over.  Bulky yarn would work too.

A bit about padded crochet: this technique originally was used to crochet around thicker yarn to create different motifs.  It gives you a lot of flexibility because you don’t have to crochet into the previous row, you can also just crochet around your material.  You see this technique often used in  Irish Crochet.

To begin, work a foundation chain, and work single crochets into the chain.  This can be any width, as we’re working a practice swatch.  After you’ve finished those two rows, you begin by adding in your cord/rag/yarn.  You’ll be crocheting around it much like you do when you’re burying an end into your crochet work, except this will be much larger.

Adding in your cord/rag/yarn

Adding in your cord/rag/yarn

Begin by holding your cord/rag/yarn above the last row you worked.

Joining Yarn around padded crochet

Joining Yarn around padded crochet

In this case, I’m also joining the yarn for this row.  Insert your hook into the last stitch of the previous row, and draw up your yarn.

Attaching yarn, Padded Crochet, Step 2

Chain one, securing yarn around the cord/rag/yarn.  I like to hold my tail together with my working yarn for this first stitch, or no other reason than it makes me feel better, and makes me feel like things are more secure.  I’ve got no proof, though.

Begin working Single Crochets around cord/rag/yarn

Begin working Single Crochets around cord/rag/yarn

Now, begin working your crochet stitches into the stitch of the previous row, working the yarn around the cord/rag/yarn.  In this case, I’m working a variant of the v-stitch.

Some tips:

  • Make sure you’re letting your stitches lie flat.  If you make them tight, they’ll bunch up your cord/rag/yarn.
  • Every once and a while check to make sure that your piece is laying flat.  Because the cord/rag/yarn that you’re working over has a tendency to shift around, it can make things pucker, draw tighter or looser.  I like to measure ever few rows.
  • When you have to add more cord, there’s a few ways you can do it.  In my case, I sewed on my rags together, because it was a bit more tidy.  You can also just hold the end of one rag and the beginning of another together.
  • Make sure if you’re using rags they’re the same width, so your rug doesn’t have a lumpy look, or have irregular rows (unless that’s the effect you’re going for)!
Measure, measure, measure!

Measure, measure, measure!

Have you every worked padded crochet?  How’d it turn out?  What was the project?

Breaking it Down: Russian Join

The Russian Join is one of the tricks I love to teach in my class.  It’s a great way to join two yarns, and I love how strong the join is!  While sorting through some photos on Friday, I realized I’d taken all the photos to do a tutorial on the Russian Join… and simply had forgotten to post them.

So here you go: my tutorial on the Russian Join!

If you enjoyed this, share it with others!  Pin, tweet, or post this to facebook!

Breaking it Down: Embroidering with Crochet

Today I’ve got a fun and different tutorial for you.  It’s crochet based, but it’s also based on embroidery.  This is actually a technique that is called tambour, and it’s usually worked with a specialty tool, much like a crochet hook.  But for beginners, or for those who are just interested in the craft, this is a good way to start.
For this tutorial you’ll need some fabric, a very fine crochet hook (I used a size 10 steel hook), embroidery floss, some crayons, a piece of paper, and an iron.  You’ll also need an embroidery frame.

First, you’ll sketch out your design in the crayons.  I prefer crayola crayons, because they seem to have the best color.  Press well and make sure that your color is the depth of color you want.  Coloring in the background means if you don’t embroider everything, the color will show through, which is a neat effect, I think.

Next, iron the design into the fabric.  I use the highest heat setting.  Put the side with the colored design face down with a piece of paper underneath (as some of the wax from the crayons will melt off).

Then, proceed to iron.

See the faint impression of the crayon?  This is why the ironing is important.

Secure your design in an embroidery frame, making sure the fabric is tight.

Take the embroidery floss and the tiny crochet hook.  Insert the crochet hook from the front to the back, and pull a loop of the floss through the fabric.

It might take a bit of wiggling, but it’ll work.

Pull the loop up to the front side.  You now have your working loop.

Now, punch through, grab another loop from the yarn in the back, and pull that through the fabric.  Pull the first loop through the second loop.

Continue, punching the hook through the fabric,

Grabbing a loop and pulling it through the fabric,

… and pulling the new loop through the old loop.

At this point you should be tracing the outside of the design.  The back should look like a straight line, while the front should look like the chains stitch.  Here’s a look at the view from the back, the hook coming through the fabric,

And pulling grabbing the loop,

and pulling it through to the front-side.

Now, you pull the first loop through the second loop.

Here, I’ve traced the outside of the apple, and I’ve finished with this series of stitches.  How do I finish the chain stitches off?  First, I begin pulling the live loop through the fabric.

More…

And more….

Until the floss in the loop is all on the front side.  But now my leftover floss is on the wrong side of the work.  What next?

Now I grab the thread from the other side (the wrong side) and pull it through the fabric once more.

All the way to the back!  Here, I can knot it and weave in the ends!

Tah-Dah!  What do you think?

What You Need to Know to Repair Handknit Socks: Adding a New Afterthought Heel

One of the reasons I love my mother is because she gives me back the hand-knit socks I made her to repair.  Today I’m going to show you why I love afterthought heels, and how easy it is to replace the heel in an afterthought heel sock.

These socks are Pomatomus, an older pattern on Knitty.  You might notice here that my stitches on the sole are twisted… I had a theory a few years back that socks with twisted stitches might wear better.  While I don’t think that’s the case anymore, please just ignore the twisted stitches if you notice such things.

holes in my hand knitted sock
Holes in the Sock

As you can see above, a hole has developed between the heel and the body of the sock.  This is due to a few different things – first, I didn’t really know how to weave in my ends as well as I do now, so things are not staying together as well.  Second, my mother has a rather wide heel-to-ankle ratio (like me) and I’ve learned since I made this pair that it’s better to add a bit of extra room at the heel.  Finally, these socks are over five years old, and one of my mother’s favorite pairs I’ve made her – so they are just wearing out.

holes in my hand knitted sock thin yarn
Thin Stitches

You can see how thin the stitches are wearing.

So I’m going to make my mother a new pair of heels, and in the process save the yarn to do some other repairs to the sock (mostly reinforcing).  The first step is to remove the old heel.

cutting away knitting heel
Make small cuts!

I used scissors to just cut the first few rows because the yarn was so felted together there, and I’d done a better job weaving in the end at the heel, so I could find the end to unravel.

Snip!

holes in my hand knitted sock
All Gone!

Heel tip is gone.

I then began pulling the little bits of cut stitches away from the yarn that didn’t get snipped, until the fuzzies were all out.

unraveling afterthought heel
Removing little fuzzies

It took a while, and I ended up with a lot of lint to throw away.

Then I found an end to start pulling.  It worked for about half a row, and then ended, because I had snipped it in the process of snipping out the other end.

pulling out old afterthought heel
pulling yarn

The second end I started pulling was good. I kept pulling that until I was on the last row of the afterthought heel.  I then started picking up stitches as I pulled out each stitch.  I was slow and careful – I didn’t want to drop any stitches!

picking up stitches
Picking up stitches

The thing that worked to my advantage was that this sock has been washed and dried many times – the yarn wanted to stay in the place where it had been – in the stitch.  So I’d have to actively tug at stitches in order to make then drop, because the yarn is so matted together with wear.

kinky yarn

As you can see, the yarn wanted to stay crinkly even after I’d pulled it all out.  It reminded me of a spring.

kinky old yarn
boing!

This yarn I gathered up and made into a mini-skein.  I wet it down, hung it from a hook in the Farm’s basement, and hung a wrench from it until it was dry, to straighten the yarn out again so I could use it for other repairs.

But back to the sock heel.

When you’ve picked up all the stitches on both sides, it should look like the sock has sprouted a mouth.

stitches picked up for heel
open heel

Om-nom-nom-nom.

You’ll notice how, at each side of the live stitches on the cable to the needle, there’s a little gap, where there’s no stitches.  In a bit, when we’re working with the new yarn, we’ll pick up stitches along those gaps so there aren’t any holes.

knitting new heel

I like to slip to the middle of the sock to join my new yarn.  This makes the join less obvious, and also because I think it’s easier to weave in ends in plain stockinette rather than where the gaps are. (Another trick I learned since making these socks!)

knitting new heel

I joined the yarn by just beginning to knit with the new yarn, along the old stitches.  I left the tail hanging, as I’d weave that in later.

picking up heel stitches to close hole

When I got to the gaps I was talking about earlier, I picked up 2 stitches, along the edge, trying to keep the yarn nice and tight here, so the stitches didn’t become sloppy.

Then I kept knitting all around, doing the same for the 2nd gap as I did for the 1st gap.  After I knitted all around, then I began my preferred method of decreases, whichever you prefer for an after-thought heel.

knitting new afterthought heel

I worked, continuing to decrease, until I only had a few stitches left.  Rather than doing the Kitchener, I just mattress stitched the live stitches together, pulling tight as I went.  I think it creates a nicer ending, rather than trying to get my Kitchener stitches to match my gauge.

You’ll note, below, that I happened to work the heel in a slightly tighter gauge than the rest of the sock.  This happened for three reasons.  First, my gauge has changed in the last five years. Second, the yarn I used for the heel is slightly lighter weight than the yarn for the sock.  This is because I wanted to match for color rather than for the exact right yarn.  Third, I used a smaller needle size to accommodate the smaller yarn.  I think, after wearing them  a few times, the difference in gauge will even out, or at least become less noticeable.

new afterthought heel in sock
fixed sock – the stitch marker is to mark a place I need to fix

Got questions?  Shout them out!  I’d love to help troubleshoot your own sock repairs!