MENU

Breaking it Down: Russian Join

The Russian Join is one of the tricks I love to teach in my class.  It’s a great way to join two yarns, and I love how strong the join is!  While sorting through some photos on Friday, I realized I’d taken all the photos to do a tutorial on the Russian Join… and simply had forgotten to post them.

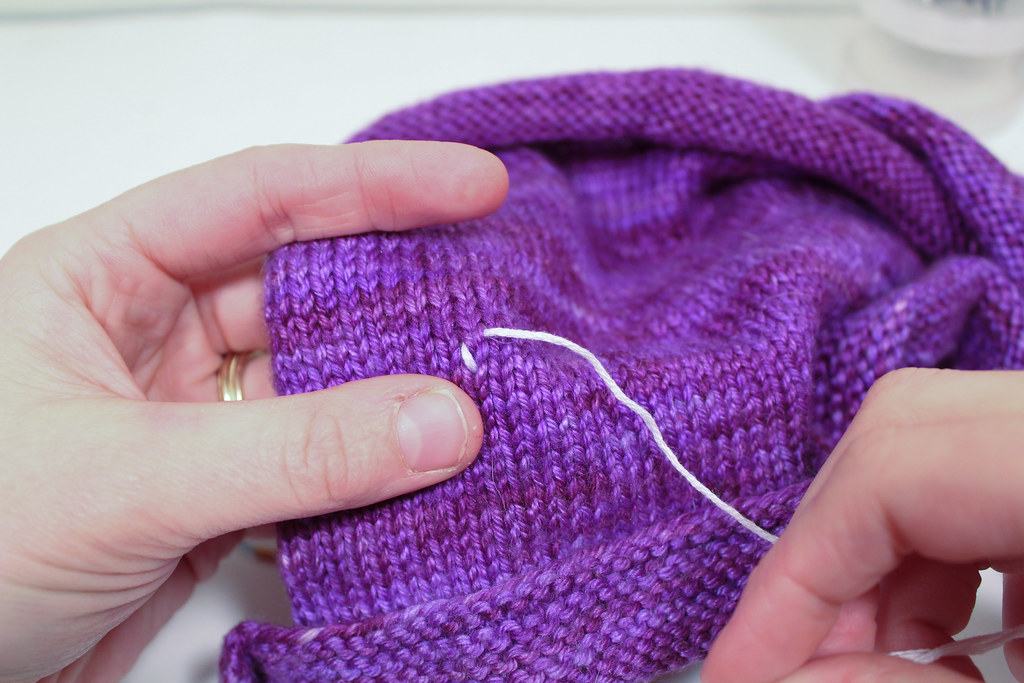
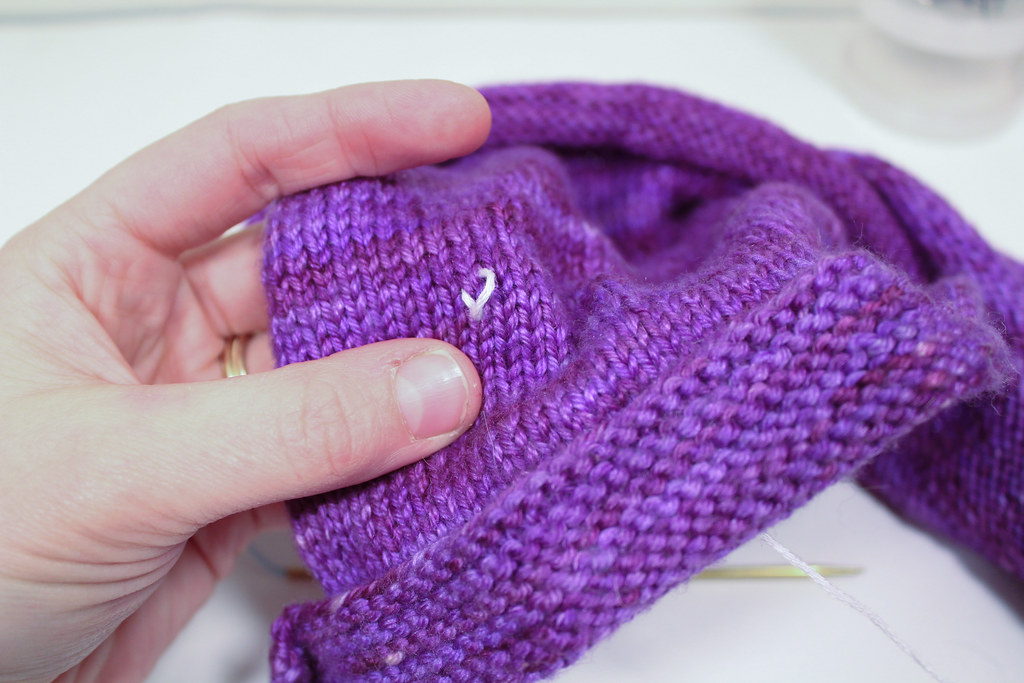
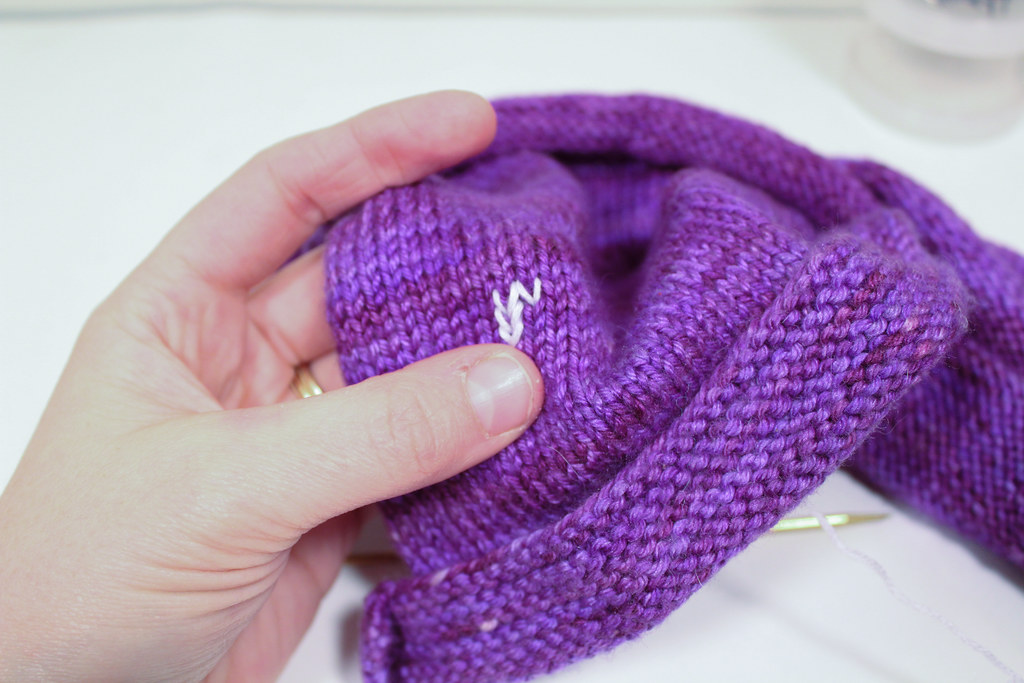
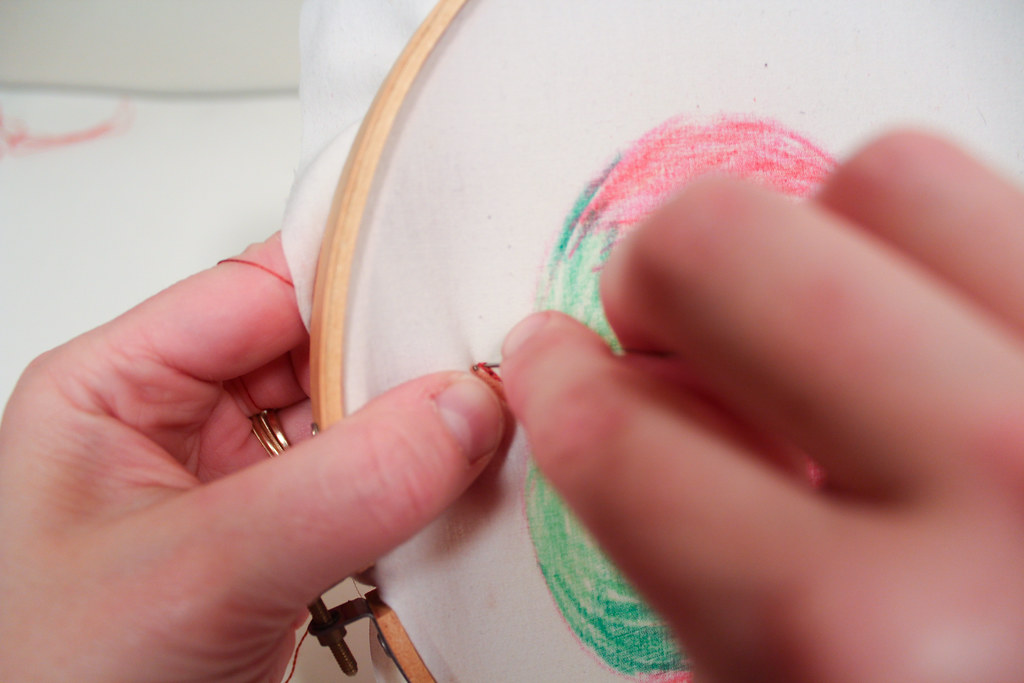
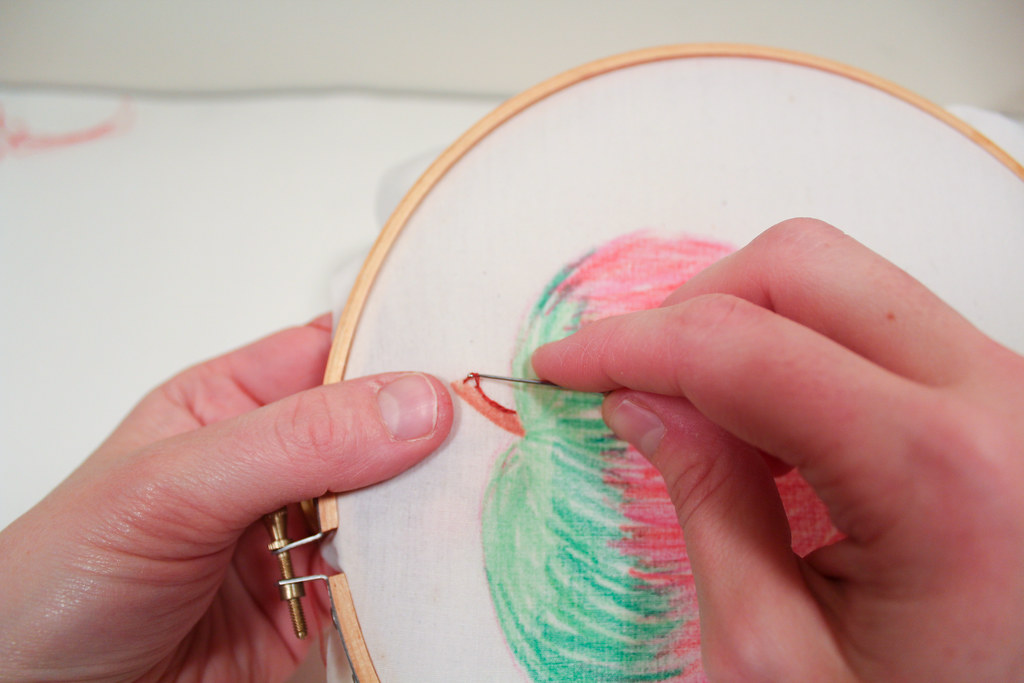
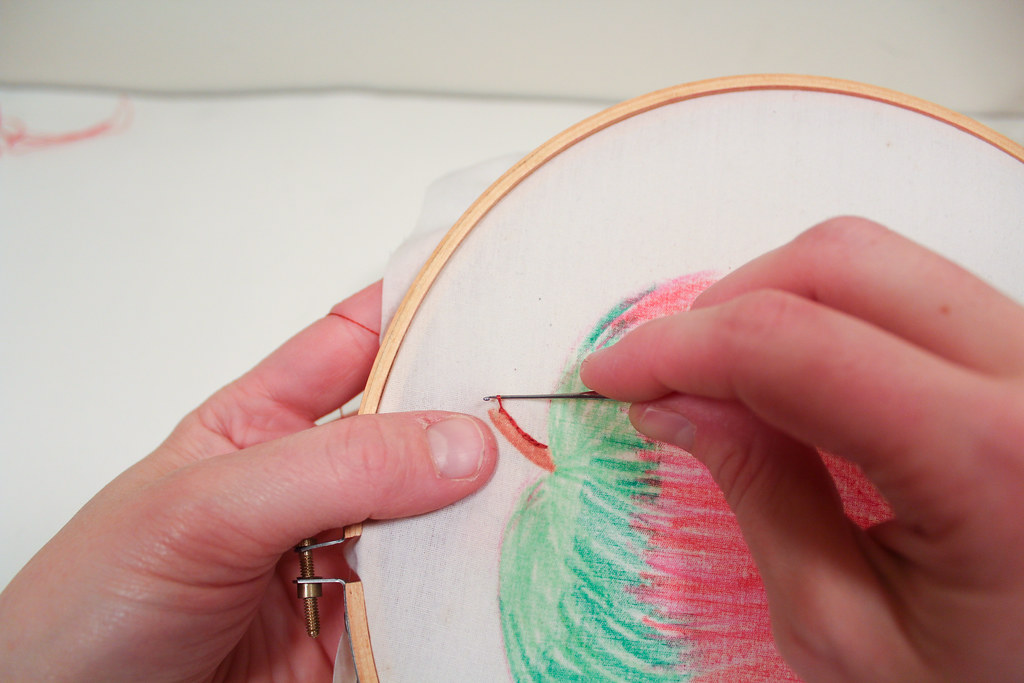
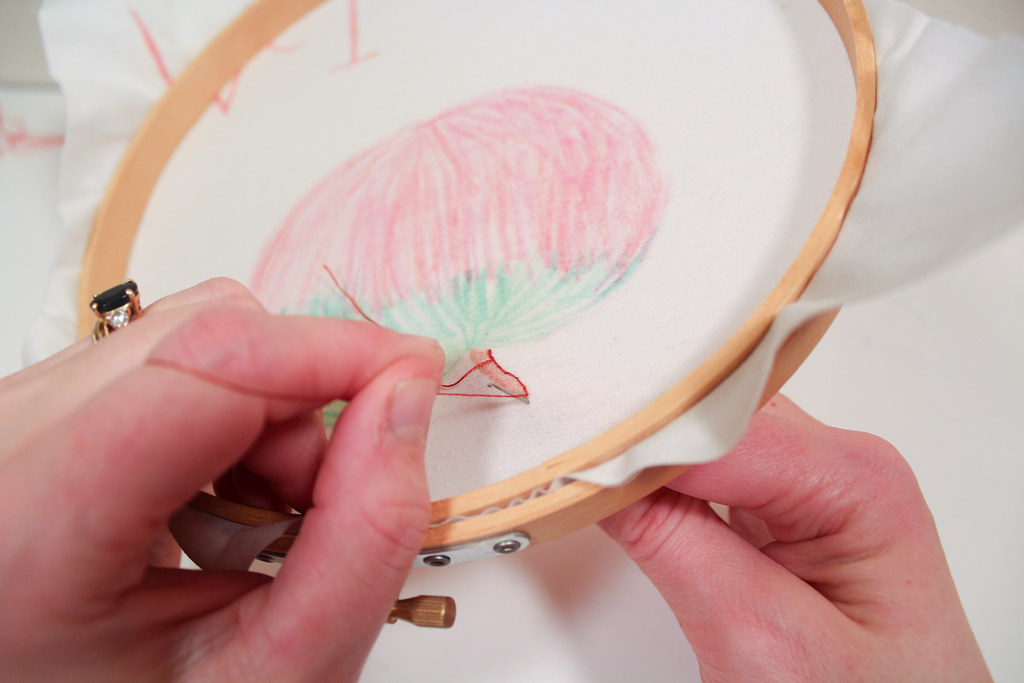
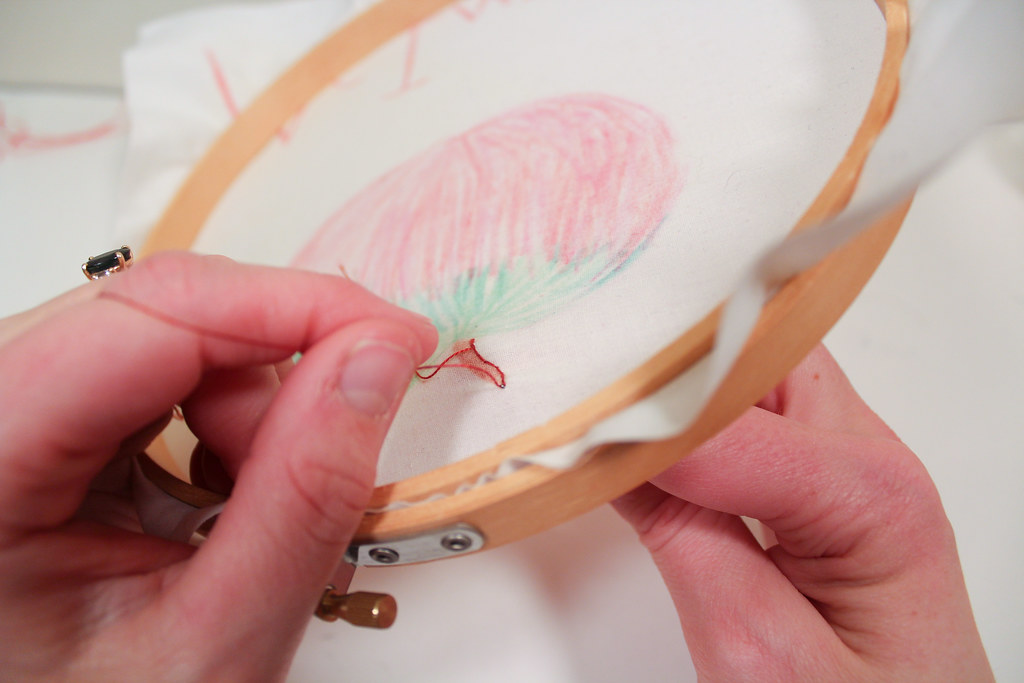
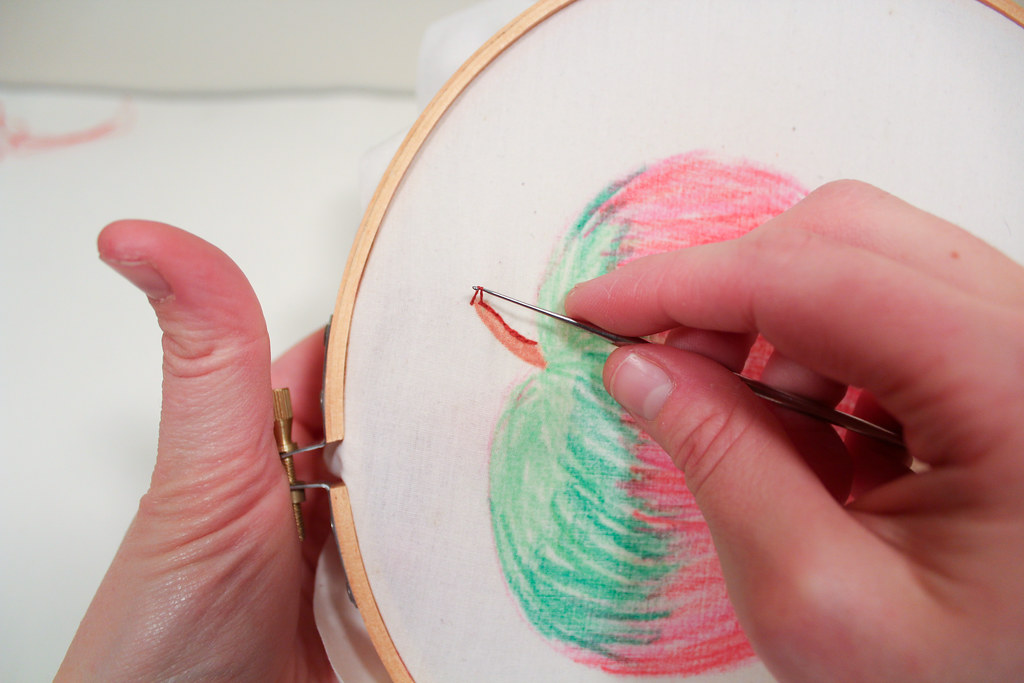
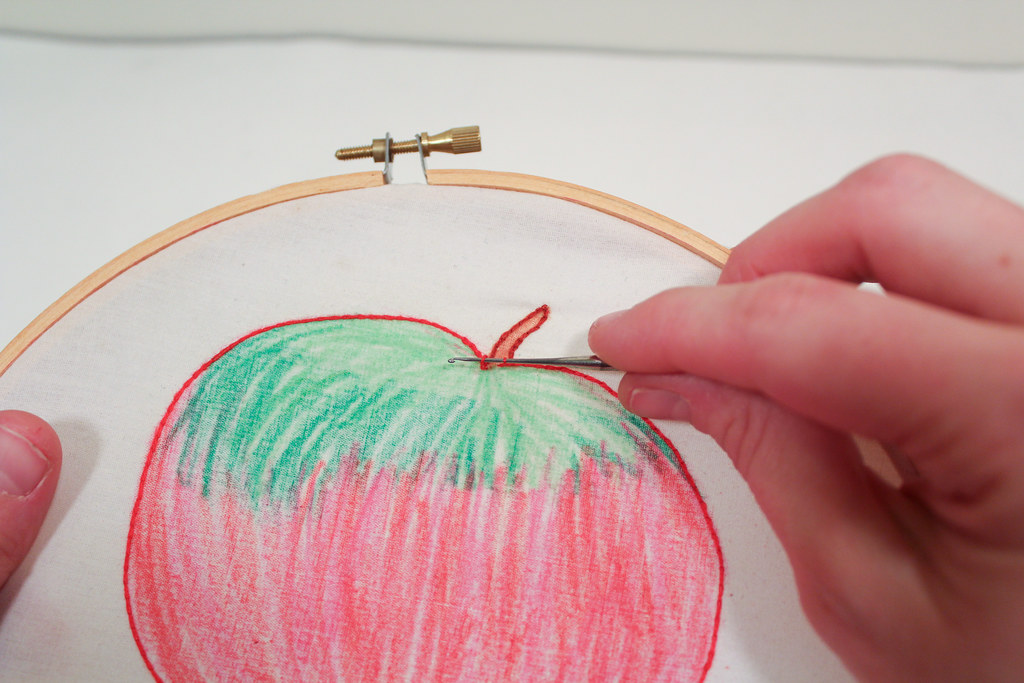
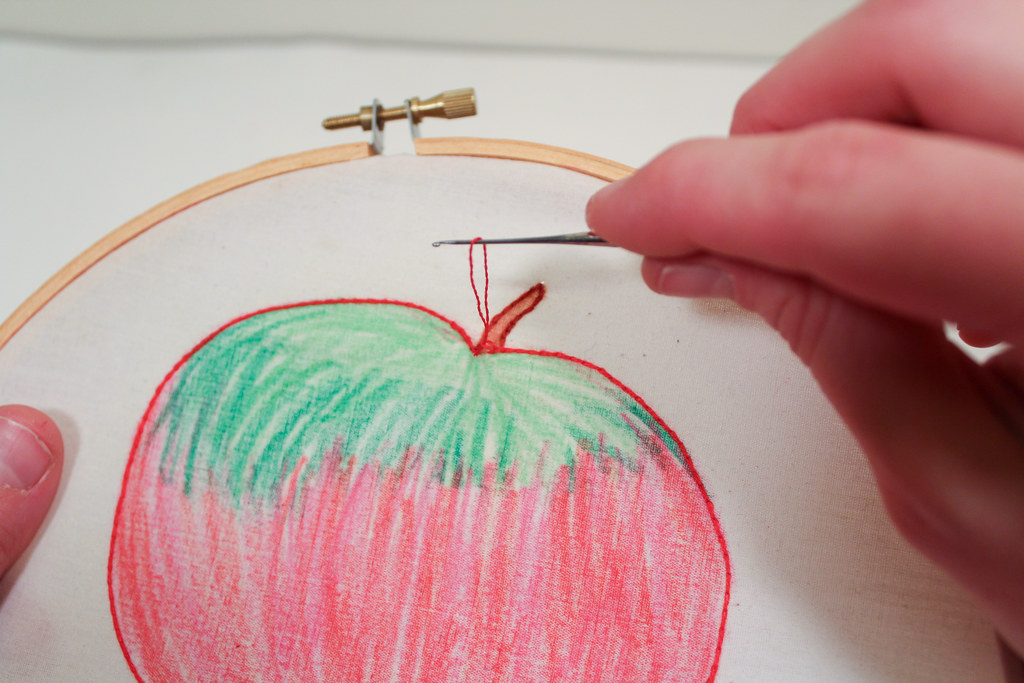
So here you go: my tutorial on the Russian Join!

If you enjoyed this, share it with others!  Pin, tweet, or post this to facebook!

A handy tutorial on Duplicate Stitch

Note: I’m on vacation this week!  Some of these posts were originally done for Jordana Paige’s blog, but the rights have reverted back to me so I’m free to publish them myself.  The original post has been edited for clarity.
I was recently reminded of duplicate stitch when I was
working on a pair of color-work socks (I can now reveal: these were a stitch on the bottom of my Octopodes Socks!). I realized that I’d managed to knit the
wrong color in a part of the pattern.  I
practically cried.  I was nearly done
with the sock, and I certainly didn’t want to pull back to nearly the middle to
fix the mistake.  But the mistake was
also terribly noticeable–in fact, I was surprised I hadn’t noticed it before
then.
 After taking a few
deep breaths, and saying a few choice words, I gave some different solutions thought.  I settled on duplicate stitch.  What I ended up doing was covering the
original stitches with stitches in the right color, so it looked like I’d worked the correct color the whole time. 
The area was marginally thicker, but not very noticeable.  I was pleased with the result.
 Duplicate stitch is
most often used to add color to knitting when you don’t want to do complicated
color work, like intarsia or stranded knitting (though duplicate stitch can
also be used in conjunction with them, so you aren’t holding too many
colors).  It can be used to fix mistakes,
as I did, or it can be used to embellish or embroider a knit fabric–perhaps a
sweater that you want to mod.  I’ve been
thinking about doing something to do with scrollwork, vines or some sort of
black and white illustration on an old sweater I have to liven it up.
The duplicate stitch
is basically done by tracing the knit stitches. 
Today we’ll just be focusing on stockinette, though it can be done, with
mixed results, on garter or reverse stockinette.  You’ll need a contrasting color yarn and a
blunt-tip needle. 
Let’s first take a
careful look at the knit stitches in stockinette.  See how they look like zigzags stacked on top
of each other?  I like to think of them
as an army of “V”s standing shoulder to shoulder.  Each “V” is an individual knit stitch.
Thread your needle and insert it in the base of the V where
you want to start your design.  I find it
easiest to work from the bottom left and work up and to the right, though your
mileage may vary.
Now, insert your needle down through the top of one side of
the “V” and up through the other side, like so.
Pull through.
Finally, insert your needle into the base of the “V” again,
where you first came up through the fabric. If you need to, adjust the tension
of the yarn so it matches the tightness, or gauge, of the rest of the fabric.
For the second stitch, repeat the same steps for the “V”
directly above the first.  Repeat as many
times as needed.
Now, you may have need at some point to move over to the
next column of stitches. Simply do the same steps for the “V” Directly next to,
or diagonal to, the one you last worked.
If you need to, you can skip a column or two of stitches to
get to the next place you want to embroider. 
Just remember to leave enough extra yarn so the knit fabric can
stretch.  I recommend that you try to
avoid skipping columns if possible.

When you are finished, weave in your ends.  The back of your knit won’t look quite as
nice as the front, but it still should be tidy.
Love these posts and don’t want to miss a single one?  Sign up for a weekly email digest of my blog posts!

Breaking it Down: Embroidering with Crochet

Today I’ve got a fun and different tutorial for you.  It’s crochet based, but it’s also based on embroidery.  This is actually a technique that is called tambour, and it’s usually worked with a specialty tool, much like a crochet hook.  But for beginners, or for those who are just interested in the craft, this is a good way to start.
For this tutorial you’ll need some fabric, a very fine crochet hook (I used a size 10 steel hook), embroidery floss, some crayons, a piece of paper, and an iron.  You’ll also need an embroidery frame.

First, you’ll sketch out your design in the crayons.  I prefer crayola crayons, because they seem to have the best color.  Press well and make sure that your color is the depth of color you want.  Coloring in the background means if you don’t embroider everything, the color will show through, which is a neat effect, I think.

Next, iron the design into the fabric.  I use the highest heat setting.  Put the side with the colored design face down with a piece of paper underneath (as some of the wax from the crayons will melt off).

Then, proceed to iron.

See the faint impression of the crayon?  This is why the ironing is important.

Secure your design in an embroidery frame, making sure the fabric is tight.

Take the embroidery floss and the tiny crochet hook.  Insert the crochet hook from the front to the back, and pull a loop of the floss through the fabric.

It might take a bit of wiggling, but it’ll work.

Pull the loop up to the front side.  You now have your working loop.

Now, punch through, grab another loop from the yarn in the back, and pull that through the fabric.  Pull the first loop through the second loop.

Continue, punching the hook through the fabric,

Grabbing a loop and pulling it through the fabric,

… and pulling the new loop through the old loop.

At this point you should be tracing the outside of the design.  The back should look like a straight line, while the front should look like the chains stitch.  Here’s a look at the view from the back, the hook coming through the fabric,

And pulling grabbing the loop,

and pulling it through to the front-side.

Now, you pull the first loop through the second loop.

Here, I’ve traced the outside of the apple, and I’ve finished with this series of stitches.  How do I finish the chain stitches off?  First, I begin pulling the live loop through the fabric.

More…

And more….

Until the floss in the loop is all on the front side.  But now my leftover floss is on the wrong side of the work.  What next?

Now I grab the thread from the other side (the wrong side) and pull it through the fabric once more.

All the way to the back!  Here, I can knot it and weave in the ends!

Tah-Dah!  What do you think?

What You Need to Know to Repair Handknit Socks: Adding a New Afterthought Heel

One of the reasons I love my mother is because she gives me back the hand-knit socks I made her to repair.  Today I’m going to show you why I love afterthought heels, and how easy it is to replace the heel in an afterthought heel sock.

These socks are Pomatomus, an older pattern on Knitty.  You might notice here that my stitches on the sole are twisted… I had a theory a few years back that socks with twisted stitches might wear better.  While I don’t think that’s the case anymore, please just ignore the twisted stitches if you notice such things.

holes in my hand knitted sock
Holes in the Sock

As you can see above, a hole has developed between the heel and the body of the sock.  This is due to a few different things – first, I didn’t really know how to weave in my ends as well as I do now, so things are not staying together as well.  Second, my mother has a rather wide heel-to-ankle ratio (like me) and I’ve learned since I made this pair that it’s better to add a bit of extra room at the heel.  Finally, these socks are over five years old, and one of my mother’s favorite pairs I’ve made her – so they are just wearing out.

holes in my hand knitted sock thin yarn
Thin Stitches

You can see how thin the stitches are wearing.

So I’m going to make my mother a new pair of heels, and in the process save the yarn to do some other repairs to the sock (mostly reinforcing).  The first step is to remove the old heel.

cutting away knitting heel
Make small cuts!

I used scissors to just cut the first few rows because the yarn was so felted together there, and I’d done a better job weaving in the end at the heel, so I could find the end to unravel.

Snip!

holes in my hand knitted sock
All Gone!

Heel tip is gone.

I then began pulling the little bits of cut stitches away from the yarn that didn’t get snipped, until the fuzzies were all out.

unraveling afterthought heel
Removing little fuzzies

It took a while, and I ended up with a lot of lint to throw away.

Then I found an end to start pulling.  It worked for about half a row, and then ended, because I had snipped it in the process of snipping out the other end.

pulling out old afterthought heel
pulling yarn

The second end I started pulling was good. I kept pulling that until I was on the last row of the afterthought heel.  I then started picking up stitches as I pulled out each stitch.  I was slow and careful – I didn’t want to drop any stitches!

picking up stitches
Picking up stitches

The thing that worked to my advantage was that this sock has been washed and dried many times – the yarn wanted to stay in the place where it had been – in the stitch.  So I’d have to actively tug at stitches in order to make then drop, because the yarn is so matted together with wear.

kinky yarn

As you can see, the yarn wanted to stay crinkly even after I’d pulled it all out.  It reminded me of a spring.

kinky old yarn
boing!

This yarn I gathered up and made into a mini-skein.  I wet it down, hung it from a hook in the Farm’s basement, and hung a wrench from it until it was dry, to straighten the yarn out again so I could use it for other repairs.

But back to the sock heel.

When you’ve picked up all the stitches on both sides, it should look like the sock has sprouted a mouth.

stitches picked up for heel
open heel

Om-nom-nom-nom.

You’ll notice how, at each side of the live stitches on the cable to the needle, there’s a little gap, where there’s no stitches.  In a bit, when we’re working with the new yarn, we’ll pick up stitches along those gaps so there aren’t any holes.

knitting new heel

I like to slip to the middle of the sock to join my new yarn.  This makes the join less obvious, and also because I think it’s easier to weave in ends in plain stockinette rather than where the gaps are. (Another trick I learned since making these socks!)

knitting new heel

I joined the yarn by just beginning to knit with the new yarn, along the old stitches.  I left the tail hanging, as I’d weave that in later.

picking up heel stitches to close hole

When I got to the gaps I was talking about earlier, I picked up 2 stitches, along the edge, trying to keep the yarn nice and tight here, so the stitches didn’t become sloppy.

Then I kept knitting all around, doing the same for the 2nd gap as I did for the 1st gap.  After I knitted all around, then I began my preferred method of decreases, whichever you prefer for an after-thought heel.

knitting new afterthought heel

I worked, continuing to decrease, until I only had a few stitches left.  Rather than doing the Kitchener, I just mattress stitched the live stitches together, pulling tight as I went.  I think it creates a nicer ending, rather than trying to get my Kitchener stitches to match my gauge.

You’ll note, below, that I happened to work the heel in a slightly tighter gauge than the rest of the sock.  This happened for three reasons.  First, my gauge has changed in the last five years. Second, the yarn I used for the heel is slightly lighter weight than the yarn for the sock.  This is because I wanted to match for color rather than for the exact right yarn.  Third, I used a smaller needle size to accommodate the smaller yarn.  I think, after wearing them  a few times, the difference in gauge will even out, or at least become less noticeable.

new afterthought heel in sock
fixed sock – the stitch marker is to mark a place I need to fix

Got questions?  Shout them out!  I’d love to help troubleshoot your own sock repairs!

Photo Tutorial: Mattress Stitch

When I’m seaming a sweater, one of the most used stitches I use is the Mattress stitch.  Also known as the Ladder Stitch, I love this stitch because when done right, it’s nearly invisible, adds very little bulk to the seams, is quick to do, easy to take out, and practically perfect.  Let me tell you how I do the mattress stitch.

2 quick notes: here I start in the middle of a project.  Normally I start at the beginning of the seam and work my way up, but that’s hard to photograph well.  Also, I’m using embroidery floss in the tutorial, both because it’s in a contrast color, and because it’s cotton, and easy to pull out.  Most people like seaming with the yarn they used in the project, but if it’s too delicate, or too bulky, embroidery floss in a similar color works beautifully.  Mattress stitch done right should be practically invisible.

mattress stitch photo tutorial, ladder stitch photo tutorial, seaming knits together

The first part of learning the mattress stitch involves taking a good look at your knitting.  Look between two stitches.  See the horizontal bars that run between the stitches?  This is where the sewing action will take place.  You’ll want to be working the mattress stitch between the 1st and 2nd columns of stitches on the edge of your work.  See Below?

mattress stitch photo tutorial, ladder stitch photo tutorial, seaming knits together

Don’t quite see it?  Let me show you with my sewing needle.  I’ve put 2 of the horizontal bars on my sewing needle.

mattress stitch photo tutorial, ladder stitch photo tutorial, seaming knits together

Okay, so that’s what the bars look like on the knit side.  What about the purl side?

mattress stitch photo tutorial, ladder stitch photo tutorial, seaming knits together

The bars that run between the stitches on the knit side are the purl bumps on the wrong side.  If you are having trouble ID’ing the purl bumps, turn your knitting over with your needle placed where you think the stitch should go.  The needle should be running between the 2 columns of stitches we found before.  See?

mattress stitch photo tutorial, ladder stitch photo tutorial, seaming knits together

Right, so we now know where the stitches are supposed to go.  When I teach the matress stitch, I always say to go beneath 2 horizontal bars each time.  Some directions will tell you to go underneath only one bar, but when you’re first learning, it’s easier to go underneath 2.  I normally go underneath 2 bars if the yarn is an aran weight yarn or lighter, just because mattress stitch goes a lot more slowly when only going underneath 1 bar.  For aran weight yarns and higher (like bulky) I’ll go underneath only one bar, because each “stitch” is so big. So in most instances, just go underneath 2 bars between the stitches.  I like to start with the right side, just because I’m right handed.

mattress stitch photo tutorial, ladder stitch photo tutorial, seaming knits together

Now pull the needle through, leaving enough thread at the end for a couple of inches of tail.  Don’t pull the yarn through!  See how the thread goes underneath 2 bars?

mattress stitch photo tutorial, ladder stitch photo tutorial, seaming knits together

Now I go to the left side, and put my needle underneath 2 bars.

mattress stitch photo tutorial, ladder stitch photo tutorial, seaming knits together

Pull through again.  Congrats, we’ve gotten started!  Now we’re back to the right side.  How do you know where to put your needle next?

mattress stitch photo tutorial, ladder stitch photo tutorial, seaming knits together

Look at the thread that’s coming out from the right side.  Put your needle down through the hole that thread is coming out of, and run it up under 2 more bars.

mattress stitch photo tutorial, ladder stitch photo tutorial, seaming knits together

Pull the needle through.

mattress stitch photo tutorial, ladder stitch photo tutorial, seaming knits together

Now we go back to the left side, find the thread coming out of the left side, and put our needle through the same way we did for the right.

mattress stitch photo tutorial, ladder stitch photo tutorial, seaming knits together

And pull the needle through again.

mattress stitch photo tutorial, ladder stitch photo tutorial, seaming knits together

Now, we repeat the pattern, going under 2 bars on the right side, then two bars of the left side.  The stitch starts to look like rungs on a ladder, hence the alternative name “ladder stitch.”  Notice this whole time I’m not pulling the stitches tight, I’m leaving them loose.

mattress stitch photo tutorial, ladder stitch photo tutorial, seaming knits together

When I’ve got about 1″ to 2″ of stitching, I stop and admire my work, and make sure everything looks right.  Then, I take the tail, and the thread that’s attached to the needle?

mattress stitch photo tutorial, ladder stitch photo tutorial, seaming knits together

I pull both ends tight.  Note that I’m not letting the fabric wrinkle or scrunch.  I’m just pulling on the thread.

mattress stitch photo tutorial, ladder stitch photo tutorial, seaming knits together

There’s a quick trick to find out if you’ve pulled the thread tight enough.  If  you can pull the 2 pieces of fabric apart and you can see your stitches, it is still a little loose.  Pull both ends again.

mattress stitch photo tutorial, ladder stitch photo tutorial, seaming knits together

Now those stitches are tight.  See how I’m holding the thread with both ends?  At this point, neither end is secured, so if I pulled on the fabric without holding the ends tight, the stitches would again loosen up.  This will mitigate when you work more of the seam.

mattress stitch photo tutorial, ladder stitch photo tutorial, seaming knits together

Now, I loosen up the last stitch I did, so I can find where I need to go next, and I continue.

mattress stitch photo tutorial, ladder stitch photo tutorial, seaming knits together

Now, what happens if you are working columns of stitches to rows of stitches?  You still use the mattress seam, the placement on the row side is just a little different.  Take a look at the edge of your knitting, where you bound off or cast on.  See how the v’s connect to make a zig-zag?  This is where we’ll be working.  Let’s look at an individual stitch.  Here, I’ve got it lifted up by my needle.

mattress stitch photo tutorial, ladder stitch photo tutorial, seaming knits together

You are going to go down through the middle of that stitch, between the 2 sides of the “V.”  Then, you’ll come up from under the fabric through the next “V.”  See how you still have 2 strands on the sewing needle?

mattress stitch photo tutorial, ladder stitch photo tutorial, seaming knits together

Pull the yarn through, leaving the same type of tail you left when working the mattress stitch before.  Now, on the column side, work the mattress stitch as normal.

mattress stitch photo tutorial, ladder stitch photo tutorial, seaming knits together

Now, go back down to the row stitch side.  See how the thread is coming out, same as it did with the other matress stitch?  You’re going to go down through the stitch with the thread, and go up through the next stitch.

mattress stitch photo tutorial, ladder stitch photo tutorial, seaming knits together

And repeat over and over again, until you run out of fabric to stitch on.

It’s important to note, you can switch between working columns to columns, columns to rows, rows to rows, and back again.  You can be seaming on the stockinette side, and then switch to seaming on the row side.

Got questions?  Please ask in the comments, on twitter, or on facebook.  Or, if you liked the tutorial, tweet it, facebook it, or share it!

Crochet Reinforcing for Steeking

Have you ever tried to steek?

When I was first learning to steek, I felt I couldn’t cut into my own knitting.  So I went to the thrift store and got a slightly-felted really ugly sweater and went to town.  I practiced sewn-reinforcement steeking, hand-sewn reinforcement steeking, crochet reinforcement steeking, and a variety of other ways.  By the time I was done, not only was I really good at cutting between stitches, but I’d gotten comfortable enough cutting knitting without even reinforcing – just going for it!

When people ask me what my favorite type of steeking is, I normally say crochet.  This is not because I think it is the best way to steek (sometimes some crochet reinforcements can be a bit tight), but mostly because I’m lazy.  I nearly always have a crochet hook and thin yarn/thread on hand.  A sewing needle I sometimes have to go searching for.

There’s two ways of working a crochet reinforcement to steek.  The first is to work a row of single crochet around the column of stitches to either side of where you are going to cut.  While easy to do, it is sometimes hard to make sure you catch all the “floats” on the back of the work when you do this method.

The second way is my preferred way of working a crochet steek, though it is sometimes a bit of an inflexible reinforcement.  This involves working a row of slip stitches on either side of the planned cut.  Below is the process of how I normally proceed.

But before I speak to that, a note about yarn.  Below, I have a sweater that I’m cutting.  The yarn is made of cotton, which has very little ability to “grip” itself to prevent it from unraveling, which I why I felt it necessary to add reinforcing.  Still, if I wanted to go with a reinforcement that was more stable than crochet, I would have hand sewn.  I made the decision to use a crochet reinforcement because the sweater had been washed multiple times, and the yarn was essentially “blocked” into place.  When I removed the seams, there was very little fraying unless I actively tugged at the stitches.  It’s always best practice to block your piece before steeking.

First, take a look at your knitting.  Look at a column of stitches.  They often look like a bunch of V’s stacked on top of each other. If you pull the “V” apart, you’ll notice between each V is a bar running along the back.  Each time you work a slip stitch, you want to be sure you are catching the bar, and any floats that are behind the bar.

My crochet hook here is pointing to the bar I’m going to go around.

You want to join your yarn so that your hook and 1st loop is on the front of your work, and the yarn is on the undersides, as shown below.

Crochet Steeking, knit, crochet hook, yarn, hands
Adjust your loop so that it’s the right size to go over the bar between the knit stitches above.  Put your hook in, grab the thread from behind the work (this takes some practice, especially if you’ve never used a crochet hook before), and draw a 2nd loop up to the front of the work.
Crochet, Reinforcing, Steeking, knit, crochet hook, yarn, hands
You’ll see that the first loop is below the bar between the knit stitches, the second loop is above the bar between the knit stitches.  Pull the second loop through the 1st loop, so there is only 1 loop on the needle.
Crochet, Reinforcing, Steeking, knit, crochet hook, yarn, hands
You’ll continue this process all the way up the fabric.
Sometimes you’ll have to shift over a column or a row, or both.  Below, I’m going over and up 1 st (to the right)for my next crochet slip stitch.
Crochet, Reinforcing, Steeking, knit, crochet hook, yarn, hands
After you are done, you should have a row of crochet stitches running up each side of where you plan to steek.  For my purposes, I was cutting away fabric to tailor a sweater, and had stitches running to either side of my basting stitches. 
Crochet, Reinforcing, Steeking, knit, crochet hook, yarn, hands, basting stitches
My thumbs, below, are on the 2 sides that are to be cut away.
Crochet, Reinforcing, Steeking, knit, crochet hook, yarn, hands
And then Finally, I cut!
Crochet Reinforcing, Cutting Knitting, Steeking, Colorwork, Stranded Knitting

New Pattern: One Salt Sea

by Jennifer Raymond

Published in: Tinking Turtle Designs
Craft: Crochet
Category: Neck / Torso → Scarf
Published: October 2013
Yarns suggested: Three Irish Girls Glenhaven CashMerino Sock
Yarn weight: Fingering / 4 ply (14 wpi) Information on yarn weights
Hook size: 3.75 mm (F)
Yardage: 200 – 300 yards (183 – 274 m)
Sizes available: 14″ x 68″, blocked. May be worked longer.

This pattern is available for $5.00 USD

One Salt Sea is a great first hairpin lace project. Each strip that makes the scarf is short and sweet – no marathon strips to join together! If you’ve never done hairpin lace crochet before, don’t worry – this pattern walks you through the whole thing.

This scarf works up quickly – even in sock yarn! Work the strips and join as you go, or wait until the end to join them. It’s a great introduction to hairpin crochet.