MENU

A Perfect Sweater Repair

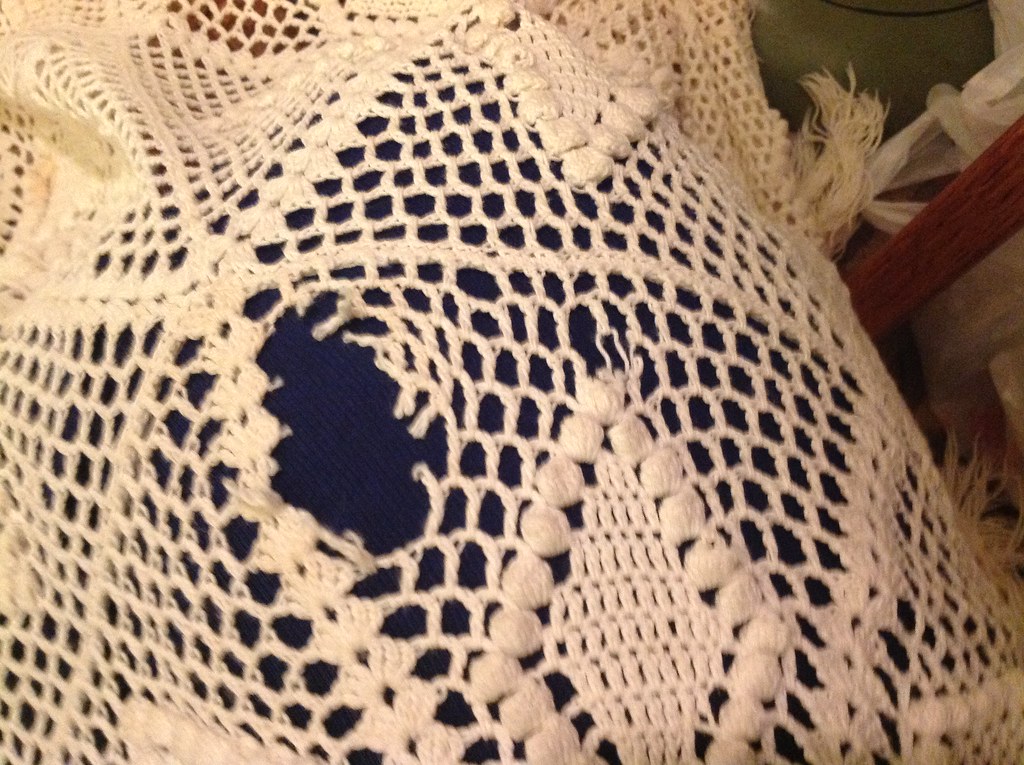
As I mentioned earlier this week, I’ve been hopping, trying to wrap up finishing projects before Christmas is truly upon us.  I’ve nearly pushed through the projects that are due in the next two weeks (and then the rest aren’t due until the New Year!).  I had one repair in particular that I wanted to share – a sweater repair in the Irish Knit Style.  The owner, AM, discovered me through the Washington Post article, and got in contact with me shortly thereafter.  She had a hole right in the front of the sweater, and could I please repair it?

As always, I told her I’d do the best I was able, but I was concerned – the yarn she had, a cream flecked with bits of brown, looked to be tricky to match.

This week I sat down to start on her repair, and when I pulled her sweater out of my bag, I couldn’t help wincing – this yarn was going to be really tricky to match.  I have a number of different creams on hand, but all of them were too light, and with too much “yellow” undertone.  AM’s sweater was a cream with an almost grey undertone.  And again, it had flecks of brown it it – tricky to match.  I checked the sweater – there wasn’t a good place to “harvest” yarn without going to a lot of effort, and I knew AM wanted to keep the costs down.  So matching the yarn from somewhere else would be a better option.

The hole itself was a lucky one: a row higher and it would be in the middle of a cable – a repair that’s much more finicky and tedious to do.  Two rows down there was the same problem.  This hole happened in exactly the right place – the few rows between two cables.

Well, it’d been a while since I’d been to one of the local yarn stores.  I figured it was time for a visit.

The Knitting B is a local yarn store about 25 minutes from where I live.  It’s the longest drive to a LYS I’ve had since I left my parents’ house.  So I don’t get there as often as I feel I should, and it’s too bad.  It’s a great store with lots of natural light, a solid selection of yarns, and a good parking area (always a plus!). Elizabeth, the owner, had an LYS in Charlottesville, VA for 25 years.  She’s a savvy businesswoman who knows here stuff.

When I got to the Knitting B one of the employees began helping me out trying to get a match.  Everything we pulled was not right.  Many of my go-to’s weren’t working.  And then, I remembered a trick I’d used before to get a good match.  Color changing yarns often will have sections that shift between colors, which means you get a lot of “bang” for your buck – and in this case, a couple of yards of yarn that match a hard to match yarn.  In this case, Noro Silk Garden came to the rescue.

The repair was pretty standard after that.

Because the yarn was awfully fuzzy, and hard to see what I was doing, I did a step I sometimes skip.  I ran guidelines: a different color of crochet thread for each row.  Because it’s the holidays, I decided to go with red and green.  I then unpicked the old yarn, pulling it out of the way.

Sweater repair with guidelines.

Sweater repair with guidelines.

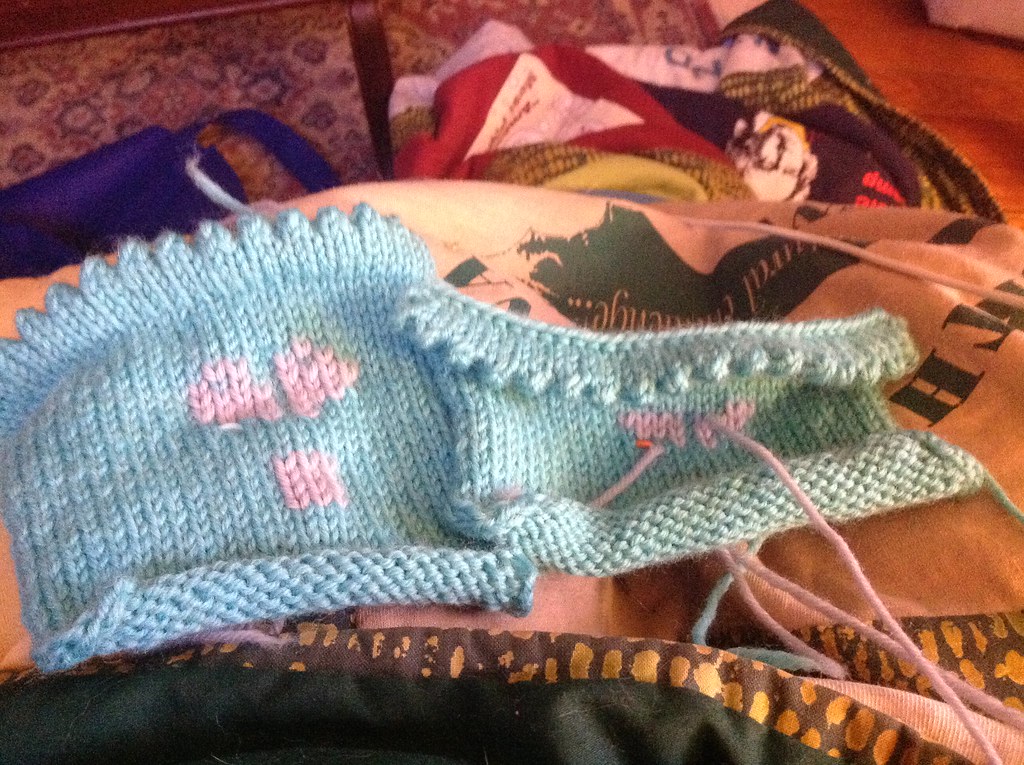
I began tracing the yarn with the Noro Silk Garden.  My only complaint about Noro is that it’s really easy to pull apart, being a single-ply.  It was also a fraction less lofty than the original yarn, but the color matching was so perfect I didn’t care, as the repair was only 4 stitches across.  I ran the first row of yarn, adjusting the stitches to make sure they matched the gauge of the stitches around them.  Then I pulled out the green guideline.  It’s one of the reasons I love crochet cotton: it pulls out REALLY easily, and is nearly unbreakable without scissors.

Sweater repair half done, only red guidelines remain.

Sweater repair half done, only red guidelines remain.

I then ran the second set of yarn, and pulled out the red yarn.

Sweater repair, needing ends woven in.

Sweater repair, needing ends woven in.

See how nice the color match is?  Just let me be geeky for a moment – the under-color is SO close, and the flecks of brown is SOOO close too.  You’d really have to be looking to notice this.

Then got down to the tedious part: weaving in the old ends and the new ends, tweaking things as I go.

Sweater Repair, finished.

Sweater Repair, finished.

Can you spot the repair?  Yes?  Well then, I ask you.

How about now?

Sweater Repair, big view

Sweater Repair, big view

As always, if you’re looking to have a knit piece repaired, get in touch with me on my Finishing Page.  Got questions?  I’d love to hear from you.  Comment, or drop me a note!

A Collection of Life Notes

Today’s a bit of a mishmash of life-notes and thoughts, being that I’m still working through the laundry from Thanksgiving and have all my deadlines looming right at the same time, mid-month.

Not much personal knitting/crocheting has been happening in the Turtle household lately, which makes me a very boring person indeed.

I’ve been working in a sweater made in a size small.  Working a size small sample always makes me nervous: even though I know my math is correct, and the piece is measuring out correct, when I look at the knitted piece I have a hard time believing it would actually fit a real live adult person.  I keep going over to my size small dress form and holding it up, reassuring myself it really is the right size, and then working myself up into a tizzy again a few hours later.

For some reason it doesn’t happen when I work a size medium.

Anyone else ever have this problem?


Being away from home means the cats have been very needy the last two days.  I suppose this is a good thing, as I’m doing 3-5 hours of knitting each day to meet a mid-month deadline.  They can sit on my lap and I can work, work, work.

Watson and Peake helping with the knitting

Watson and Peake helping with the knitting – if you look close you can see my current project!

Still, it’s grey and rainy out, and due to be the same weather until Thursday, which seems like such a long way away.  That meant yesterday my knitting time became my nap time for entirely too long.  It also means my needy white cat, Watson, has been in my face saying “pet me! pet me!” … with his claws.

Still, it’s good to be home for a little stretch, even if it’s just shy of two weeks before we’re off again.


Crochet lace about to be repaired

Crochet lace about to be repaired

I’m tearing through the last of the finishing that’s due before Christmas, and hoping to get it off a little before the holiday.  I’ve had a number of rather challenging projects: a fisherman’s sweater that had seen better days, and a crochet bedspread made a difficult repair simply because it was so LARGE.  If you’ve been waiting on your finishing to arrive before Christmas, it should be going off sometime around the 18th.

Meanwhile I haven’t started on Christmas cards, nearly any shopping, or cleaning the house.  I’ve been vibrating a little with holiday tension. If I wasn’t knitting for work, I’d be knitting for stress relief.

Still, I get to listen to as much of the holiday music as I can stand, which is a huge plus.


duplicate stitch on knitting

Foxes being embroidered

When off shopping with my mother and sister over the holiday, I noticed no fewer than five different shirts on adults and children (in different stores) featuring foxes.  One of my current designs has a fox on it.

I’m so excited for it to be out in the world.  Foxes are soooo in right now.  And it’s great – I think they’re adorable!


Family and Thanksgiving

Packing last night to get ready to go, I noticed one of my favorite pairs of socks had a hole in it – like nearly half of the hand-knit socks I own right now.  They’ve went in the repair bag, to take along with me this weekend.

We’re heading up to my parents in Upstate New York, and it’s bound to be a lovely trip.  My youngest brother I haven’t seen in person for nearly a year.

What are you doing for the holidays?21657912859_40b7ff2d54_o

Stained Glass Rug, Out in the World

Woman working on padded crochet motif.

Woman working on padded crochet motif.

Two weekends ago I had a really fun class I taught at Fibre Space on one of my favorite patterns I’ve designed: Stained Glass Rug.  The class which focused on padded crochet was dynamic and fun – and the students walked away with a good grasp of where to go next.  I’m looking forward to seeing some of their finished projects!

Stained Glass Rug has been getting a lot of attention lately: it continues to show on Knitting Daily TV and public television.  Students continue to love learning how to work it in the video I produced with Interweave.  It’s no surprise – working up quickly, it’s a great way to make a holiday gift, use up scraps, or try out different color combinations.

And best of all?  It’s free if you sign up for the Knitting Daily Website!

I’ve been loving seeing the color choices, variations and interpretations students make to the pattern as they make it their own.

Nearly finished Stained Glass Rug Motif!

Nearly finished Stained Glass Rug Motif!

One student I had chose this lovely greenish brown color to be her neutral, and had a yarn the color of bricks to be her “pop” color.

Back in August, Ravelry User BarbR made this lovely interpretation of Stained Glass Rug.

rug in teal, blue and cream

BarbR’s Stained Glass Rug, used with permission

Barb said of the project,

“I wanted to find something for some old wool that I had in my stash for a long time. It is a sturdy wool that is perfect for a mat. Your mat was something different and it really caught my eye.
The yarn was much thicker than what you had in the pattern, so I had to adjust the stitch count to get it to lay flat. The new stitch count doesn’t quite cover the cord as well as in your pattern, but does the job.
When I do it again, I will have to be careful to not pull the cord so tight, the circles don’t lay perfectly flat.

Stained Glass Rug Motifs, all stacked up with a padded crochet basket on top!

Stained Glass Rug Motifs, all stacked up with a padded crochet basket on top!

As for myself, I’ve been contemplating a rainbow Stained Glass Rug – still figuring out the details!

Coming Home From Holiday

A quick update from the Turtle front…

Last week Mr. Turtle and I took a much needed trip with two of our close college friends, to a small island off of Puerto Rico, called Culebra.  It was wonderous.

20151112_6928

We went hiking along the coast, making our way along crystal clear beaches – some sandy and some rocky.

20151113_6887

We had the opportunity to to go snorkeling – one of my favorite activities!  We played games, got sun, caught up on sleep – I even managed to get some knitting in.

20151115_6789

Right now the inbox is full to overflowing, as I try to catch up on 5 days of missed work.  Please be patient with me as I attempt to catch up in the next few days!

Normal blog posts and updates will resume shortly.

Repair and Restoration: Behind the Scenes

Last Thursday I had a lovely surprise: Jeanne Huber, a reporter in the Washington Post, quoted me heavily in answer to a question about repairing an afghan.  She had been asked a question: was there a way to get the holes in her afghan repaired?  Huber called Fibre Space (one of the yarn stores I often teach at), who in turn recommended her to me.  Huber had gotten in touch with me on a Friday afternoon, and between packing up to leave for a long weekend, I chatted to her on the phone about how I do repair.

Huber did a lovely job with the article, taking my rambling replies and distilling them into the pertinent information.  As a result, I’ve been able to chat with a number of people looking to have family pieces repaired.

Still, it left me realizing that there’s a bit of mystery to what I do, and I wanted to expand a little upon the article.

20479758521_1a7f106415_b

Blanket in the process of being repaired

How I Approach Repair Work

When someone gets in touch with me looking to get an item fixed, I try and have a dialogue with the customer about their goals.  What is it they want from the repair?  What would be the ideal results for them?  Are they looking to have an item repaired so they can use it further or are they looking to have the holes fixed so that the problem doesn’t get worse?  Are they on a budget?   Are they looking for the item to look pristine or are they willing to allow the repair to become part of the character of the object?

Each person has a different idea of what “fixed” means.

21831892331_7742a4b943_bMeanwhile, I’m also looking at the practical part of the project.  How damaged is the item?  How widespread is the wear?  Would attempting to fix the item hurt things further?  When I’m looking into this I’m often learning about the history of the item: if it was stored in a place where a lot of sunlight, heat or humidity could get to it, the fibers may be damaged.  Are the places where wear is showing from use – such as worn out fingers on mittens, or a handle on a bag becoming worn, or because of a different factor?  Often the answers form the type of repairs I can do – mittens that are going to get further wear over each winter are going to receive different treatment than a Christmas stocking that’s taken out once a year.

Based on the customer’s feedback, I come back with a number of options.

Sometimes this means the repairs are visible repairs: so that the owners can show where the original piece is, and where the repairs are.  Sometimes this means we transform a piece: adding a cute embroidered kitten over an elbow patch.  Other times the repairs are nearly invisible as I splice new yarn into the old.

Just as I put time and thought into repairing damaged items, so can you put the time and thought into what you want from your repair.  Worried that a piece of yours might need help?  Check out my post on what to look for.  Already decided to have your piece fixed?  Get in touch with me through my finishing form– I’d love to start our conversation!

New Online Learning Videos with Interweave

You may remember that over the summer, I went to Interweave in Fort Collins, CO to film four classes. This was part of Interweave’s Online Learning video program.  The first one, based off of Stained Glass Rug, was released a couple of months ago.  The others, I’m happy to report, have just come out!  Let me tell you about them!


Short Rows in Crochet: Learn Shaping and Texture Techniques for a Great FitEP12640

This class is based on a method of working short rows that I uninvented.  I’ve been using this technique for a while now, as I love the texture and look it gives crochet fabric.  I also love how shaping can be achieved to create projects that imitate ribbing in knitting, or allow you to play with color.

This class has two free patterns that come with the download or video: Riverbend Skirt and Ski Slope Hat.

In addition to teaching you about short rows, this class also has a great tutorial about using the mattress stitch to seam together crochet stitches.  I think you’ll love it.

You can purchase the class here, for $19.99.


Quick Crochet VestQuick Crochet Vest: Learn Broomstick Lace, Short-Rows, Back Loop Stitches & More

I love my Pattern Crossed Arrow Vest, and I think it’s the perfect project for beginners looking to challenge themselves!  Going into the class, the only skills you need to know are how to chain and single crochet.  I take you through the rest.

What I love about this pattern is how, with very little shaping, you create a very flattering vest that works as a great layer piece.  And the best part is, with a bulkier weight yarn, this project just flies by.  With the video you get a free copy of Crossed Arrow, plus my instruction as I walk you through each of the steps to complete this project.

And if you’ve never tried broomstick, this is a great project to start on.  You’ll get the hang of it in no time.

You can purchase the class here, for $19.99.


Crochet Barber Pole Cowl: Stranded Colorwork Techniques and MoreCrochet Barber Pole Cowl

My Barber Pole Cowl has been featured in several of my classes, and I’m now glad to bring it to video with Interweave.  Like Crossed Arrow, this is a pattern that’s completely accessible to beginners: if you can single crochet and chain, I can teach you how to make this project!

With a lot of color options, this project is always popular around fall – a perfect pattern for working up in school or team colors, just as the air is getting nippy.

Here, I take you through learning how to crochet through the back loop (can you tell it’s one of my favorite techniques?) and also how to work stranded crochet – which is different than tapestry crochet!  Stranded crochet creates a fabric that is warmer (because of the two layers of yarn) and much stretchier than tapestry crochet.  It’s a fun and helpful skill to have in your arsenal.  In the process of learning this technique, you also learn how to change colors in crochet without making a jog.

If you like the pattern and love my classes, I think you’ll get a lot from this one.  You can purchase the class here, for $19.99.


Got questions about the videos?  I’d love to answer them!  And if you have bought the videos, how did you like them?


Changes: Pricing and Holiday Deadlines

Repair of a Shetland Lace Shawl

Repair of a Shetland Lace Shawl

It’s getting to be the end of October (where did all the time go?) and that means we’re starting to move into the Holiday season. This is the time of year where the amount of finishing and repair I do nearly triples!

I love doing finishing and repair work – I love being able to help you finish your projects and make them perfect!  I love helping you restore older pieces that have gotten loved on a little too much.

But the reality is that Finishing & Repair are the types of work I can only do so much of in a day before my well runs dry.  It’s also time (and very often space) consuming.  There’s a reason I get so many different large shawls, blankets and other large items to block!  I’m fortunate that Mr. Turtle and I have been able to dedicate a space in the house just for this type of work, and that he’s totally chill with finding a bunch of sweaters and other things drying on the guest bedroom bed.

Repairing a Crochet Blanket

Repairing a Crochet Blanket

What Changed?
Quite a few things have changed since I last changed my pricing-  nearly two years ago now!  And many of these changes have led to me concluding that prices need to increase.

  • I moved, and it became more costly for me to drive to my drop-off/pickup locations.
  • More individuals have opted to mail, and have me mail back, their items.  Postal prices have increased.
  • The type of projects I tend to get have become more complicated: most of my customers like to handle the “smaller items” themselves, and send me the more difficult projects.
  • My volume of projects has increased!  Now, don’t get me wrong – I’m happy about this.  BUT!  The reality is that knitting, crocheting, seaming, blocking, pinning, etc are all hand and arm heavy activities.  I’m relatively young, but I’d hate to find that 5 or 10 years down the road, I’ve given myself a repetitive stress injury.  Because of that, I limit the amount of hand-heavy activities I do during a day, and I make sure I have time to stretch in between.  This means I have a finite amount of time during the day I can devote to finishing and repair.
  • I’ve gotten better. As I practice more and learn more, the quality of my finishing and repair has increased, and I believe that my expertise is worth it!

Frankly, I’ve known I’ve had to raise my prices for nearly 6 months, but the reality of the holidays coming really drove the point home – my prices are not sustainable.

So what does this mean for you, my customer?

  1. Coming Sunday November 1st, my prices will be increasing on Finishing & Repair work.  My hourly rate will increase from $30 to $40.  Many of the categories in my Finishing line of services will also change – some won’t change as much as my hourly rate, and some won’t change at all.  But most things will be increasing by a little.
  2. On Monday November 30th, I will no longer be accepting Rush Service.  This will continue thru January 1st, and then Rush Service will return.  You may still request (and receive!) Express Service. That means if you want to get something finished or repaired before the Christmas Holidays – get it in sooner rather than later.
  3. There will be a new surcharge for oversized items.  Details are still being determined.  But the long and short of it is: I have cats.  I make sure all my finishing stays in places where it won’t get affected by cats.  This is fine for smaller items, but when I need to work on really large things, I have to rearrange my house to create a space where I can work that won’t also have cats laying all over it.  This extra effort needs to be taken into account – otherwise I’m going to get frustrated and grumpy every time I go to work on large items.  I don’t want that to happen.
  4. Note: for any of you that have gotten items to be before the November 1st deadline, don’t worry! Your projects will be charged under the old system.

Got questions about the changes?  As always, you can leave me a comment, or drop me an email, and I’ll be happy to answer them!

Thank you so much for being loyal customers!

Upcoming classes at Fibre Space

This weekend I’m teaching four different classes at Fibre Space (in Old Town Alexandria), and I wanted to share them with you.  There’s still spaces available; and I’d love to have you join us!


http://www.ravelry.com/patterns/library/karner-butterfly-socksStranded Crochet Cowl is based off of one of my favorite patterns for a quick gift: Barberpole Cowl.  Featuring Stranded Crochet, it’s a fun technique that creates and warm and durable fabric.  It’s also accessible for students that are still new to crochet: all you need to know is how to chain and single crochet – I’ll take care of the rest!


Finishing Essentials is one of my most in-demand classes, and covers skills such as:

  • weaving in ends
  • seaming
  • preventing or solving problems like curled hems or uneven seams
  • and dozens of tips to make the finishing process easier.

I do a lot of finishing, and I love to give you all my tips and tricks!


Intarsia Wrap is based off Frances Wrap, and features a unique way of working intarsia!  We learn:

  • a tubular cast on
  • tubular stockinette stitch
  • and Intarsia Colorwork

The result is a wonderfully modern wrap!


Oops! Fixing Mistakes is another one of my foundational classes. If the sight of a dropped stitch, a mixed up cable, or a problem in your lace sends you scrambling for outside help, this class if for you. Learn to fix your mistakes!


I’d love to see you in one of my classes!

Spinning Resources for Children

Recently I’ve had a number of individuals get in touch with me about spinning supplies for their children.  It can be hard for parents or guardians to know what to get their children when they have no knowledge of the craft itself.  Says one parent,

My daughter took your class over the summer and I wanted to get her craft supplies for the wool felting and the other crafts (except for crochet). What do you recommend and where can I get them?

I’ve created a list of supplies, resources and tools to help you get your child on their way to spinning!

Tools
Generally children first learn how to spin on a drop spindle.  These are either made from wood or plastic and are a dowel with a weight around it to enable the drop spindle to spin.  Think of them like tops – they look very similar!

Camper using TurtleMade Turkish Drop Spindle

Camper using TurtleMade Turkish Drop Spindle

  • TurtleMade ($25): Hands down my very favorite drop spindles to use with children.  I’ve used their Turkish Spindles – the advantage being that, when used correctly, the spindle creates a ball of yarn when done.  It’s much easier to ply from when first working with spinning.  Get the Standard size spindle – sometimes the smaller sizes are harder to use for children, as there’s less to grab onto.  I love that TurtleMade has different colors, and does special holiday themed spindles – there’s some really cool halloween printed ones.  TurtleMade’s plastic spindles have never broken on me, and even if they do, they sell replacement parts.
  • Knit Picks ($14.99): Wooden Drop spindle, heavier than TurtleMade’s, and is a solid option.  I don’t find these as sturdy.
  • There are a variety of other spindles out there, mostly in wood.  They range in prices from $39 to $50, and are really only worth acquiring if your child really gets into spinning.  Same thing with spinning wheels (which range from $150-1,000) – only get one if your child is serious about the craft.

Supplies
When children first learn how to spin there’s quite a bit of waste.  Normally it’s best to get a good amount of something affordable, and a little, “special” bit for when they’re further along.  A 4-8 oz amount of wool normally spins up to make something, depending on the thickness of the yarn.  Your child may be able to spin enough to make an accessory, such as gloves, a hat, or fingerless mitts.

  • Neutral colored wool ($1.49/oz):  Wool is generally a good fiber to begin spinning, as it tends to be the most cooperative for beginners.  Order anywhere from 4 – 8 oz to start – and don’t be surprised if your child goes through the amount quickly!  When you’re first learning, there’ll be a fair amount of waste.  If your child is interested in having colored yarn, after the yarn is spun you can experiment with food dyes.
  • After your child has mastered spinning, they may want to venture into other fibers or colors.  A few hints: DO not, until you know what you’re getting into, get anything called “Raw wool” – it’ll be tempting because it’s a lot cheaper, but that means the wool has not been cleaned (IE: has grass and oils from the sheep in it), and has not been carded.  Instead, look for words like, “Combed Top,” “Roving” or “Carded Batts.”

Resources
There are a number of resources for adults looking to spin, however, not all of these are particularly accessible to children, depending on the age.  The books/resources I’ve listed below are the best ones I’ve found for children, and contain lots of pictures!

  • Teach Yourself Visually Handspinning ($14.99): Plenty of pictures, this is one of the books that got me started.
  • Craftsy ($20 – $30): Craftsy has some great resources, if you don’t have access to local teachers.