MENU

Book Review: Socks A La Carte Colorwork

Today has been the day of socks.  I had to get the knitted sample of a design I’m working on for Sockupied off by 3 – so I was knitting the afterthought heel into the sock the entire morning.  (It was in Anzula.  It wasn’t exactly a hardship.)

Then, as I was working on the heel, my girlfriend Lois called with some knitting questions.  Specifically, I’d worked with her and another friend so they could each make their first pair of socks, and now Lois was getting ready to tackle her second pair.  Since working with the two ladies had been a rather informal affair, they’d gotten a sock pattern tailored specifically to them, and Lois had some questions about why I’d chosen the particular toe and heel that I’d taught them.  It led to a wonderful conversation about sock knitting philosophy, and in the course of the conversation I made a book recommendation that I’d thought I’d pass along to the rest of you!
Most of the resources I use for sock knitting that I reference nearly all the time are Knitty Articles.  Kate Atherley (who also tech edits for Knitty) has written a comprehensive primer of sock articles.  My favorites are Socks 101 and a blog post talking about foot sizing relationships.
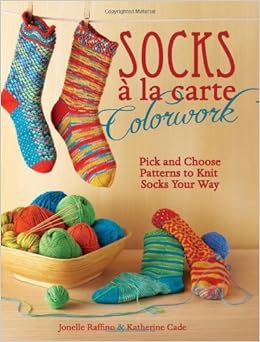
Still, I started thinking about one of the books I used a lot when I first started knitting socks.  I ended up telling Lois about the Socks A La Carte series by Jonelle Raffino & Catherine Cade.  I own the Colorwork one, and have borrowed from the Library a few different times the other two.
What I love about these books is simple.  Remember those toys when you were a child where you could pick a head, pick a body, then pick a pair of legs?  And you could mix and match them to your heart’s content?  That’s this book series.  You can choose what you like from all the different patterns, mix and match, and come to the pair of socks that you like the most: with your favorite toe, heel, cuff and leg.  It’s particularly delightful.

In other news, I’ve got some serious pattern writing to do tomorrow.  So if my blog post on Friday is light, you’ll know why.  My brain will be wrung out.

Lastly, I’ve been having a great conversation in the Designer Forums on Ravelry about work schedules, Flow, and staying on task.  It’s particularly enlightening.

Last night we opened up the house and turned off the air conditioning.  I left the fan on, and halfway through the night I awoke to turn the fan off; the air circulating through the house was cool enough.  In the wee hours of the morning I woke up again to pull the fleece blanket out over the sheet.  This morning, as I climbed on my bike, I wore long workout pants and a sweatshirt.

Tomorrow the morning will be warmer, and I doubt I’ll need the sweatshirt.  By Wednesday we’ll probably close up the house as the humidity and heat climbs.  But it’s happened – I’ve seen my first glimpse of Fall through the haze of summer.

I’ve talked before how I’ve always been an Autumn Girl.  The smell of hot cider and the curve of a pumpkin reside someplace to the left of my heart.  Halloween is anticipated with the same excitement of a birthday.

Maybe it has something to do with the weather cooling and the hand-knits coming out.  Maybe it has something to do with the start of school, the crisp feel of unlined paper, new school supplies, and a potential for learning.

This upcoming Fall has a special highlight – I’m teaching at Rhinebeck.  There’s so much to do before the date!  I’m working on class samples, and trying to squeeze in the time to make a Rhinebeck Sweater (
which, unfortunately is looking less and less likely).

Finish This: One of the Classes I’m teaching at Rhinebeck

I’m really excited because I’ve been dreaming of teaching at Rhinebeck for several years.  This is where you come in – if you’ve been thinking about taking a class, and haven’t decided yet – you really should!  Many of the classes I teach need to meet minimum enrollments – so if you wait unti
l the last minute you might miss out.  New York in the fall is simply beautiful, and many people I know are making a trip out of going to Rhinebeck, and taking some time to enjoy the Fall foliage!

You can signup here!

https://www.tinkingturtle.com/2014/08/last-night-we-opened-up-house-and/

Handmade vs. “Just Passing”: the Story of my Lace Souvenirs

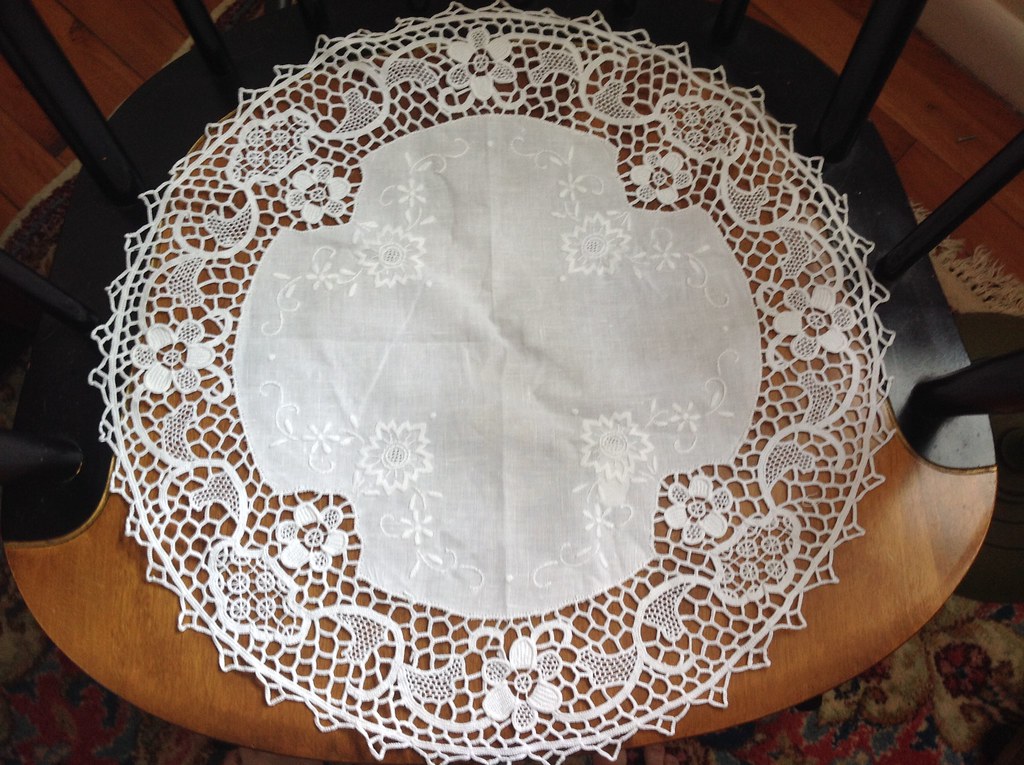
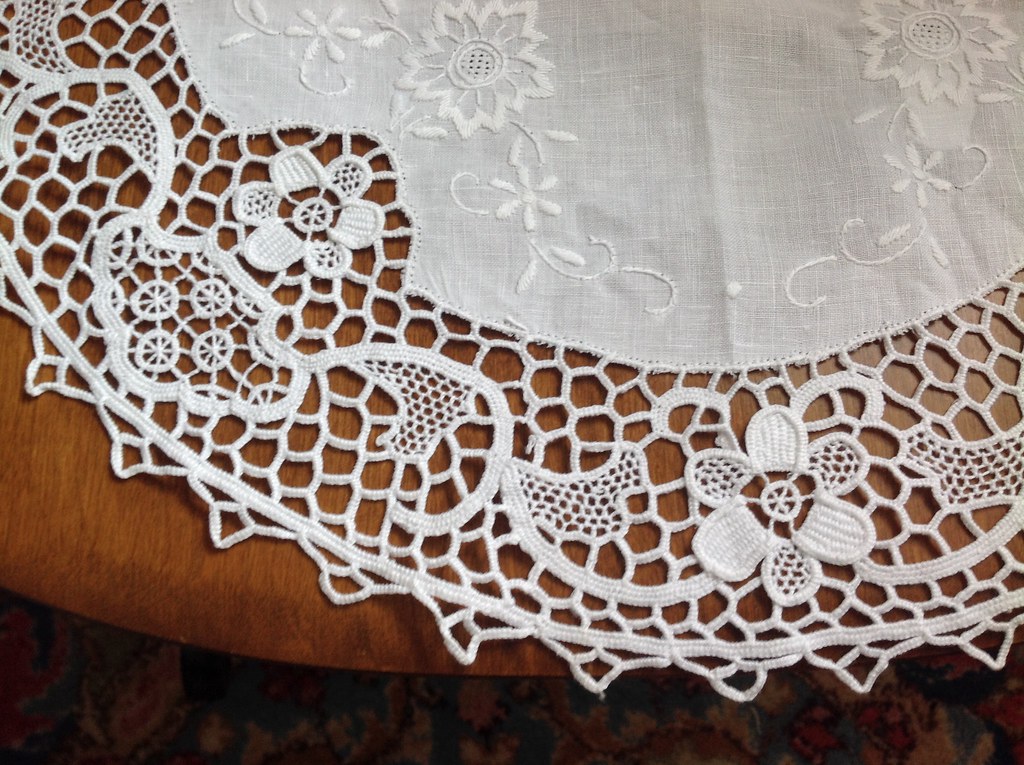
My family and I spent the last two weeks in the Mediterranean.  It was my first time going, and it was a wonderful time.  Perhaps one of the things I’m most excited about is the additions I made to my lace collection.  There’s 4 pieces total, one crochet, and one Burano traditional needle lace.

The crochet my parents got for me in Dubrovnik, Croatia.  It features Fillet crochet
and pineapple motifs.
The other pieces I acquired was in Florence, on the island of Burano, which is known for it’s colored houses, and it’s lace.  I fell completely in love with Florence, and especially Burano.
Shopping for lace in Burano was an interesting experience.  The shops we went into on the main drag were – frustrating for me.  I was told as I walked in that all lace was “handmade.”  I found this a frustrating experience, because I can te

ll the difference between handworked and machine (at least when it came to this example of embroidery).  I’m afraid I got a very angry look on my face and dragged my brother, who was with me, out of the store.

He then very patiently listened as I ranted for about 10 minutes, and cooled off.  After that we were much more selective in the stores we went into, until I found one that was authentic.
It was worth it to wait.  I got to meet the owner, who spoke maybe 10 words of English.  I spoke about 5 words of Italian, and enough Spanish (which linguistically, is similar enough that I could limp along) to make my interests known.  Once I pulled out the knitting, she understood that I knew about the work that went into the lace, and she started pulling out the “good stuff.”

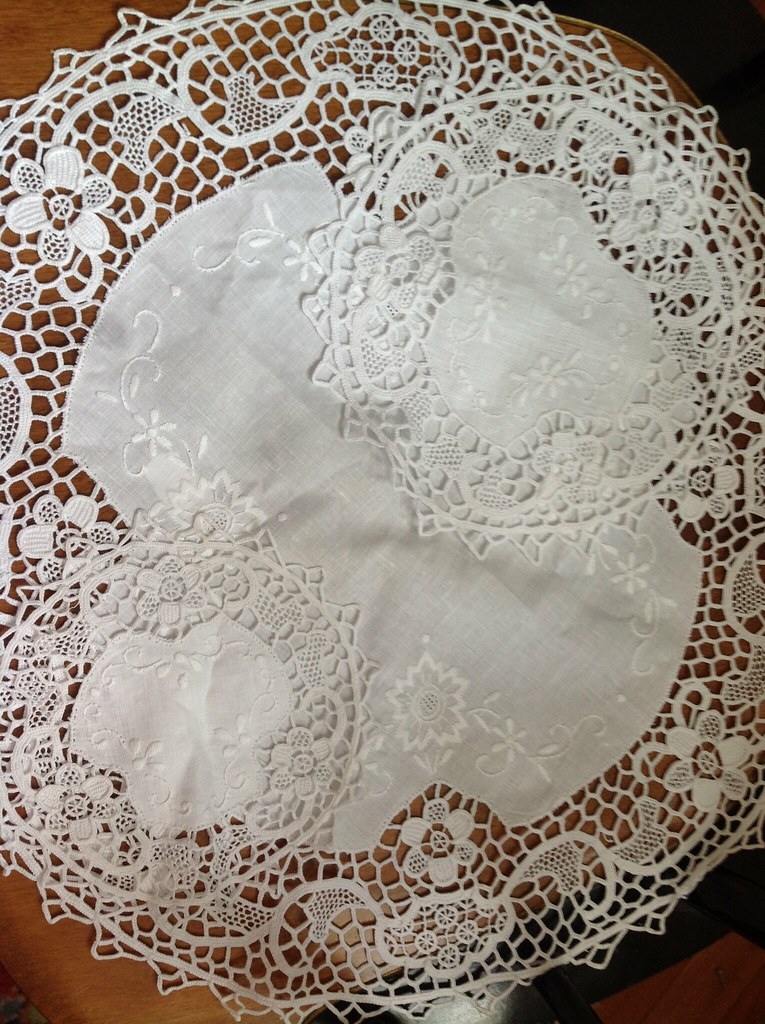
The lace was full of traditional motifs and beautiful embroidery and work.  I ended up getting 3 different sized doilies, and I couldn’t be happier.

For me, it was important to know that the crafts and the lace were the real thing – because I hate when something that isn’t handworked is “passed.”  In an age where most people are unfamiliar with the traditional crafts, it’s important to me that people’s hard work be appreciated for what it is.

5 Quick Routines that make my Knitting and Crochet Easier

This summer has been crazy for Tinking Turtle – I’ve been traveling both domestically and abroad. (I’ll be sharing more about the cruise on my next post!)  Finally, though, I’m home for a while, and I’m beginning to settle into a routine.

It’s got me thinking about the routines I have – specifically, for my knitting and crochet.  These are things I’ve developed over time as a designer and as a stitcher to stay organized – or to make sure I don’t forget something important!  I thought I’d share some of these systems I’ve developed over time, in case they might help someone else!

  1. When I go to knit a pattern out of a book or magazine, I always make a photocopy.  They’re always single-sided (so I can take notes on the back) unless they’re really long.  This way, I can make changes in the margins or loose the pattern (and I don’t loose the original).
  2. If I know I’m going to put a project down for a while, I take the needles out of it, and attach a marker that lets me know what size needle I was using.  I use this set from Knitpicks, but there’s also another variation here.  You could also make them using wire and beads with numbers on them.
  3. I’ve bought a whole bunch of measuring tapes and miniature scissors, and I just keep a pair in each knitting bag – so I don’t have to transfer them out.
  4. I have 4 rare earth magnets (kinda like these), which are super-powerful.  I have them in a set of altoid containers, and I use them to store my sewing needles and darning needles.  That way if I’m in a rush I can just put the needle on the top of the container, and because of the magnet, it sticks.
  5. I always keep a handful of locking stitch markers in each of my knitting bags.  You never know when you, or a friend, might need a stitch marker.  They’re also really great for catching a dropped stitch that you can’t fix right away.
What routines do you have that make your life easier?

From the Business Desk: Leveraging your Strengths

From the Business Desk is back.  From the Business Desk is a semi-regular series that looks at some of the important factors in running a Small Fiber Arts Business.  This feature revolves around market evaluation, and some tips to find the right niche for your business.

As any small business owner knows, it’s a fierce world out there to break into any market.  Be it establishing a LYS, becoming your own design company, breaking into the teaching circuit, all of these arenas seem to have well established entities that have solid client bases that seem to have everything put together.  How will you ever be able to differentiate your new business and your ideas from the existing market, you may ask yourself.  One of the handiest tricks of the business trade to help you accomplish this is the SWOT analysis.  Standing for Strengths, Weaknesses, Opportunities, and Threats, this analysis can help you start to make sense of your business’s place in the market, and areas which you can develop to better differentiate and market your ideas.

SWOT Matrix overview.  Image courtesy of wikipedia.org

Fitting neatly into a 2 x 2 matrix (one of my favorite visualizations for many different business strategies), the SWOT analysis can help you identify some key attributes both about your business as well as the marketplace.

Strengths are the things that your business does quite well or has a key competitive factor; items could include physical location of a shop in a high-traffic downtown area, or having a well rounded resume of instruction at a variety of locations.

Weaknesses are known areas where you could use some improvement; an example of this could be that you don’t really possess a strong skill-set on computer tools like Excel or Microsoft Publisher as a designer.

Opportunities are areas that in your opinion the market or industry has not fully realized, such as there being a wealth of crocheters living in a particular town, but no dedicated crochet instructor.

Threats can be anything externally that stands the chance of impeding the growth and progress of your business.  Threats can be micro, such as the fact that there is already a teacher who has been teaching a particular class that you want to start teaching at a regional fair, or macro, such as the overall state of the retail yarn market in a particular state.
Remember, these should be fairly high-level; while it’s good to have an in-depth analysis of your business and the market, for the first time that you do this exercise, try to distill it down to the top three or four attributes in each category.

Once you have developed your ideas and thoughts, it’s time to tweak the matrix to help understand how this can lead to a strong business plan development.

SWOT action item Matrix

By combining each of these categories in a grid, you can identify specific action items that emerge from the attribute clusters.  The two most important areas to be aware of and consider are the Strength-Opportunities  and the Weakness-Threat quadrants.  These two reflect the immediate areas for business development and defense strategy respectively.

Breaking down your businesses’ market position utilizing the SWOT analysis, you can simply and easily lay the groundwork for a comprehensive business plan that can help you take advantage of market opportunities.  One final note about the SWOT analysis; it is not meant to be a static market.  Over time, both your business strengths and weaknesses as well as your perceived opportunities and threats in the market can significantly change.  It’s a good idea to review and update this grid on a regular schedule (here at Tinking Turtle we review our SWOT items quarterly and develop a new SWOT matrix annually).  By doing this, you can ensure that you are aware of where you need to focus your business development objectives for the near future.

~ Mr. Turtle

Yosemite, In a selection of Pictures

I never did get around to showing some pictures from Yosemite, so I thought I’d take some time to share a glimpse of what other creative outlets I have: fooling around with my camera.
Alpine flowers that needed very little to grow.
I fell in love with the wood, how it was preserved, and what it looked like.
I have very few photos I took of views (well, I’m still processing the panoramas), but there just wasn’t a good way to convey scale – everything is just so BIG.
Flowers and Rocks – formations by glaciers.
I looked like a road from a car commercial.
Wood!
Yes, it was really necessary to get in the lake. I had to know if the water was as cold as everyone was making it to be.
Berries, and wood.
Blue, blue Sky.  And yet, so many different shades!
A long, long, way down.  It was hard not to get dizzy when you looked down.
Playing with the capabilities of my camera.
A quiet lunch moment.
Flowers.
I loved the stuff that grew on the trees – such a vivid green!

Free Pattern: Water Babies!

You’re in for a real treat today: a free pattern!  As a policy, I rarely make free patterns, but Jordana Paige sweet-talked me into creating one last year.  Since it’s the heat of summer, I thought this would be the perfect repost, a sweet little something for kids and adults alike to enjoy.  Quick to make up, you can use these as intended and inflate a water balloon (either with water or air) to use as stuffing, or you can stuff and have as a forever-stuffed animal.
When I was younger and my mother needed something to keep my
siblings and I occupied, she’d make water babies.  Filling balloons with water, she’d hand us
markers and we’d go to town, decorating our water babies, taking boxes lined
with tissue to make beds, and making various outfits for them.  Inevitably, though we’d drop the balloon on
the grass, or it would brush up against the edge of paper or something else
sharp, and our beloved water babies would be gone – popped in a rush of water.
Being an enterprising young child, I decided that my water
babies needed an outfit, a protective cover to protect it from the world.  Being handy with a hook, I made small bags
that my balloon would rest in, to be protected. 
Over time these developed into quite elaborate creatures in their own
right.
And then, I grew up and forgot about them.
Recently, however, these water baby costumes were brought
back to mind.  I have two young girls in
my life, and they were playing with water babies the other week.  Inevitably, one got dropped on the hot
asphalt, and burst… leading to some quite natural tears.  I decided it was time for me to break out my
hook and an old idea, and give it a new twist.
And so, I present to you, a modern twist on my 20 year old
water baby pattern.
Free Pattern Water Baby
MATERIALS
Gauge: 7 sts and 6 rows equal 1”
Hook: F/5 3.75 mm
Yarn: Worsted weight yarn, 4 colors plus black and white.
C1: Dark Blue
C2: Green
C3: Red
C4: Light Blue
INSTRUCTIONS
Using C1, Create sloppy slip knot, sc 2.
Round 1: 6 sc in circle. (6 sts)
Round 2: *sc twice in next st. Repeat from * 6 times total.
(12 sts) Join to next st with sl st. BO.
Round 3: Switch to C2. *sc twice in same st, sc in next st,
repeat from * 6 times total.(18 sts)
Round 4: Switch to C3. *sc twice in same st, sc in next 2
sts, repeat from * 6 times total. (24 sts)
Round 5: *sc twice in next st, sc in next 3 sts, repeat from
* 6 times total. (30 sts)
Round 6: *sc twice in next st, sc in next 4 sts, repeat from
* 6 times total. (36 sts)
Round 7: Switch to C4. *sc twice in next st, sc in next 5
sts, repeat from * 6 times total. (42 sts)
Round 8: Switch to C1. *sc twice in next st, sc in next 6
sts, repeat from * 6 times total. (48 sts)
Round 9: *sc twice in next st, sc in next 7 sts, repeat from
* 6 times total. (54 sts)
Round 10: *sc twice in next st, sc in next 8 sts, repeat
from * 6 times total. (60 sts)
Round 11-12: *sc twice in next st, sc in next 14 sts, repeat
from * 4 times total. (60 sts)
Round 13-16: Switch to C2. Sc all around.
Round 17: *sc2tog, sc in next 8 sts, repeat from * 6 times
total. (54 sts)
Round 18: *sc2tog, sc in next 7 sts, repeat from * 6 times
total. (48 sts)
Round 19: *sc2tog, sc in next 6 sts, repeat from * 6 times
total. (42 sts)
Round 20: Switch to C3. *sc2tog, sc in next 5 sts, repeat
from * 6 times total. (36 sts)
Round 21: *sc2tog, sc in next 4 sts, repeat from * 6 times
total. (30 sts)
Round 22: Switch to C1. *sc2tog, sc in next 3 sts, repeat
from * 6 times total. (24 sts) At this point you should stuff your orange ball.
Round 23: *sc2tog, sc in next 2 sts, repeat from * 6 times
total. (18 sts)
Round 29: *sc2tog, sc in next st, repeat from * 6 times
total. BO. (12 sts)
Ears:
Using Green, foundation double crochet 12 sts. Bind off. Tie
a knot in one end, use the tail to attach the other end to the water baby.
Eyes:
Using White: Create sloppy slip knot, sc 2.
Round 1: 6 sc in circle. (6 sts)
Round 2: *sc twice in next st. Repeat from * 6 times total.
(12 sts) Join to next st with sl st. BO.
Round 3: Join C2, ch 1. *sc twice in same st, sc in next st,
repeat from * 6 times total. Join to Ch 1 with sl st. BO.(18 sts)
Using Black: Create a sloppy slip knit, sc 2.
Round 1: 6 sc in circle. BO. (6 sts)
Nose:
Using C2: Create sloppy slip knot, sc 2.
Round 1: 6 sc in circle. (6 sts)
Round 2-3: Sc all around.

Assembly: Sew eyes, nose and ears to water baby. Insert a
balloon into the back, fill with water or air. Tie balloon end in knot and
play!

From the Business Desk: Finishing Projects

After a delay due to some career changes that Jen talked about earlier, From the Business Desk is back.  From the Business Desk is a semi-regular series that looks at some of the important factors in running a Small Fiber Arts Business.  This feature revolves around ensuring that all of your business projects have fully completed.


As a small business owner, staying on top of everything necessary to run your business is no small task.  With a constant turmoil of new projects, new customers, and everyday business inquiries, it is important to understand what is required for you to close out your existing projects; by successfully and formally closing out a project, it can be put to rest with all parties comfortable that their requirements have been met.

Not all Project Management needs to be this complicated. A few
simple tips can keep you on track to successful completion.
Source: http://en.wikipedia.org/wiki/Gantt_chart

One of the first items to be aware of in the closing stage of a project is that it’s important to identify up front what the final items on your project or to-do list are.  For example, if you are working on establishing and running a new class at your shop, you may think that the project is complete when the class runs.  Thinking this out ahead of time can help you identify  items that are always good to check off before putting a project to bed  Namely, ensuring that all compensation and contractual terms have been met and a project post-mortem to document lessons learned.  Following through with these steps ensures that you don’t forget some of the important elements of a project for any business: getting paid, and meeting legal obligations.  A post-mortem, either publicly or internally is a good time for one or more parties involved to learn from the project, documenting what went well and what could use improvement for next time.

This is an example of using Insightly to keep track of project tasks.
This is the project list for the pattern Sweet Strawberries.

Keeping track of all of this can be overwhelming; fortunately there are several options available that are easy to use in web form.  I’d recommend ZOHO Projects or Freedcamp as two of the better solutions available out there for someone just getting started.  Other options include systems that link Customer Relationship Management and Project Management.  Here at Tinking Turtle, our CRM system, Insightly includes an integrated Project Management module.  This provides additional functionality to link projects to various associated parties, and track when a project is waiting on a third party to take action.

No matter how extensive or basic your knowledge of projects is, ensuring that you take some time on all of your projects to double check that your steps are completed is well worth the peace of mind..  The more projects that can be completed without final steps left un-done, the easier managing the entire workload of your business can be.

~ Mr. Turtle

A handy tutorial on Duplicate Stitch

Note: I’m on vacation this week!  Some of these posts were originally done for Jordana Paige’s blog, but the rights have reverted back to me so I’m free to publish them myself.  The original post has been edited for clarity.
I was recently reminded of duplicate stitch when I was
working on a pair of color-work socks (I can now reveal: these were a stitch on the bottom of my Octopodes Socks!). I realized that I’d managed to knit the
wrong color in a part of the pattern.  I
practically cried.  I was nearly done
with the sock, and I certainly didn’t want to pull back to nearly the middle to
fix the mistake.  But the mistake was
also terribly noticeable–in fact, I was surprised I hadn’t noticed it before
then.
 After taking a few
deep breaths, and saying a few choice words, I gave some different solutions thought.  I settled on duplicate stitch.  What I ended up doing was covering the
original stitches with stitches in the right color, so it looked like I’d worked the correct color the whole time. 
The area was marginally thicker, but not very noticeable.  I was pleased with the result.
 Duplicate stitch is
most often used to add color to knitting when you don’t want to do complicated
color work, like intarsia or stranded knitting (though duplicate stitch can
also be used in conjunction with them, so you aren’t holding too many
colors).  It can be used to fix mistakes,
as I did, or it can be used to embellish or embroider a knit fabric–perhaps a
sweater that you want to mod.  I’ve been
thinking about doing something to do with scrollwork, vines or some sort of
black and white illustration on an old sweater I have to liven it up.
The duplicate stitch
is basically done by tracing the knit stitches. 
Today we’ll just be focusing on stockinette, though it can be done, with
mixed results, on garter or reverse stockinette.  You’ll need a contrasting color yarn and a
blunt-tip needle. 
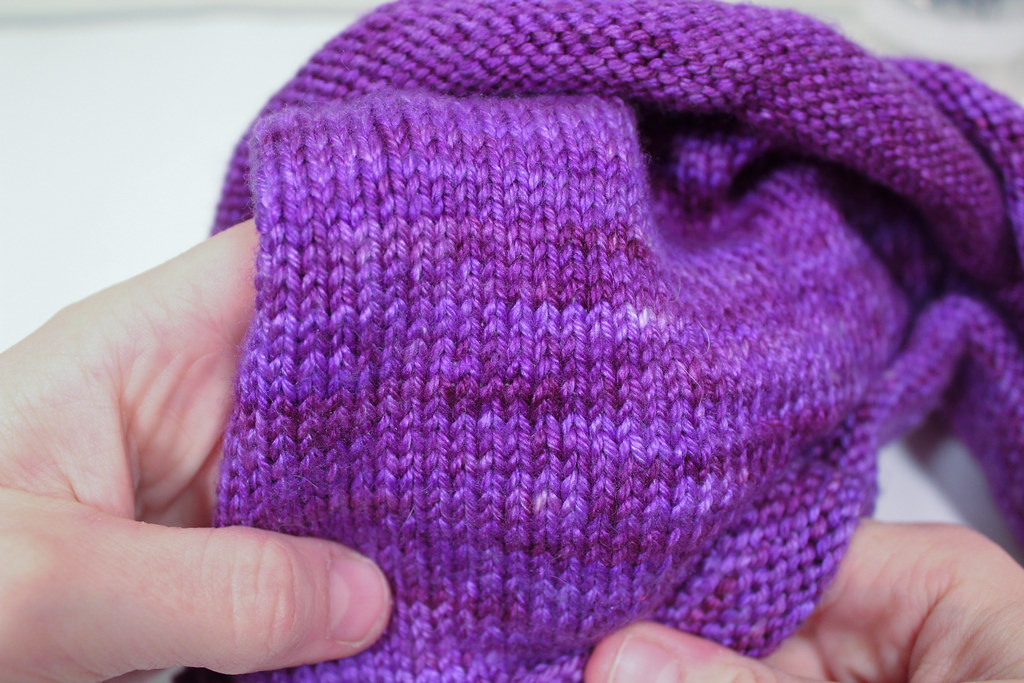
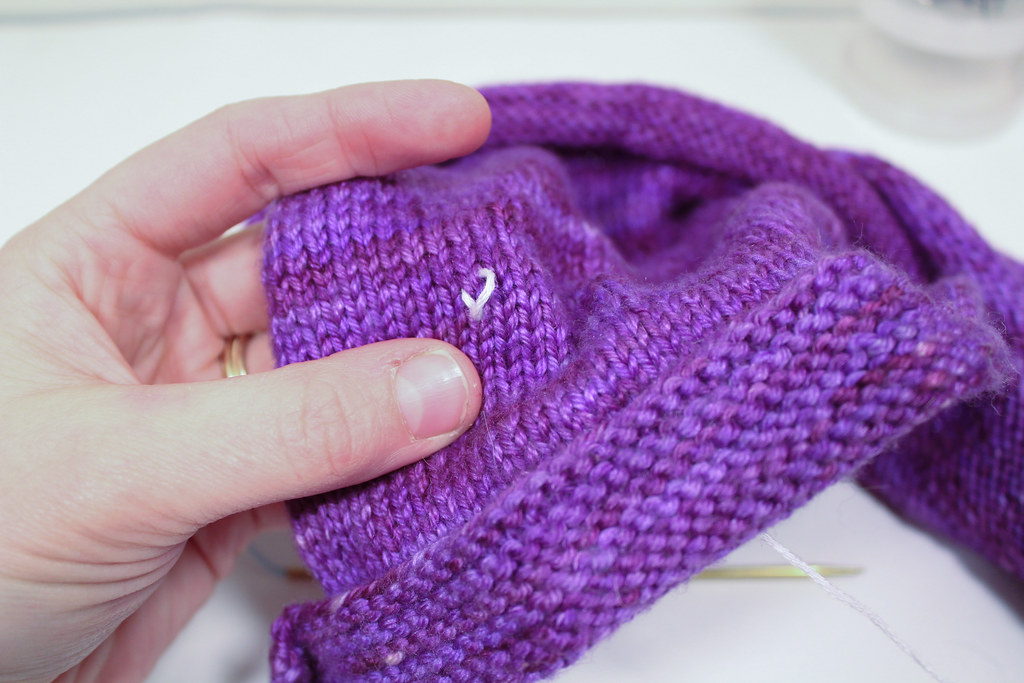
Let’s first take a
careful look at the knit stitches in stockinette.  See how they look like zigzags stacked on top
of each other?  I like to think of them
as an army of “V”s standing shoulder to shoulder.  Each “V” is an individual knit stitch.
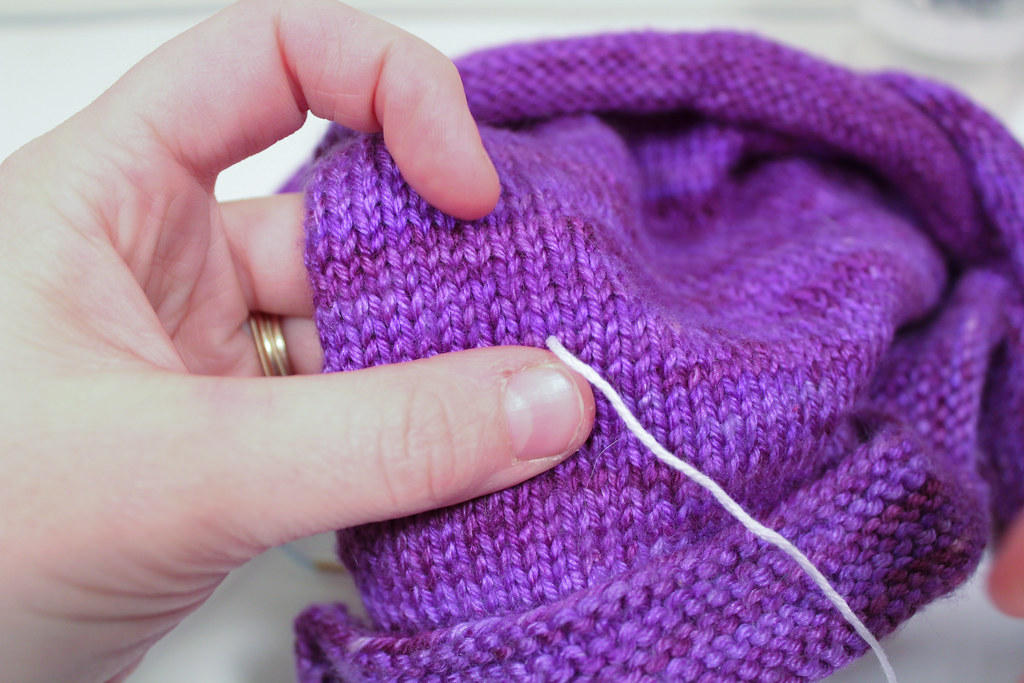
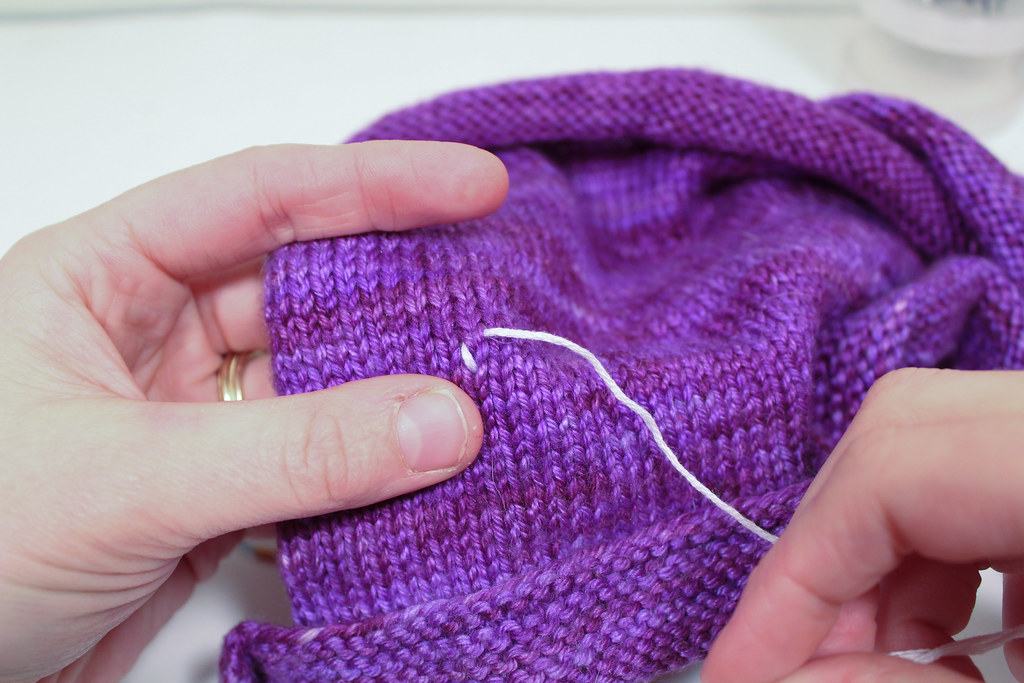
Thread your needle and insert it in the base of the V where
you want to start your design.  I find it
easiest to work from the bottom left and work up and to the right, though your
mileage may vary.
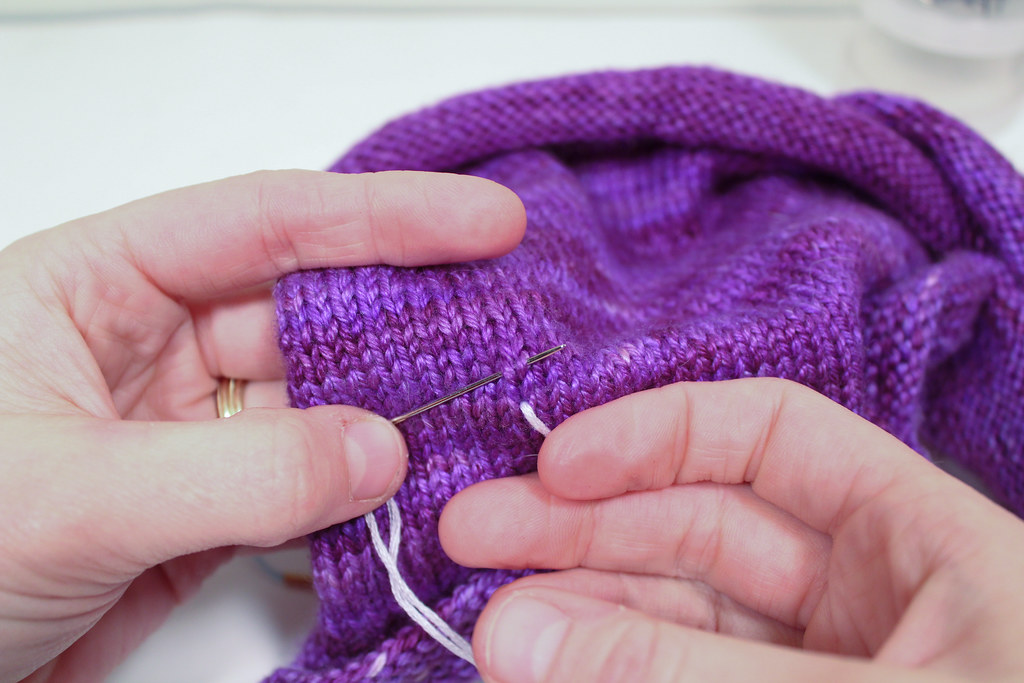
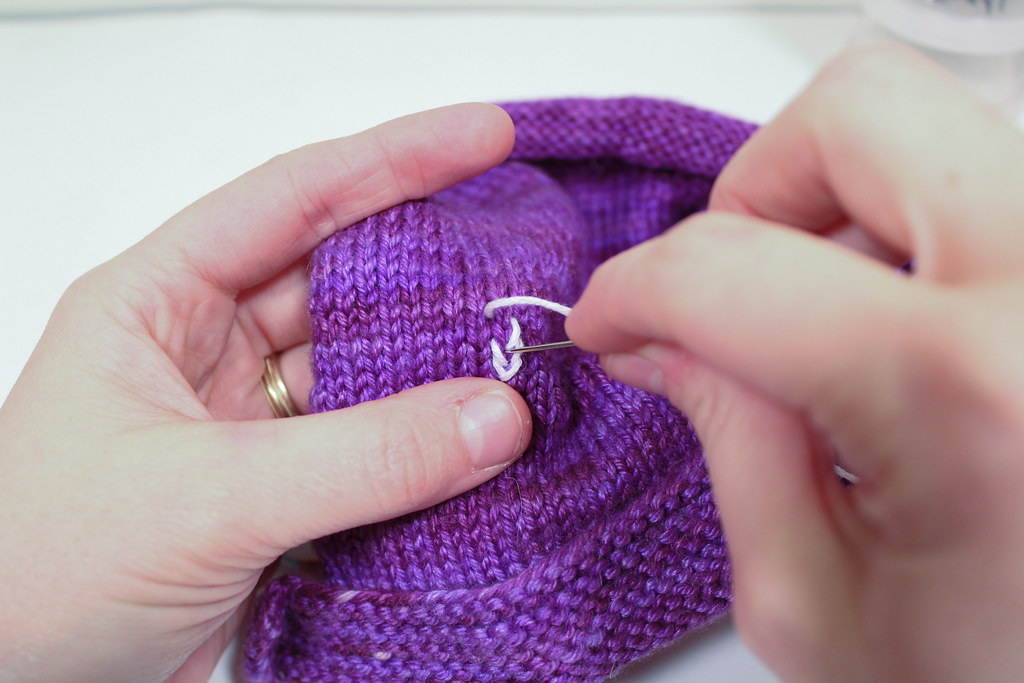
Now, insert your needle down through the top of one side of
the “V” and up through the other side, like so.
Pull through.
Finally, insert your needle into the base of the “V” again,
where you first came up through the fabric. If you need to, adjust the tension
of the yarn so it matches the tightness, or gauge, of the rest of the fabric.
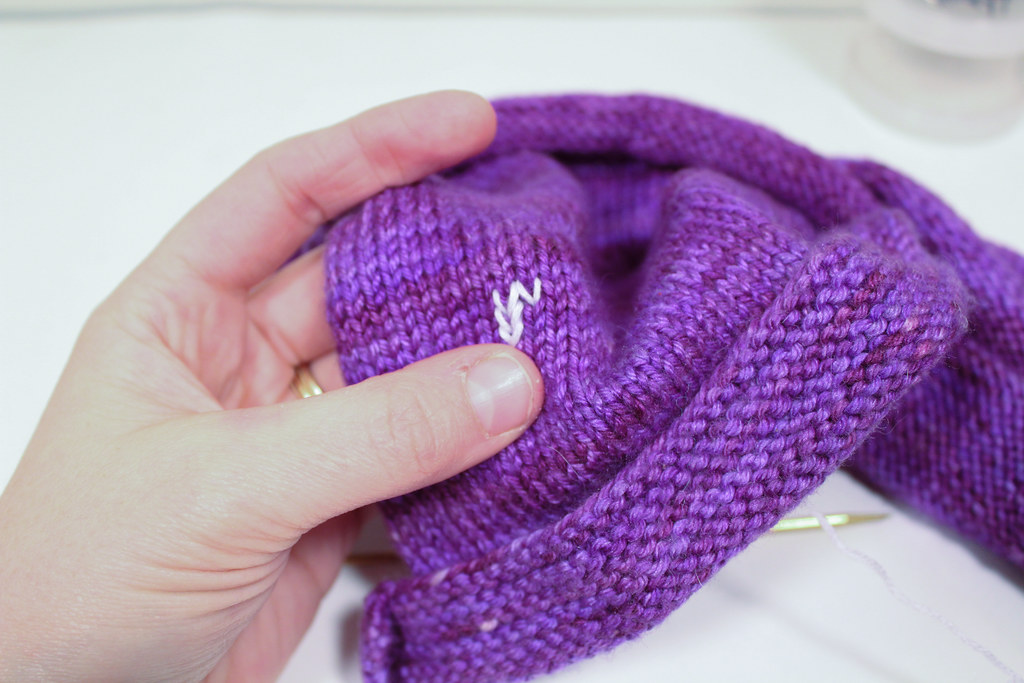
For the second stitch, repeat the same steps for the “V”
directly above the first.  Repeat as many
times as needed.
Now, you may have need at some point to move over to the
next column of stitches. Simply do the same steps for the “V” Directly next to,
or diagonal to, the one you last worked.
If you need to, you can skip a column or two of stitches to
get to the next place you want to embroider. 
Just remember to leave enough extra yarn so the knit fabric can
stretch.  I recommend that you try to
avoid skipping columns if possible.

When you are finished, weave in your ends.  The back of your knit won’t look quite as
nice as the front, but it still should be tidy.
Love these posts and don’t want to miss a single one?  Sign up for a weekly email digest of my blog posts!

Historic Stitching: Vintage Crochet Made New

This is a post that, in its original form, appeared for Jordana Paige’s blog.  The rights reverted back to me, and in light of the publication of Time Traveler

Photocredit: Sockupied
My Historically inspired socks

, I thought it was a timely blog post.  I’ve made updates and edits to this post, as time has reflected.

One of my favorite things to do when I get a little bit of time
(between teaching crochet and knit, designing, and writing) is to peruse
historical patterns.  It’s a fortunate
function of our digital age that the casual crocheters or knitter can, with a
click of their mouse, find a wealth of historical magazines online.
Now, I will not claim that reading historical patterns is
for everyone.  For one, half of my
digital collection is in French and German, and it can sometimes be a little
challenging to translate patterns.  And
even in English, patterns can trip the casual reader up, using the same name
for different stitches, or using terms that are no longer commonly used.
There exists a wealth of resources where you can find
historical patterns online.  To get you
started, I have listed some of my favorite resources:
http://archive.org/
(search knitting or crochet)
If you’re willing to do some digging in other languages, there’s a few other resources I can recommend:
http://gallica.bnf.fr/
(French, search tricoter and crochet)
http://www.collectionscanada.gc.ca
(Canadian, search knitting, crochet, or tricoter)
When you go to any of them, just search “crochet” or
“knitting” or “needlework.”  You’ll find
tons of patterns, though unlike modern resources, knitting, crochet and needlework
were not so sharply divided.  In the same
magazine you might find a pattern that calls for use of crochet, knitting and
sewing.  I think that’s half of the fun.
If you are willing to squint at some old etchings and
problem solve when things don’t quite go right, it can be a fun way to get a
glimpse of the past.  And maybe you’ll find some new patterns to love!
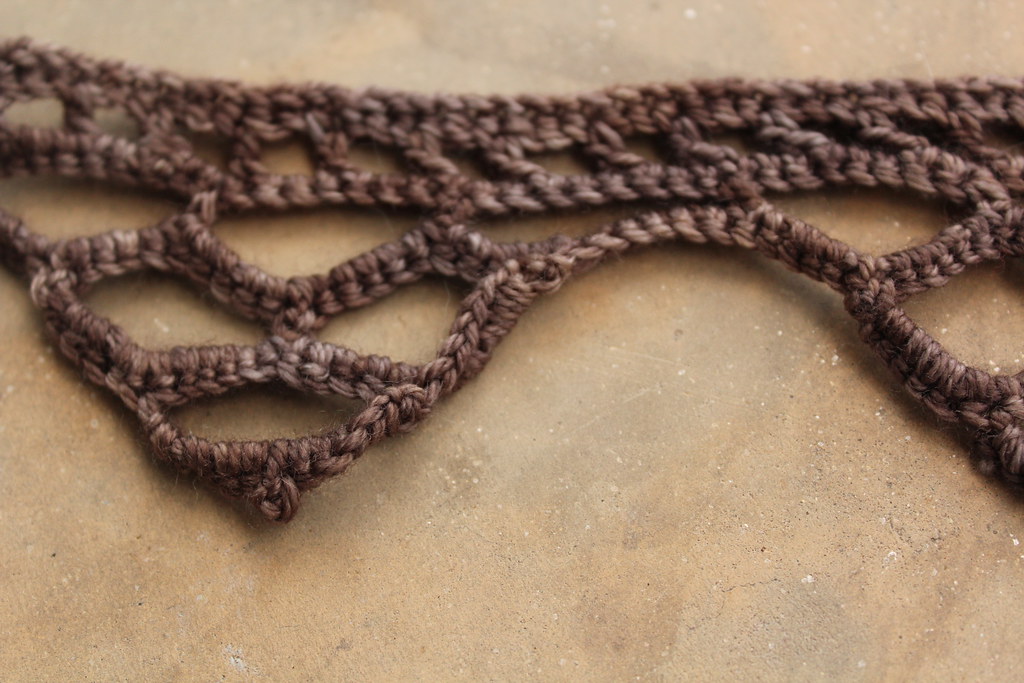
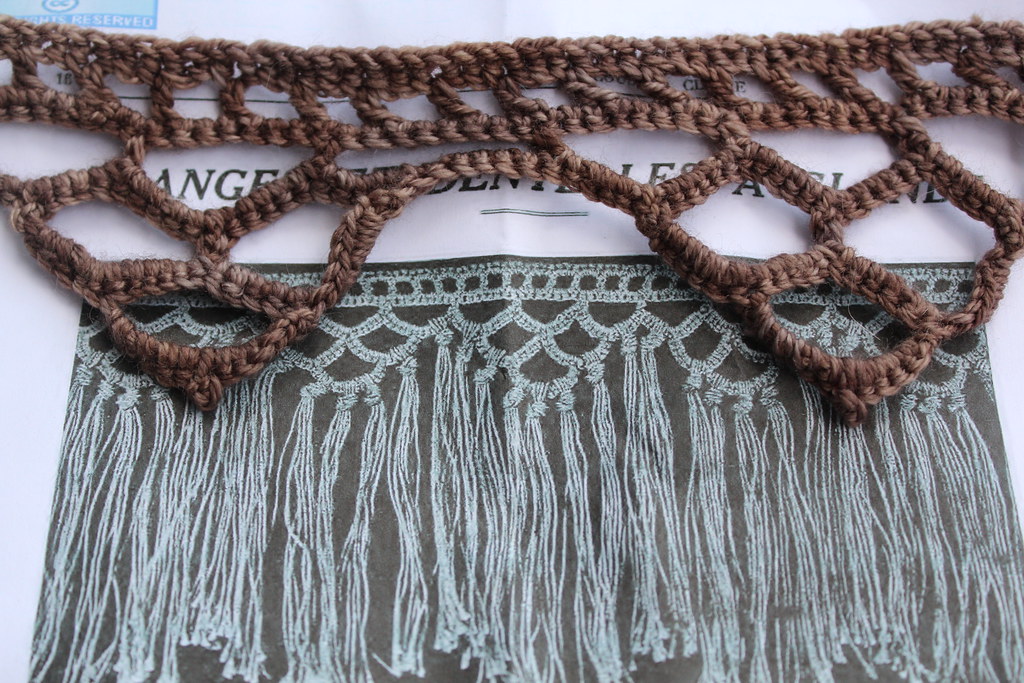
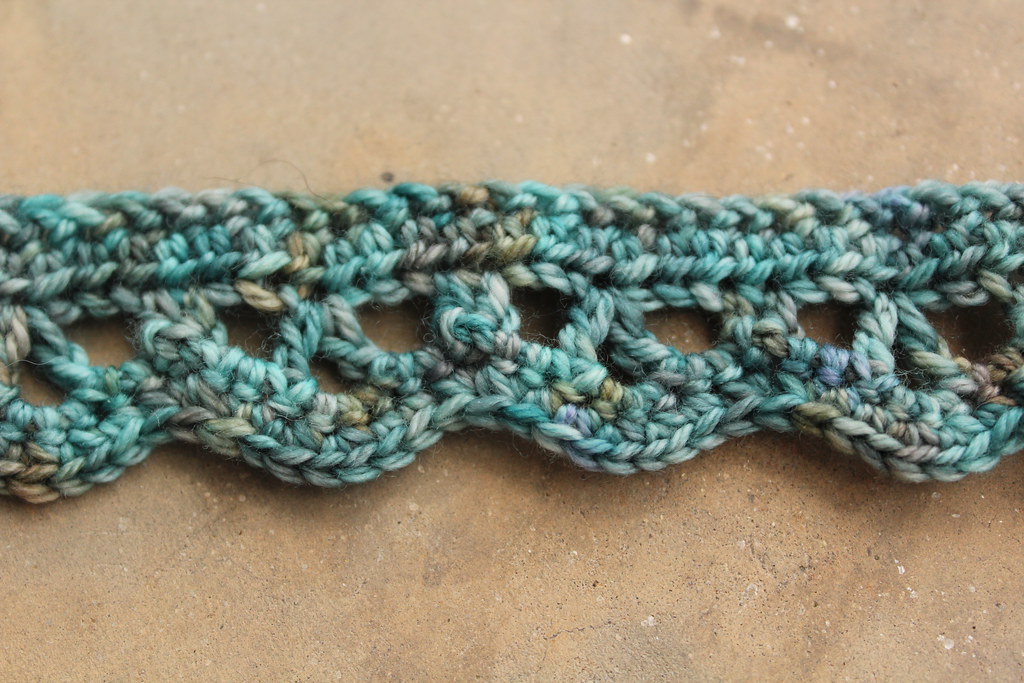
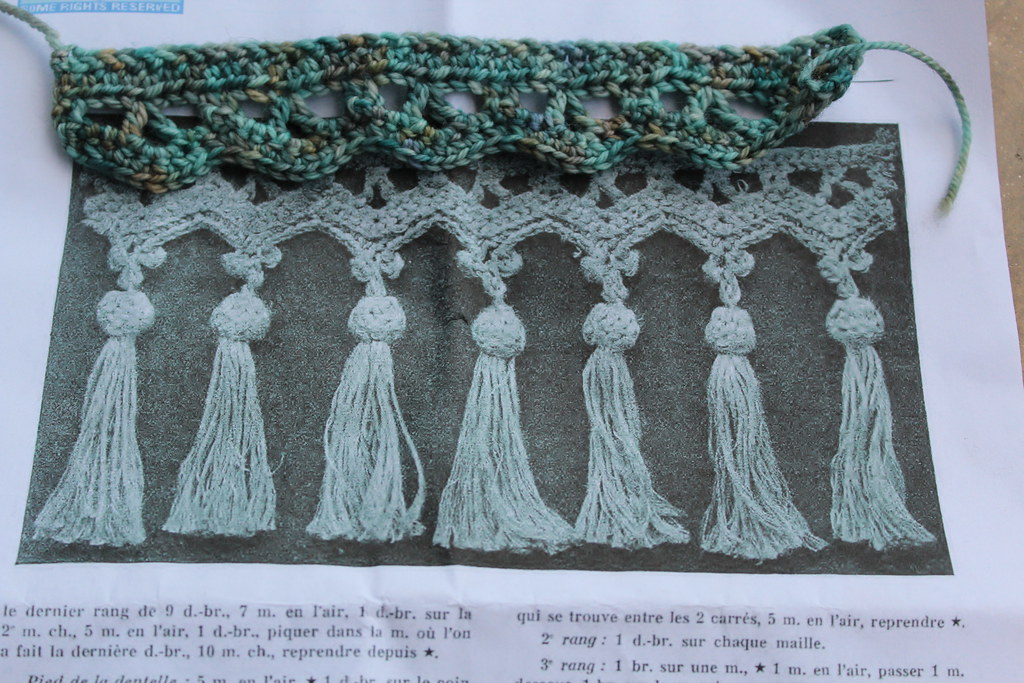
Below, I’ve written out two edgings that I adapted from “Le
Crochet, Album de Travaux de Cousine Claire.” 
These come from page 16-18 of the book, in the section titled “Franges
Et Dentelles a Glands.”  While the
original patterns served as an influence, I couldn’t help but add my own twist!
 

Tiers and Hills
Tiers and Hills
Ch 24 +1
Sample with original pattern.
Ch 2, sk 1st st, hdc all sts afterward. Turn
Ch 3 (counts as dc), *ch 2, sk 2, dc into next st. Repeat
from * until end. Turn
Ch1, sc into every st. Turn
Ch1, sc into 1st st. ch 8, sk next 7 sts, sc into next st.
Repeat until end. Turn
Ch 1, sc 11 times into ch 8 space. Repeat until all ch 8
spaces are worked. Break yarn and turn.
Sk 1st 5 sts, join yarn to 6th sc. *Ch 8, sk next 10 sts, sc
in 11th st, repeat from * once more. Turn, * sc 11 sts in ch 8 space, repeat
from * once more. Break yarn and turn.
Sk 1st 5 sts, join yarn to 6th sc. Ch 8, sk next 10 sts, sc
in 11th st. Turn, sc 11 sts in ch 8 space. Break yarn and turn.
Repeat steps 7 & 8 over next 3 ch bumps. Continue until
entire edging is worked.
 

Lacy Chevron
Lacy Chevron
Ch multiple of 7

Sample with original pattern.
Hdc in each st. Turn.
Ch 2 (counts as hdc) *hdc in 1st st, ch 2, sk next 2 sts, dc
in next st, ch 2, dc in same st, ch 2, sk next 2 sts, hdc in next st. Repeat
from * until end of row. Turn.
Ch 1, *sc in 1st hdc, sc twice in ch 2 sp, sc 4 in next ch 2
sp, sc 2 in next ch 2 sp, sc in hdc. Repeat from * until end of row. Turn.

Ch 1, *sc2tog in next 2 sts. Sc in next 2 sts. 2 sc in next
st, 2 sc in next st, sc in next 2 sts, sc2tog. Repeat from * until all sts are
worked.