MENU

November and December Roundup

I feel like it has been a sprint to the finish from the first week in November until now, but I can say with pleasure, as of the wee hours of today, I have all my deadlines finished until after the New Year.  The finishing is done, the patterns are mailed off, presents are wrapped, Holiday cards are distributed, and I am officially very tired.

A collection of November and December Pictures

In case you missed it the first time, the most popular posts from the last 2 months:
Tutorial: Mattress Stitch or Ladder Stitch
The Importance of Customer Relationship Management
Crochet Reinforcing for Steeking
Warning Signs Your Family Heirloom is Falling Apart
A Helpful Tool to Set in Sleeves

Over at Jordana Paige’s Blog:
The Low Down of Plies: What to Know when Choosing Yarn
What you need to know to set a Zipper in a Sweater
Tutorial: Re-sizing a Finished Sweater 
Changing the Sleeve Silhouette on a Set in Sweater
Magic Sleeve Recipie

Things I pinned.

May you have a Happy Holiday!

Crochet Reinforcing for Steeking

Have you ever tried to steek?

When I was first learning to steek, I felt I couldn’t cut into my own knitting.  So I went to the thrift store and got a slightly-felted really ugly sweater and went to town.  I practiced sewn-reinforcement steeking, hand-sewn reinforcement steeking, crochet reinforcement steeking, and a variety of other ways.  By the time I was done, not only was I really good at cutting between stitches, but I’d gotten comfortable enough cutting knitting without even reinforcing – just going for it!

When people ask me what my favorite type of steeking is, I normally say crochet.  This is not because I think it is the best way to steek (sometimes some crochet reinforcements can be a bit tight), but mostly because I’m lazy.  I nearly always have a crochet hook and thin yarn/thread on hand.  A sewing needle I sometimes have to go searching for.

There’s two ways of working a crochet reinforcement to steek.  The first is to work a row of single crochet around the column of stitches to either side of where you are going to cut.  While easy to do, it is sometimes hard to make sure you catch all the “floats” on the back of the work when you do this method.

The second way is my preferred way of working a crochet steek, though it is sometimes a bit of an inflexible reinforcement.  This involves working a row of slip stitches on either side of the planned cut.  Below is the process of how I normally proceed.

But before I speak to that, a note about yarn.  Below, I have a sweater that I’m cutting.  The yarn is made of cotton, which has very little ability to “grip” itself to prevent it from unraveling, which I why I felt it necessary to add reinforcing.  Still, if I wanted to go with a reinforcement that was more stable than crochet, I would have hand sewn.  I made the decision to use a crochet reinforcement because the sweater had been washed multiple times, and the yarn was essentially “blocked” into place.  When I removed the seams, there was very little fraying unless I actively tugged at the stitches.  It’s always best practice to block your piece before steeking.

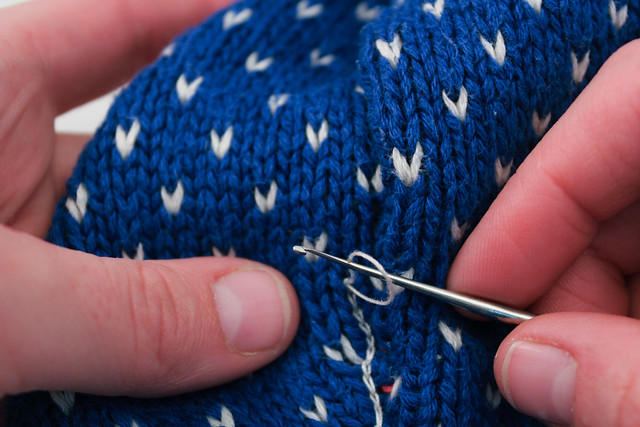
First, take a look at your knitting.  Look at a column of stitches.  They often look like a bunch of V’s stacked on top of each other. If you pull the “V” apart, you’ll notice between each V is a bar running along the back.  Each time you work a slip stitch, you want to be sure you are catching the bar, and any floats that are behind the bar.

My crochet hook here is pointing to the bar I’m going to go around.

You want to join your yarn so that your hook and 1st loop is on the front of your work, and the yarn is on the undersides, as shown below.

Crochet Steeking, knit, crochet hook, yarn, hands
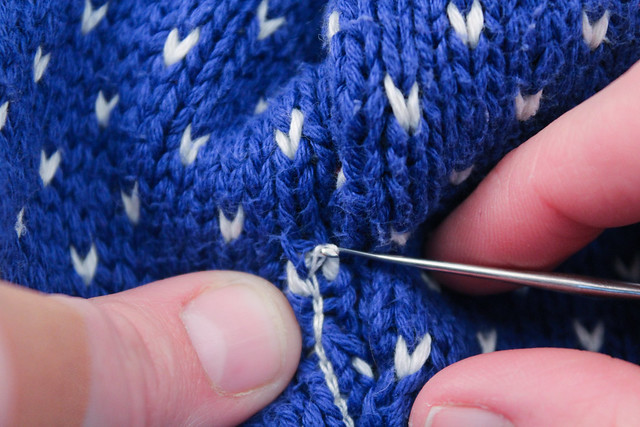
Adjust your loop so that it’s the right size to go over the bar between the knit stitches above.  Put your hook in, grab the thread from behind the work (this takes some practice, especially if you’ve never used a crochet hook before), and draw a 2nd loop up to the front of the work.
Crochet, Reinforcing, Steeking, knit, crochet hook, yarn, hands
You’ll see that the first loop is below the bar between the knit stitches, the second loop is above the bar between the knit stitches.  Pull the second loop through the 1st loop, so there is only 1 loop on the needle.
Crochet, Reinforcing, Steeking, knit, crochet hook, yarn, hands
You’ll continue this process all the way up the fabric.
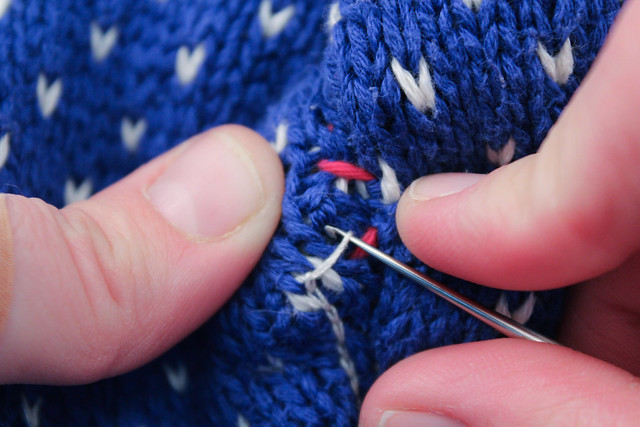
Sometimes you’ll have to shift over a column or a row, or both.  Below, I’m going over and up 1 st (to the right)for my next crochet slip stitch.
Crochet, Reinforcing, Steeking, knit, crochet hook, yarn, hands
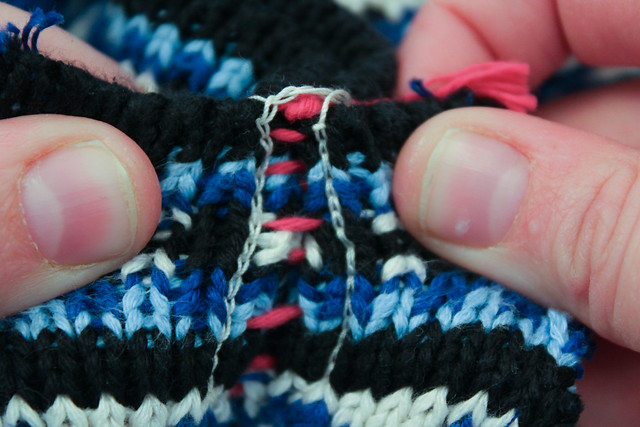
After you are done, you should have a row of crochet stitches running up each side of where you plan to steek.  For my purposes, I was cutting away fabric to tailor a sweater, and had stitches running to either side of my basting stitches. 
Crochet, Reinforcing, Steeking, knit, crochet hook, yarn, hands, basting stitches
My thumbs, below, are on the 2 sides that are to be cut away.
Crochet, Reinforcing, Steeking, knit, crochet hook, yarn, hands
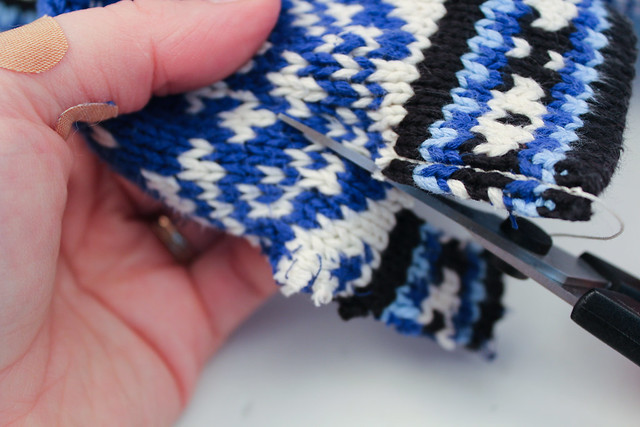
And then Finally, I cut!
Crochet Reinforcing, Cutting Knitting, Steeking, Colorwork, Stranded Knitting

Another Helpful Tip for Swatching: Steeking Round Swatches for Photography

Look closely at the edges of this swatch.  Notice anything interesting?

Yes, the edges are cut.  And the sides are steeked with my sewing machine.  This is a trick I use when I need to make a swatch in the round, because I don’t like running strands of yarn behind the swatch.  Instead, I work the swatch in the round and then cut it in half, block it and then photograph it for my design submission.

Then, when I’m putting the design submission together, I crop the ugly edges out, leaving just the beautiful picture to show the design idea.  You can also do this for when you are measuring a gauge swatch for in the round.

How do you save time when you are working up a design swatch for a submission?