MENU

Acrylic Hotpads… not a good idea. Let this be a warning.

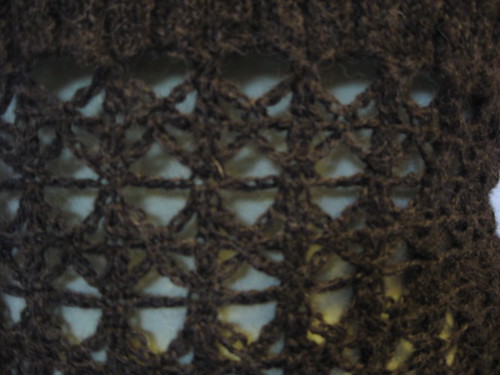
This was my fault, really.  Michael and I inherited some really ugly hotpads from a friend a couple of moves ago.  They were the ones that make me wince – acrylic, with plastic in-between to hold it stiff.  Done is some ugly colors.

Now I’ve known from an early age that hotpads should never be acrylic, for the same reason acrylic isn’t good for anything that might be exposed to heat.  It melts, and actually can catch fire, and when that plastic gets on skin, it sticks, and melts into you.  I once actually got rather badly burned on my leg because I got a piece of burning plastic stuck to me.  It took a long time to heal.

This once was a hotpad.

So I’ve always kept these “hotpads” away from the ones that you use to get things out of the oven, and in fact, had always stashed them away where someone wouldn’t get themselves into trouble using them.  I really couldn’t bear to throw them away… after all, they represented somebody’s hard work, but I really didn’t want to use them either.  However, in the last move Michael was the one unpacking, and he, unbeknownst to me, put them with the other hot pads.

You can see where this was going.
Melted.  Use wool, people!
Last night, he used one to put beneath a hot tray.  It melted to the tray and stuck, and Michael didn’t notice.  He put the tray, with the hotpad still stuck to it, back into the oven.

This is what happened.

So, let this be a warning.  Acrylic.  It’s plastic.  It catches fire, and has a relatively low melting point.  This is why you don’t want to use acrylic for hot-pads.  Or why you don’t want to use it for anyone or anything that might get exposed to extreme heat.  Or for people who might accidentally catch fire.

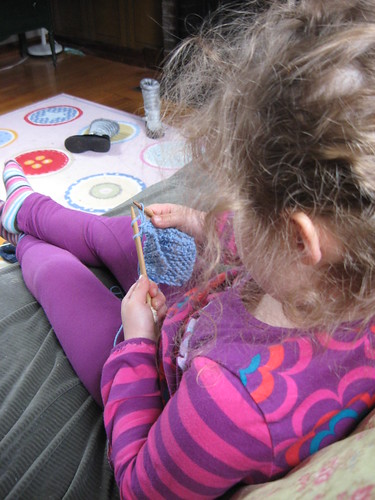
Use wool.  It is fire-retardant (why wool blankets are thrown over burning people), burns at a higher temperature, and if it does catch fire, stops burning as soon as the source of heat is removed.  Or use plant fibers, which will burn once the heat is removed, but at least char, and don’t actually melt into you.

Finally, it’s a really bad idea to throw an acrylic blanket over a person who is on fire.  Just sayin’.

Why I don’t Recomend Adults to take Knit/Crochet Lessons with their Children

Children behave better when their parents aren’t there.  I’m sorry, but in my experience, it’s true.  Children listen to me better when the parents aren’t there dividing their attention.

Adults are dividing their attention between their children and learning themselves.  It’s just gotta be said.  Knitting and Crochet aren’t easy.  You gotta concentrate on what you are doing.

And the final reason?

Adults get frustrated when their children learn faster than them.  And typically?  Children learn much faster than adults.  Children are hardwired to learn, and they do it well.  It’s hard for adults, who are used to teaching their children, to be the ones that are struggling beside their younger classmates.

And I know, there are exceptions to this rule, but… it happens often enough it bears saying.

The Relationship Between Chains and Stitches

So today’s post is going to talk about a concept I like to talk about with my students.  For some of you it’s going to seem pretty obvious, but for some of you (and me, for a long while) it was a concept that I struggled with.

In crochet, it’s a convention that at the beginning of a row or round, where you need to get to the height of the next row, you chain a certain amount of stitches to replace the stitch.  The relationship goes something like this:

Sl st- 0 chains
Single Crochet – 1 chains
Half Double Crochet – 2 chains
Double Crochet – 3 chains
Treble Crochet – 4 chains
Double Treble Crochet – 5 chains
… and so on a soforth.
The key is, you can not only substitute chains for a stitch, but you can substitute stitches for chains.
Take this granny square.  It’s pretty standard, but you see where the single crochets are (hint: The red x’s)  They are worked into the 3rd chain.  I do this instead of doing a slip stitch to finish off the row.
Confused?
Let’s see if I can explain it with pictures.
Things making more sense now?  Let’s compare the two different types of Granny Squares.

Leaves!

192Hello Yarnies,

I must share this.  This wonderful, wonderful green.

It is really, really spring.  We have left winter behind us.  I know, we’re weeks into spring, but I’m so heady with it not being winter, that each change is a new revelation.

For instance, my morning bikeride is actually cooler than it was a week ago.  The reason why?  A week ago there were not leaves on the trees.  Now there are, and the shadows cast in the morning don’t help me get any warmer.

I’m actually quite OK with that.

In other news, I’ve got a few things in the works.  Swirl socks are being test-knit, another pattern is in the pipeline, while another one is still in the designing stages.  Plus, I think I’m going to be able to score a dress form over the summer, which will make sizing things SO much easier.
197
There’s also a whole bunch of things going on behind the scenes that I can’t really talk about, but just you wait.  As they come to fruition, I’ll keep y’all posted.

Until later,
Jen

First Spring in Metro DC (Or, An Exuse to Post a Bunch of Pictures)

2010 October and November 030Yarnies,

April 042As you might have gathered by now, I’m a Northerner at heart.  Or as Boyfriend would say, a Yankee.  I grew up always looking forward to Fall.  It’s when school started, and I loved school.  I loved the leaves turning color, I loved the hot summers and the smell of sticky popsicles and suntan lotion fading to the crisp Fall air with the hint of woodfires.  To me, Fall was characterized by going hot cider doughnuts, apple picking, cider in my thermos instead of milk on Fridays, and making leaf crowns.  Fall is prime crafting time.  I could never understand why people might love Spring instead of Fall.

205And then I met the Boyfriend, who couldn’t imagine me liking Fall instead of Spring.  Spring had always been mud for me.  Mud, and weather that was not quite Winter but not really early Summer either.  My first Spring in North Carolina in 2006 was a revelation.

But let me tell you.  North Carolina has nothing on DC when it comes to Spring.  I’ve never seen so many flowering trees in my LIFE.
March 173
201I’ve been taking pictures like crazy, because if I tried to tell anyone back north about this, they’d fall off their seats laughing.  There’s been times where our few flowering trees haven’t started until the beginning of Summer.  Never mind in April.  April we’re still sometimes getting snow.

Yarnies, if you’ve never been to DC in the Spring, you have to come.

Maybe the Boyfriend has something.  I’m not saying I like Spring more than Fall, but maybe, just maybe, I can understand why some people like Spring better than  Fall.

What’s your favorite season?

Classes and CAL!

Hello Yarnies,

So I’ve mentioned before that I have a Crochet along starting this Thursday.  It’s looking to be a good turnout, so you should buy your yarn and come out.  It’s at the Yarn Spot from 6:30-7:30, more details here I’m still dithering about what yarn to use, but it’s promising to be a great turnout.

In other news, I’ve been working on a few new designs, and should have some peaks at them shortly.  Also, the first Beginner Crochet of the season started on Sunday, and my students are making some great progress.  Jen, from Magpie Knitter Designs, is in the class and she posted some great photos.  Also, you should check out her stash.  It’s epic.

Until later,
Jen

I think I know Better than You. And you, too.


Confession time, Yarnies.

They do say it’s good for the soul.

I have a problem. The Yarn Harlot has this problem too (she details it in Free-Range Knitter), so I at least can claim to be in good company. You see, I think I know better than the designer. I come across this pattern. It’s wonderful! It’s georgous! It’s pratically sublime.

But, dear designer, there’s just this one problem. There’s this bit that’s a little niggly, and I’m sure I could fix it just so. Or alternatively, you have me doing a technique I hate. Like seaming. So I’ve decided that I’m just going to fix the pattern a bit, just so I don’t have to do some seams. It’ll take a bit of math, and I understand why you think that it would be better to do the seaming… after all, not every reader you encounter is going to be as smart to modify the pattern like I did, and if you did it in the round you’d have to write at least another page and a half of instruction. And I know you were trying to save the trees/fit into a magazine page limit, so I’ll forgive you.

I’ll just do it in the round.

But oh, I just realized, when I do it in the round this little bit of lace, here, suddenly gets that much more complicated. That’s all right. I’ll just chart it out so that I can do it in the round.

But while I’m at it, why don’t I just add a little bit of a cable/extra picot/pineapple here? I think it would look lovely. But hmmm, then it throws this off balance. That’s all right, I wasn’t too fond of that design feature anyway.

… and so on.

Well, I’m having a bit of that problem with the Josephine Pullover by Annette Petavy. It’s beautiful. Both delicate and wonderful. And I’m managing to modify myself in knots.

Let me first make note, the pattern as written is perfect. Do it as she tells you and you will be fine. In fact, you might even be more than fine. You might even finish it before I do. And I started it in… oh, October 2010.

You see, first I thought that it would look gorgeous in an alpaca instead of the Rowan wool you recommended. After all, it’s discontinued anyway. I figured that the ribbing would make sure it would hang right, and because the panels down at the bottom are lace, it won’t pull on the fabric overly much.  You see, I know that alpaca can sometimes drape different than plain sheep’s wool. And since the Alpaca I was using was lace also, instead of the fingering you recommended, I figured that would be okay. I’d just make the largest size… and a slightly smaller needle, and it would fit (eventually) as I lost weight with weight watchers.  So far, I hadn’t modded too much.

I figured the designer knew best, so instead of trying to do the knitted portion in the round, I actually did it in two pieces and seamed them together.  This is a big deal.  I really don’t like seaming.  But I figured I would follow the pattern anyway.

… 

Okay, since we’re going for a full confession, I did add a selvage edge, because I was planning to crochet them together instead of sewing them. Hey, ever tried sewing with alpaca yarn? (that’s loosely plied?) Not something I would want to do. So I (Mostly) followed the directions for the knitting part. Oh, and I know the directions said to do the front and the back with the crochet before you seam them, but I decided against that also.

Then came the crochet lace part. Oh, my. The designer wanted me to do the front and the back, crochet the front and the back lace patterns, and then seam up crochet. My my, no way am I doing that. I don’t like how it looks. I’ll just do the knitting part, and then I’ll do the crochet part in the round. MMKay? Great.

… Except, I have more hips than the model. And I don’t like how the pattern did the shaping in the lace, so I’m modified how I did increases. And I’m going to add more increases because I have rather gifted hips.

So far so good.

Well, maybe not. You see gentle readers, the pattern wanted me to do the sleeves from the wrist up. And then seam those to the shirt. If you thought I’d be willing to do that for the bottom half of the shirt, I’m definitely not doing that for the sleeves. I decided I was just going to start them at the shoulder and go down.

But now I’m stalled.

What?  But you modified everything else, this should be easy, right?

Stay tuned… and I’ll explain.

So I’m in a Bit of a Quandary…

Learning New Skills

Hello Yarnies,

So this post starts with a story. Occasionally I take care of a sister duo, Sweetness and Light. Sweetness is four, and Light, is around… oh, seventeen months.

2011 February and March 229Sweetness is a rather independent and precocious soul. When learning to walk she would refuse anyone’s help, waving hands away, and shout “SELF! SELF!!!” One day while we were drawing, I looked over to her paper and asked her what she was drawing. I expected something like, “a rock.” Instead I got, “The Lunar Landing Module.”

If you haven’t guessed, her father is an engineer.

Well, since I’ve been taking care of her, occasionally she’ll see me knitting or crocheting. We’ll have a moment when Vivi is playing and she is drawing, and I’ll pull out my knitting or crochet to get a few rows done.

Well, lately she’s been asking me to teach her. You see, at first I taught her finger knitting, but she quickly realized that what she was doing, and what I was doing were two different things. She wanted to knit with sticks.

Okay, I said, fine by me. I really didn’t expect it to go anywhere. It’s the rare four year old that has the hand-eye coordination, never-mind the concentration to learn to knit.

So I taught her. She practiced for a few minutes, got tired of it, and decided to make up her own knitting. Which basically meant that she made a big tangle of the yarn.

That was fine. I only gave her a little yarn. (yes, I’ve been through this before. Children will use all of any resource you give them. That’s why my mother only kept three band-aids in the box, and the rest somewhere else. Otherwise, we’d want ALL the band-aids for our dolls) I really didn’t expect her to even sit through the whole lesson.

Well, a week passed, and I was knitting again. She asked to help. I put her hands on the needles and just let her watch as I worked.

Another week passed, and again Sweetness asked to learn. It had been a rough day, and I might have responded a little harshly. I said it wasn’t fair to me to teach her if she wasn’t willing to practice. She said she would.

I taught her, at first, her just placing the needles and me wrapping the yarn. And then, at her insistence, I taught her how to wrap the yarn so she could do it herself. And now? She’s still working on it. It’s slow, and she only does three or four stitches, but when you’re that young? That’s quite a feat.

My point is, when you learn a new skill, things can often look rocky. Take my Kitchener stitch. For the longest time, every time I needed to do it I had to look it up. When I do it now, I always accidentally purl the first few stitches, and then have to undo it and correct it again. But one day in the future I will whip out something that needs to be Kitchenered, and I will remember it, right away.

And it will be a beautiful day.

The other lesson: indoctrinate children to knitting/crochet early. It can keep them occupied and quiet for a full five minutes.

Gauge, and Shaping

Dear Yarnies,

So you have this great pattern. You’ve got the perfect yarn for it, and your gauge is spot on. You stitch it, either in crochet or knitting, exactly as it says. And yet, it doesn’t fit the way you want it to when you’re done. You look at the model and you realize that well, she’s a bit more endowed than you in the bust, and a bit less gifted in the hips. It occurs to you that MIGHT be the reason why the darn thing rides up in the hips and bags around your armpits.

Well, I’m here to tell you something.

That can be avoided. Remember how I was talking to you about Gauge? Well, your gauge can really help you when working on that sweater.

You see, your gauge tells you how many stitches you get per inch. Think of it as a ratio. (I know, we’re getting back to some math from long ago, but bear with me). Say you get 10 stitches in an inch. You have a sweater pattern that has you knitting 30 inches around your bust, so you should have 300 stitches around your bust. But your waist is only 25 inches around. that means going from your bust to your waist you have to somehow decrease to 250 stitches.

You could do those decreases gradually, or you could do them all at once. (Most people choose to do them gradually, or it would cause ripples in your knitting. But if you want ripples, do those decreases all at once.)

Then, your hips are 35 inches around. So from your waist to your hips you need to increase 100 stitches.

In it’s most simple form, that is what shaping is. Now, you can get complicated by then figuring out that in between your bust and your waist you have 5inches, and you need to decrease 50 stitches. So you can figure that each inch your decreasing 10 stitches. You get 5 rows to the inch, so each row your decreasing by 2 stitches.

Do the same type of math for your waist to your hips.

The same thing would work for crochet.

So, Yarnies, make your gauge work for you, so you can have stunning pieces of work to show me!

Until later,
Jen