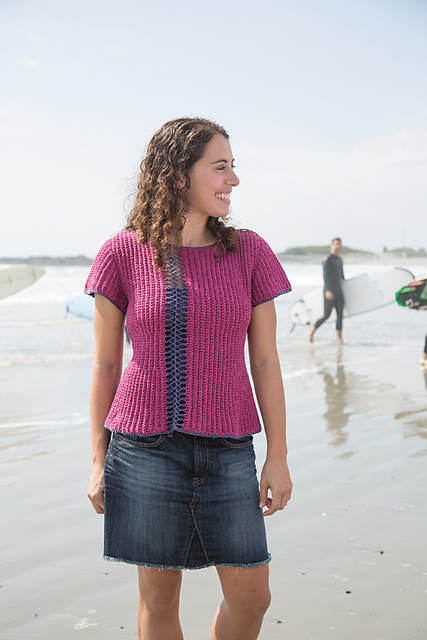
MENU

Newport Classic Elite #9213, Surf’s Up

Newport

by Jennifer Crowley

Published in: Classic Elite #9213, Surf’s Up
Craft: Crochet
Category: Sweater → Pullover
Published: February 2013
Yarns suggested: Classic Elite Yarns Classic Silk
Yarn weight: DK / 8 ply (11 wpi) 
Gauge: 16 stitches and 8 rows = 4 inches in Sc-blo with larger hook
Hook size: 3.5 mm (E), 4.0 mm (G)
Yardage: 945 – 1485 yards (864 – 1358 m)
Sizes available: S (M, L, XL, 2XL, 3XL)
Finished Measurements: 36¼ (38¼, 40¾, 43¾, 45¼, 47¾)”
Yarn Requirements: 6934 Plum MC 6 (7, 7, 8, 9, 10) balls, 6910 Soft Violet 1 ball

Ravelry Link

This pattern is available for instant download for $6 through Ravelry
You can also buy it on the Classic Elite Website.
It is also part of the pattern booklet #9213, Surf’s Up, by Classic Elite Yarns.  You can buy it in print at your local yarn store.

Debating if this pattern is for you?  Got questions?  This is the place to ask them.  Over the next few days I’ll be talking about the design process for Newport, including a great story about when I first saw the shots of the sample on the model.

See the Pretty?

Barberpole Striping over at FreshStitches

Stacey Trock is one of my crochet heroines.  I think her crochet animals are really cute – but what I admire even more than her design sense is her business model and brand.  She is really great at making quality: be it posts on her blog, patterns, or items she sells by commission.  Everything she does is well thought out and through.

So a couple of weeks back when Stacey asked for blog submissions for her blog, I put on my big girl pants, screwed up my courage and overcame my fangirlsquee and emailed her.  She was very kind, and accepted two of my blog proposals.

I meant to post about it the day it came out, but I’ve been under the weather, barely able to do the things that keep things running around here.

So anyway, I’m telling you about it now.  The other day I was over at Stacey’s blog talking about Barberpole Striping (or Helix Striping) in crochet.  It’s a fun little tutorial, and as soon as I get my lightbox fully built, I hope to follow up with a series of video tutorials.

Go over and take a look!

Some other pictures from our trip, because I have a deadline today

This is a travel swift I inherited from my great-grandmother, who was a knitter, crocheter, tatter, designer (yes! she published patterns in newspapers, we have the clippings!), sewer and all around handy woman to have around.  The swift clamps to the surface, and then folds out, as you can see.  It’s not quite a tabletop swift, not quite an umbrella swift.  The best part about it though?  It all comes apart, and can be stored in a computer bag.

When I’m traveling, it makes a lot of sense for me to keep things in the skein until I need them.  So I bring the swift along, and hand ball them.  With the swift, I can hand ball something in less than ten minutes, if I had Michael hold his hands out or tried to do it off my lap, it’d be a 30 minute process, at least.

As you can see, I’ve taken over our sleeper compartment as I set things up. I got some great comments from the Sleeping Car Attendant, and also made a friend who was a knitter.

It was great, we geeked out over socks.

Well, wish me luck as I punch out the last of the pattern today.

Do you have anything that makes traveling with your yarn easier?

Rosemary’s Hedwig

I realized that I had never gotten pictures of the Christmas gifts I made for everyone up – I had to keep them a secret because well… I wanted them to be a surprise.

Rosemary, my sister, this year got a crochet Hedwig.  I’ll quote my notes from my Ravelry project page directly, because I think it says my thoughts about the project well:

Heavily modified Nelson the Owl from Fresh Stitches, almost so that I wouldn’t call it the same pattern.

Different stitch count on body (made body taller and less squat), different stitch count on head, I didn’t do the color changes, sized up the wings, improvised my own feet so that there were toes, no ears, made eyes slightly different. Basically, only thing not changed was the nose. Changed the colors to reflect a snowy owl, made body white, didn’t do the color changes on the belly, embroidered little “ends of feathers” onto body after crocheting, made an improvised set of feet with bobbles turned inside out. 

I still think Hedwig looks funny without ear tufts, but since snowy owls don’t really have ear tufts, that’s fine. She reads as a snowy owl, so I guess that’s all that is needed.

Rosemary was happy with it, and all told the project probably only took me at most, probably 5 or 6 hours all told.  And that was mostly because I was being fiddly with things, and ripped back a few times to adjust.  I also was fiddly with the seaming, so that took longer.  I still think it came out crooked, but don’t tell my sister that – Rosemary has a “thing” about objects being symmetrical  and I already had to convince her the eyes really WERE the same size.

Students Report In!

One of my favorite things about being a knit and crochet designer and teacher is that I get to live vicariously through my students.  Because most of the projects I crochet are original designs, I rarely get to try out the beautiful other patterns other designers produce.

Elizabeth was one of my students a couple of months ago.  She came into The Yarn Spot for some private lessons, and simply took to crochet like water.  Next thing I know she’s taking some of my intermediate classes and showing me pictures like the ones to the side.  In a few short weeks she had made ENTIRE AFGHANS.  Do you know in the many years I’ve been crocheting how many afghans I’ve made?  One.  And I stopped early because I got bored.  It ended up being a lap blanket.

So in order to get in the head of someone so incredibly motivated and excited about her new hobby, I “invited” (really demanded, but she’s accommodating) Elizabeth to answer a few questions about herself.

Look how large this blanket is.
Why did you want to learn to crochet?
Two of my favorite things in my home are a blanket made by my Aunt Connie for me when I was little and a housewarming gift made by one of my best high school friends. Both are chevron crocheted blankets. I have always felt loved cuddling up in them and being able to make those for other people in my life is what made me want to learn to crochet. 
What would you like to learn to do in the future?
I’ve just started making stuffed animals, and I think, at some point, lace might be fun. But really I have no idea 🙂
Quick! Your’re an animal, what are you?
Penguin.
What type of projects are you looking at doing next?
I am working on a stuffed dinosaur and a blanket for my husband. I think, after that, I would like to try a project involving granny squares. 
What words of encouragement would you say to other crocheters or knitters who are just starting out?
Keep at it! It’s fun and relaxing all at the same time, and the feeling of finishing up your first gift is amazing. 

This one is pretty big too – and the stitches came out beautiful and regular.

Thank you Elizabeth for stopping by and showing off your hard work.  Keep at it!

Are you a student that’s taken one of my classes or a private lesson?  Have you ever worked one of my patterns?  I’d love to hear about you and your projects!

*Pokes Head Out*

I don’t know about anyone else, but the holidays are taking their toll.  It seems like a confluence of tasks for planning the wedding, plus general Christmas preparations has left me with very little brain to spare.

Last weekend I had a class at The Yarn Spot teaching students to crochet stuffed animals.  The class used three of Fresh Stitches patterns: the brontosaurus, the cow, the turkey and the owl.  Out of a class of four, two chose the brontosaurus, one the owl and one the cow.  I brought a half-finished cow to the class so everyone could see the different techniques I was teaching.

I tried to get a picture of the half-finshed cow, but I had a day where I couldn’t seem to take a decent picture.  There was always either a thumb or cat in the picture.  The best I could do was this:

I’ve been working hard in the background on some neat developments.  I hope to be able to announce them before the end of the year – but we’ll see.

Anyhoo, the cow has gotten me on a crochet kick, and I’ve got some cute little stuffed animals planned for various people over Christmas.  I also have a deadline four days before Christmas, so we’ll see how that goes.  *Wince*

How are you preparing for the New Year?

Working on Charts

One of the harder things to do when I’m designing is charts, for both knit or crochet.  Especially for crochet. Because both mediums are so flexible, computers seem to have problems with charting these things out.

It looks okay now, but it took 3 programs to get this the way I wanted it –
And it could still be better.

I’ve been working on updating some of my class worksheets, and have been working on crochet charts to go along with them.  In order to get a chart the way I want it, I often have to hop between several different programs, because none of them do quite what I want them to do.  Such is the way of life I guess.

Has there been a time where you’ve had to kludge something together technologically to get it to do what you want?  What did you have to do?  How did it turn out?

The Design Process, Part 2, The Sample

The other week, I realized that many people who knit or crochet never give much thought to how they get their patterns.  Over the next few weeks I’ll be talking about the different phases of the design process, and why a pattern might not be as perfect as you wanted it to be.  Last week I talked about the concept.  Today I’ll be talking about the sample, and in the next few weeks you’ll read about the pattern, photography, and layout.

A designer has pitched an idea to a publisher, and signed a contract to create a pattern and sample.  What happens next?


If a designer is lucky, they have a fair amount of time to turn around and create a design, but this isn’t always true.  It takes time for a publisher to choose a yarn to send the designer and for the mail to get it to them.  A designer might also be working on several different designs at once, and have to juggle multiple competing deadlines.  Turnaround time can be anything from 2-8 weeks.

Sample for my Teaching Socks


Wait, you say.  A designer doesn’t always get to choose the yarn?  Normally, a designer gets some say in what yarn they want to use: the weight and fiber content.  However, they don’t always get to choose what color or even necessarily the yarn line they want to use.  While a designer might pitch to a company for a project to be made in a wool worsted weight yarn, the company might change it to a cotton wool blend, if that is the yarn that needs to be highlighted in the issue.  If a designer is working for a magazine, the magazine might have agreements with specific yarn companies to feature their yarn in the magazine.  


Alternatively, if a designer is working for a company, the specific yarn style or color they might want may be in the process of being discontinued or not longer available.  There’s the expectation of a certain amount of flexibility on the part of the designer.

When the designer receives the agreed upon yarn, it then becomes time for them to craft a sample.  The sample is the garment that will be used to publicize the design.  It’s a way for a designer to work the pattern, and figure out if there are any problem areas.  The sample will be used for the photography for the design (like the pictures at Tangled of my Sunburst Shawl), and afterwards, it might be shipped out to yarn stores in a trunk show or displayed at booths at trade shows.  Sometimes, after all this is done, the designer might get back their sample.  Most times however, it remains the property of the publisher.


A variety of methods and processes exist in how a sample gets made.  Some designers write the pattern first, and then use the sample to test out the pattern they have written. 


Sometimes the designer writes the pattern, and then hires someone else to make the sample for him or her.  Some designers aren’t able to write a pattern without making the sample, so make the garment and take careful notes as they go, so they can write the instructions afterwards.

Hopefully, the pattern goes as expected.  It might not.  The designer might find that the yarn they swatched with works out differently than the yarn they were sent.  Perhaps they find that the yarn is too heavy for the construction of their sample, or the stitches don’t like they way the designer expected.  Occasionally the way the garment is made has to be totally re-imagined.


The last part of working the sample is the finishing.  This might involve blocking the individual pieces before putting them together.  It might mean adding buttons, blocking out lace, weaving in ends, adding zippers, lining, or fixing imperfections.


It’s then time to move toward writing the pattern.

I’ve always been terrible about keeping secrets

So when I was little, the two people you didn’t tell a secret to in our family was my father and myself.  My father, because he’d keep your secret, but would drive you bonkers in the process.  (Imagine just before Christmas  and my father going to us kids, “I know what your mother got you.  You want to know?” Us kids: No.  “Are you sure?  It’s really cool.”  Us kids: we want it to be a surprise.  “You want me to give you a hint?”)  And there was me, who just simply couldn’t keep exciting news in me.  Not because I told either, just because my whole demeanor changes when I know something nobody else knows.

Well, I have to share this with you.

Today I got an e-mail from Classic Elite Yarns, specifically Susan Mills.  She had some questions for me about my design.  But attached to her e-mail was what simply has become the highlight of my day.  Some proof pictures of my Crochet Top that is going to be published this spring.

They’re simply beautiful.  Gorgeous in a way I can’t describe.  It’s such a clutch to the heart to see something you worked so hard on made more beautiful – Classic Elite Yarns really has a great team that does the photoshoots.

I can’t show you the pictures – not until they are published – but I’ll tell you it’s in a lovely rose and purple.  And it’s in Classic Silk.

Not the color, but it is the yarn.

And that’s all I can give you.

The Design Process, Part 1, the Concept

The other day, I was talking to a customer about a pattern from a magazine.  She had come across a line that was particularly confusing in one part of the pattern, and had come into The Yarn Spot seeking help.  We puzzled over it for a couple of minutes and managed to get the pattern sorted out.

“I wish she had explained it better.  You would think that a designer would have more pride in their work,” I remember her saying.


At the time I let the comment stand, because I could understand her frustration. But as a designer, I felt it would be interesting to talk about patterns and their relationship with designers. The design process encompasses much more than just the pattern in the magazine.  It is entirely possible that the designer explained the pattern better in their original draft, but because of space constraints a magazine editor revised it to be shorter, sacrificing clarity.


Over the next few weeks I’ll be writing about the different aspects of what happens during the design process, and why a pattern might not be as perfect as a designer wanted it to be.  I’ll be discussing the design process by further breaking it down into 5 key phases (though they don’t always come in this order):  the concept, the sample, the pattern, photography, and layout.


Let’s start with The concept.


Approximately 4-9 months before a magazine, booklet, book, or single pattern is scheduled to be published, the publisher sends out a design call.


Depending on the company and the medium, a design call can be many different things.  For a magazine, the editors might have a specific  theme in mind for that issue of the magazine.  For example, Interweave Knits might be doing a spring issue, and they want transitional pieces, pieces that move from winter to spring.  A yarn company might publish booklets to go with their yarn.  Classic Elite Yarn might want something that highlights their Classic Silk yarn.  Someone might want to publish a book all on designs inspired by Sherlock Holmes.  Once a publisher decides on the details of their theme, they put out a press release (most commonly via e-mail or on their website {like here, here or here) talking about the types of designs they want.  

Drawing of Idea

Designers are constantly keeping track of these different design calls.  Not all design calls fit all designers, so most pick and choose which ones they want to work on, and which ones they have the most likely-hood of getting into.


Swatch

Then, designers dream.  They draw pictures, create swatches, do math and layout schematics.  Finally they come up with an idea that they think it will work.  They put together everything they have done – the drawing, swatches, schematics and submit it to the company.


Designers then wait, work on other projects they have under contract and plan other ideas for design calls.  If their proposal is what the editors are looking for, they are notified with an offer to publish their design.  A contract with the publisher is signed, and the publisher (most often) sends them the yarn to create the sample.


But that’s another post.