MENU

First Spring in Metro DC (Or, An Exuse to Post a Bunch of Pictures)

2010 October and November 030Yarnies,

April 042As you might have gathered by now, I’m a Northerner at heart.  Or as Boyfriend would say, a Yankee.  I grew up always looking forward to Fall.  It’s when school started, and I loved school.  I loved the leaves turning color, I loved the hot summers and the smell of sticky popsicles and suntan lotion fading to the crisp Fall air with the hint of woodfires.  To me, Fall was characterized by going hot cider doughnuts, apple picking, cider in my thermos instead of milk on Fridays, and making leaf crowns.  Fall is prime crafting time.  I could never understand why people might love Spring instead of Fall.

205And then I met the Boyfriend, who couldn’t imagine me liking Fall instead of Spring.  Spring had always been mud for me.  Mud, and weather that was not quite Winter but not really early Summer either.  My first Spring in North Carolina in 2006 was a revelation.

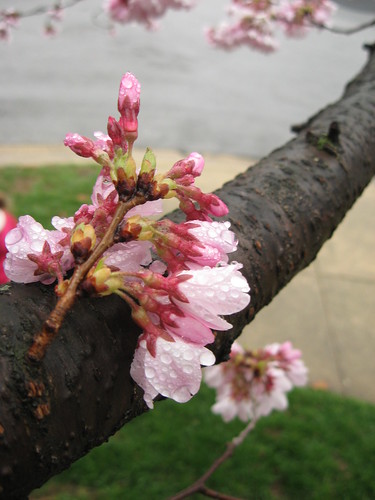
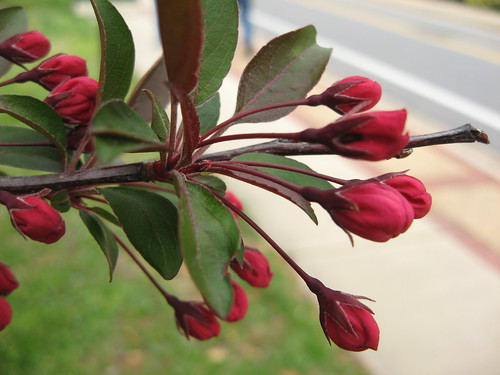
But let me tell you.  North Carolina has nothing on DC when it comes to Spring.  I’ve never seen so many flowering trees in my LIFE.
March 173
201
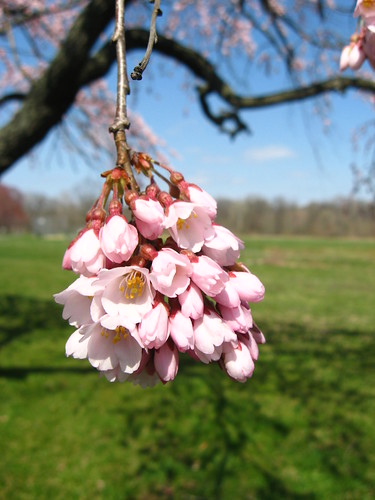
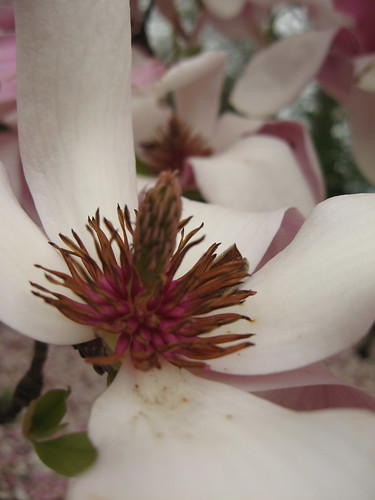
I’ve been taking pictures like crazy, because if I tried to tell anyone back north about this, they’d fall off their seats laughing.  There’s been times where our few flowering trees haven’t started until the beginning of Summer.  Never mind in April.  April we’re still sometimes getting snow.

Yarnies, if you’ve never been to DC in the Spring, you have to come.

Maybe the Boyfriend has something.  I’m not saying I like Spring more than Fall, but maybe, just maybe, I can understand why some people like Spring better than  Fall.

What’s your favorite season?

I think I know Better than You. And you, too.


Confession time, Yarnies.

They do say it’s good for the soul.

I have a problem. The Yarn Harlot has this problem too (she details it in Free-Range Knitter), so I at least can claim to be in good company. You see, I think I know better than the designer. I come across this pattern. It’s wonderful! It’s georgous! It’s pratically sublime.

But, dear designer, there’s just this one problem. There’s this bit that’s a little niggly, and I’m sure I could fix it just so. Or alternatively, you have me doing a technique I hate. Like seaming. So I’ve decided that I’m just going to fix the pattern a bit, just so I don’t have to do some seams. It’ll take a bit of math, and I understand why you think that it would be better to do the seaming… after all, not every reader you encounter is going to be as smart to modify the pattern like I did, and if you did it in the round you’d have to write at least another page and a half of instruction. And I know you were trying to save the trees/fit into a magazine page limit, so I’ll forgive you.

I’ll just do it in the round.

But oh, I just realized, when I do it in the round this little bit of lace, here, suddenly gets that much more complicated. That’s all right. I’ll just chart it out so that I can do it in the round.

But while I’m at it, why don’t I just add a little bit of a cable/extra picot/pineapple here? I think it would look lovely. But hmmm, then it throws this off balance. That’s all right, I wasn’t too fond of that design feature anyway.

… and so on.

Well, I’m having a bit of that problem with the Josephine Pullover by Annette Petavy. It’s beautiful. Both delicate and wonderful. And I’m managing to modify myself in knots.

Let me first make note, the pattern as written is perfect. Do it as she tells you and you will be fine. In fact, you might even be more than fine. You might even finish it before I do. And I started it in… oh, October 2010.

You see, first I thought that it would look gorgeous in an alpaca instead of the Rowan wool you recommended. After all, it’s discontinued anyway. I figured that the ribbing would make sure it would hang right, and because the panels down at the bottom are lace, it won’t pull on the fabric overly much.  You see, I know that alpaca can sometimes drape different than plain sheep’s wool. And since the Alpaca I was using was lace also, instead of the fingering you recommended, I figured that would be okay. I’d just make the largest size… and a slightly smaller needle, and it would fit (eventually) as I lost weight with weight watchers.  So far, I hadn’t modded too much.

I figured the designer knew best, so instead of trying to do the knitted portion in the round, I actually did it in two pieces and seamed them together.  This is a big deal.  I really don’t like seaming.  But I figured I would follow the pattern anyway.

… 

Okay, since we’re going for a full confession, I did add a selvage edge, because I was planning to crochet them together instead of sewing them. Hey, ever tried sewing with alpaca yarn? (that’s loosely plied?) Not something I would want to do. So I (Mostly) followed the directions for the knitting part. Oh, and I know the directions said to do the front and the back with the crochet before you seam them, but I decided against that also.

Then came the crochet lace part. Oh, my. The designer wanted me to do the front and the back, crochet the front and the back lace patterns, and then seam up crochet. My my, no way am I doing that. I don’t like how it looks. I’ll just do the knitting part, and then I’ll do the crochet part in the round. MMKay? Great.

… Except, I have more hips than the model. And I don’t like how the pattern did the shaping in the lace, so I’m modified how I did increases. And I’m going to add more increases because I have rather gifted hips.

So far so good.

Well, maybe not. You see gentle readers, the pattern wanted me to do the sleeves from the wrist up. And then seam those to the shirt. If you thought I’d be willing to do that for the bottom half of the shirt, I’m definitely not doing that for the sleeves. I decided I was just going to start them at the shoulder and go down.

But now I’m stalled.

What?  But you modified everything else, this should be easy, right?

Stay tuned… and I’ll explain.

Learning New Skills

Hello Yarnies,

So this post starts with a story. Occasionally I take care of a sister duo, Sweetness and Light. Sweetness is four, and Light, is around… oh, seventeen months.

2011 February and March 229Sweetness is a rather independent and precocious soul. When learning to walk she would refuse anyone’s help, waving hands away, and shout “SELF! SELF!!!” One day while we were drawing, I looked over to her paper and asked her what she was drawing. I expected something like, “a rock.” Instead I got, “The Lunar Landing Module.”

If you haven’t guessed, her father is an engineer.

Well, since I’ve been taking care of her, occasionally she’ll see me knitting or crocheting. We’ll have a moment when Vivi is playing and she is drawing, and I’ll pull out my knitting or crochet to get a few rows done.

Well, lately she’s been asking me to teach her. You see, at first I taught her finger knitting, but she quickly realized that what she was doing, and what I was doing were two different things. She wanted to knit with sticks.

Okay, I said, fine by me. I really didn’t expect it to go anywhere. It’s the rare four year old that has the hand-eye coordination, never-mind the concentration to learn to knit.

So I taught her. She practiced for a few minutes, got tired of it, and decided to make up her own knitting. Which basically meant that she made a big tangle of the yarn.

That was fine. I only gave her a little yarn. (yes, I’ve been through this before. Children will use all of any resource you give them. That’s why my mother only kept three band-aids in the box, and the rest somewhere else. Otherwise, we’d want ALL the band-aids for our dolls) I really didn’t expect her to even sit through the whole lesson.

Well, a week passed, and I was knitting again. She asked to help. I put her hands on the needles and just let her watch as I worked.

Another week passed, and again Sweetness asked to learn. It had been a rough day, and I might have responded a little harshly. I said it wasn’t fair to me to teach her if she wasn’t willing to practice. She said she would.

I taught her, at first, her just placing the needles and me wrapping the yarn. And then, at her insistence, I taught her how to wrap the yarn so she could do it herself. And now? She’s still working on it. It’s slow, and she only does three or four stitches, but when you’re that young? That’s quite a feat.

My point is, when you learn a new skill, things can often look rocky. Take my Kitchener stitch. For the longest time, every time I needed to do it I had to look it up. When I do it now, I always accidentally purl the first few stitches, and then have to undo it and correct it again. But one day in the future I will whip out something that needs to be Kitchenered, and I will remember it, right away.

And it will be a beautiful day.

The other lesson: indoctrinate children to knitting/crochet early. It can keep them occupied and quiet for a full five minutes.

Gauge, and Shaping

Dear Yarnies,

So you have this great pattern. You’ve got the perfect yarn for it, and your gauge is spot on. You stitch it, either in crochet or knitting, exactly as it says. And yet, it doesn’t fit the way you want it to when you’re done. You look at the model and you realize that well, she’s a bit more endowed than you in the bust, and a bit less gifted in the hips. It occurs to you that MIGHT be the reason why the darn thing rides up in the hips and bags around your armpits.

Well, I’m here to tell you something.

That can be avoided. Remember how I was talking to you about Gauge? Well, your gauge can really help you when working on that sweater.

You see, your gauge tells you how many stitches you get per inch. Think of it as a ratio. (I know, we’re getting back to some math from long ago, but bear with me). Say you get 10 stitches in an inch. You have a sweater pattern that has you knitting 30 inches around your bust, so you should have 300 stitches around your bust. But your waist is only 25 inches around. that means going from your bust to your waist you have to somehow decrease to 250 stitches.

You could do those decreases gradually, or you could do them all at once. (Most people choose to do them gradually, or it would cause ripples in your knitting. But if you want ripples, do those decreases all at once.)

Then, your hips are 35 inches around. So from your waist to your hips you need to increase 100 stitches.

In it’s most simple form, that is what shaping is. Now, you can get complicated by then figuring out that in between your bust and your waist you have 5inches, and you need to decrease 50 stitches. So you can figure that each inch your decreasing 10 stitches. You get 5 rows to the inch, so each row your decreasing by 2 stitches.

Do the same type of math for your waist to your hips.

The same thing would work for crochet.

So, Yarnies, make your gauge work for you, so you can have stunning pieces of work to show me!

Until later,
Jen

So, let’s talk about Gauge

Dearest Yarnies,

As you all probably know, I started off as a crochet-person (I always find that crocheter looks a little odd to me, but there’s not a better way of writing it, I suppose). I came to knitting when I crochet a pair of socks, and wore them to death. I was much disappointed when I tried to darn then, because most of the ways to darn socks are for knitting. I resolved then and there that I was going to knit my next pair of socks, so that I could darn then when they wore out.

Yes, I know. Crazy reason to start knitting, but then, there you go.

It was around this time that I began to realize that knitting, and crochet seem to involve a more math than I was willing to admit. Now I embrace it, but as an English major, I found this offensive to my creative soul.

And so, I rejected one of the most valuable tools in a crafter’s arsenal.

The Gauge Swatch.

Now, for those of you who do knot not know what a Gague Swatch, it’s a small piece of knitting or crochet that you make before you make the big project. The advantage is this: you can figure out what needle you need to pair with the yarn (to get a tighter or looser fabric). You can also find out how many stitches you get per inch, which is a very important piece of information to know.

Your gauge works like this:

Thicker yarn with a larger needle = less stitches to the inch
Thinner yarn with a smaller needle = more stitches to the inch

Typically, on a ball band, there will be a recommended needle size that goes with the yarn, and the ball band on the yarn will tell you how many stitches you will get, approximately, if you use that yarn with the needle they recommend.

Thicker yarn with a smaller needle = less stitches to the inch and a tighter fabric (socks or washcloths)
Thinner yarn with a larger needle = more stitches to the inch and a looser fabric (lace or a drapey fabric)

Now, other things can influence the quality of your fabric (like what the yarn is made of or the stitches you are working), but these are good guidelines to keep in mind.

Later we will be talking about Gauge, and how it relates to shaping your project. We’ll also talk about the great information you can learn from your swatch.

So this probably isn’t the best time to start blogging again.

So I’ve decided to start blogging the day before I go on a weekend trip to the boyfriend’s family farm… probably not the best time to start blogging, but it needed to be done.

In the upcoming weeks I’ll be talking about the projects I’m working on, the classes I’ll be teaching, and the things going on in my life. Nothing terribly out of the ordinary, but it’ll be exciting, I promise you!