MENU

Shenandoah Valley Fiber Festival!

Tomorrow morning I’ll be heading off to the Shenandoah Valley Fiber Festival – one of my favorite to teach at!  Last year was my first year teaching at the fairgrounds, and I loved every moment of it.  The staff are great; the venue is lovely, and the drive to Berryville is a pleasure.

Last year I was so busy teaching both days that I barely had time to breathe.  This time I’ve got a little more flexibility –  I’m teaching one class on Saturday afternoon, and another Sunday morning.  Mr. Turtle and I talked about going apple picking on the way home.

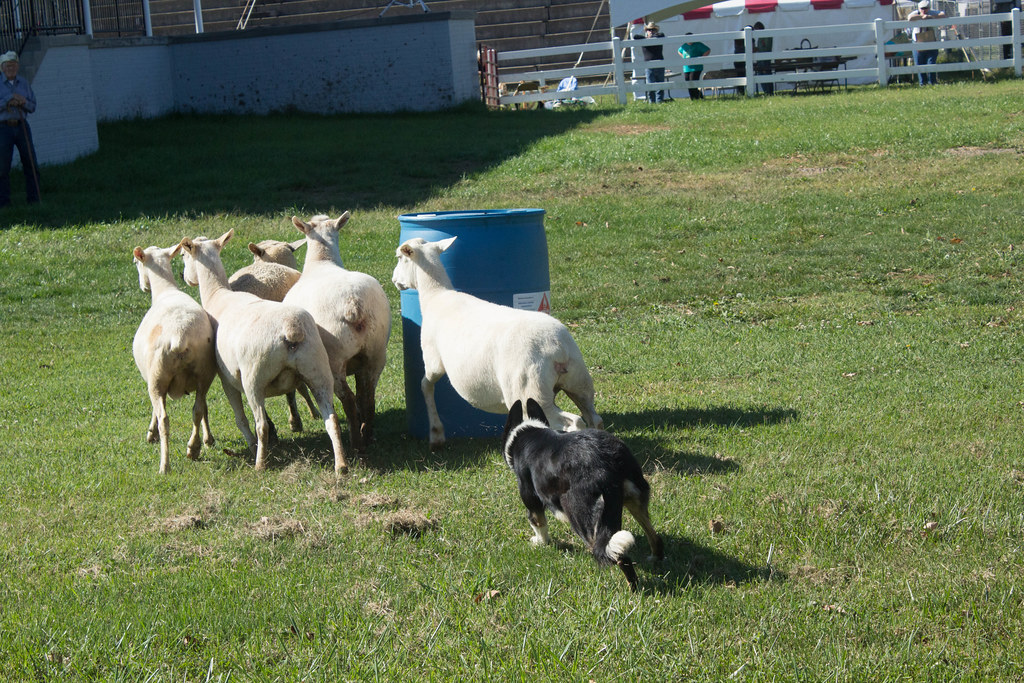
If you’ve never been to SVFF, it’s a great fiber festival for kids, and a feast for the eyes for stitchers.  Last year Mr. Turtle was fascinated by the sheep dog demos.

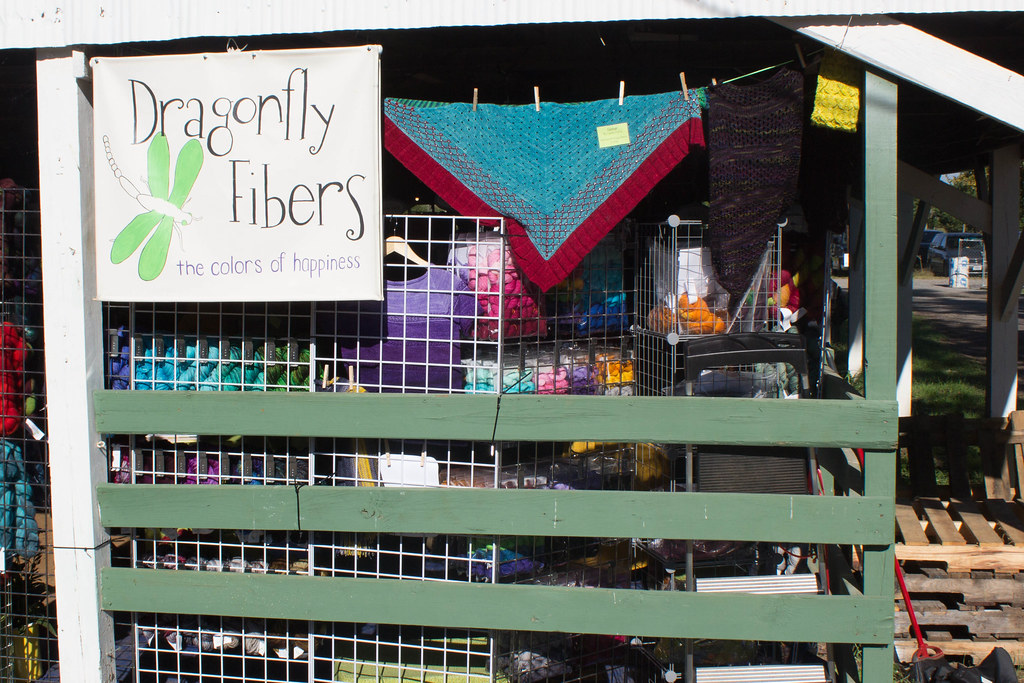
I was glad to see some of my favorite vendors.  When you do the fiber festival circuit, various vendors become your friends, and it’s good to see them again and catchup for a few minutes between sales or setting up.  If you go to the festival, go and look up Turtle Made – a company that makes the most clever turkish spindles.  Also check out Dragonfly Fibers – they’ve been the lovely sponsor of a few of my designs!

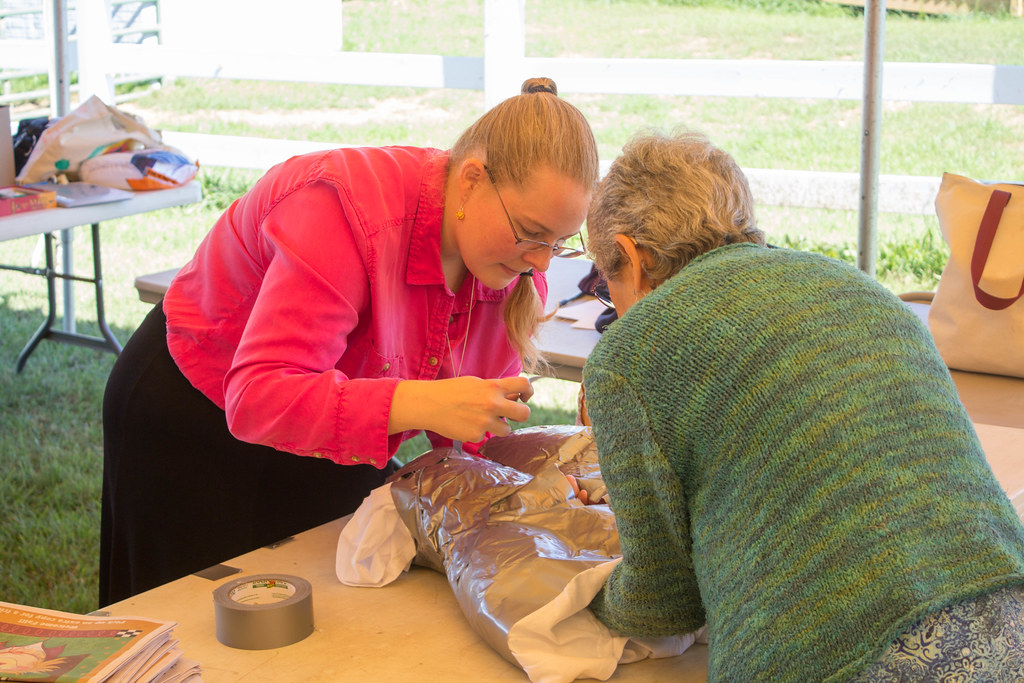
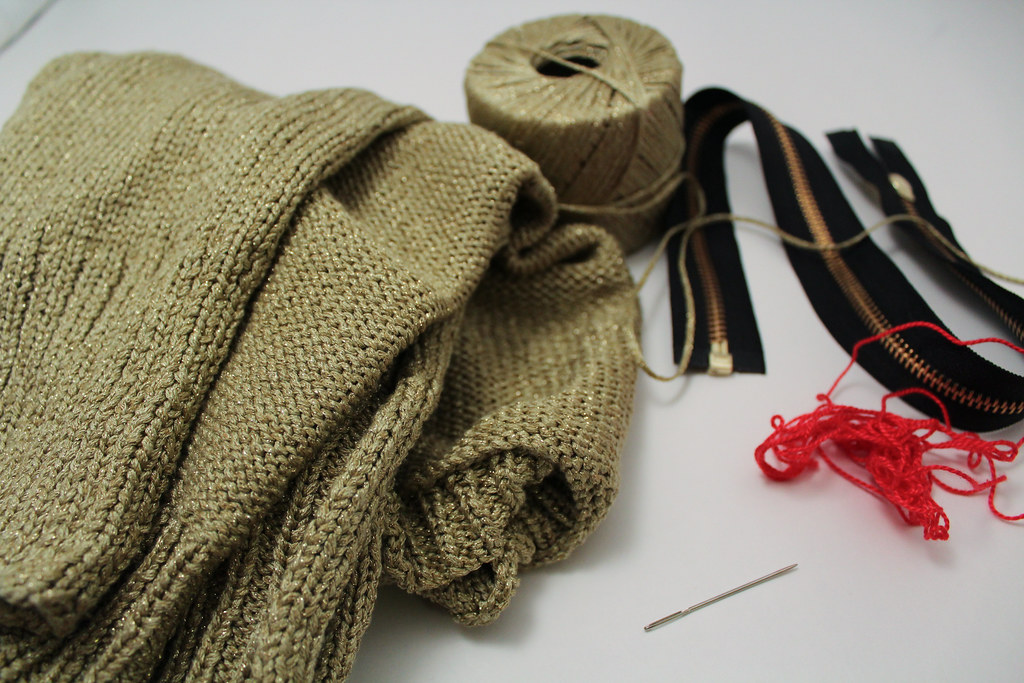
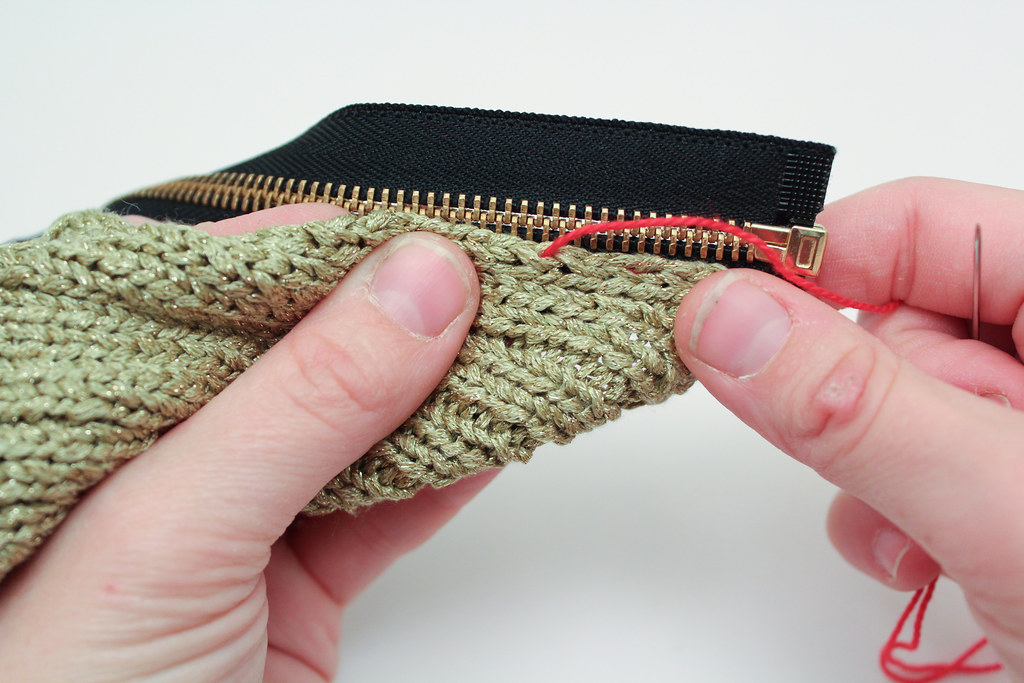
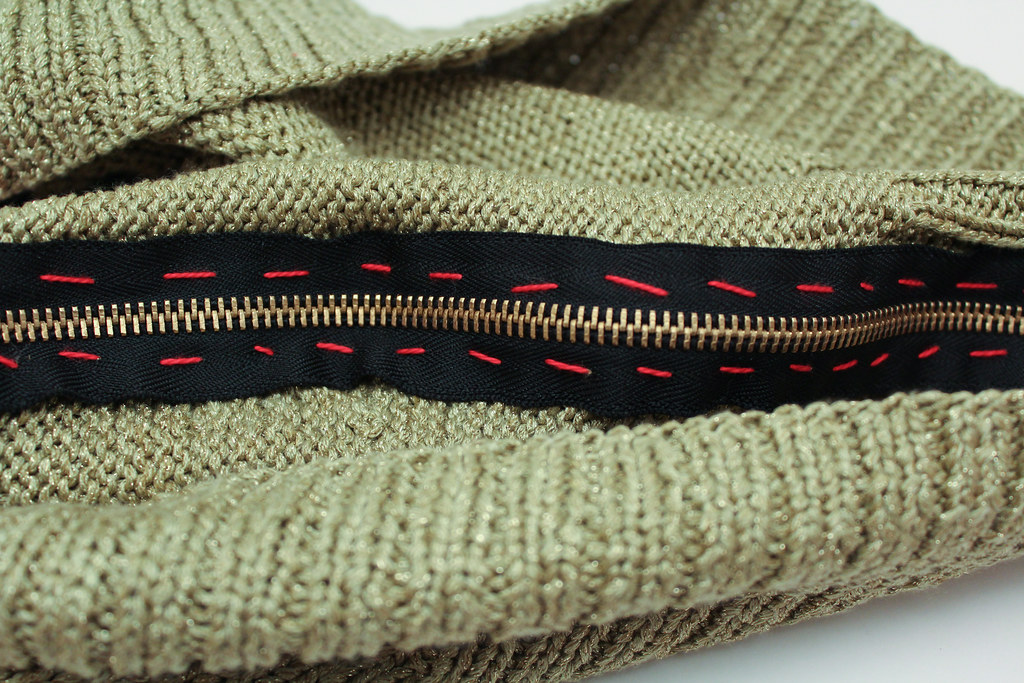
Meanwhile, I’ll be in the instructor tents doing what I do best, teaching my heart out.  This weekend we’ve got a reprise of a constant favorite, Duct Tape Dress Forms, and also a class on repairing handknits.  If you have a spare moment, keep an eye out for me at lunch, as I grab a quick bite and say hello to as many people as I can!

How to Set a Zipper in a Sweater

The rights have reverted back to me for a number of blog posts I did for Jordana Paige’s blog a few years ago, and I’ve begun re-posting them on occasion to have them on my own website, and so students can reference them.  This particular tutorial about setting a zipper into a sweater, I’ve updated and refreshed, but much of the technique remains the same.


Setting in a zipper is a process that takes time, patience, and a certain amount of willingness to fiddle.  Not everyone likes to do that, which is why so many of the finishing projects I do involve setting in zippers.  But if you’re willing to take the time, setting in a zipper can be very satisfying!

To set in a zipper you will need: a zipper, yarn to match the garment, yarn (or embroidery floss) in a contrasting color, a sewing needle (with a sharp point!), pins, and the 2 sides that you are attaching to the zipper.

a sweater, matching yarn, a zipper, needle and red embroidery floss are shown on a white background.

It’s helpful to have all your materials available!

Please note: When purchasing a zipper, make sure you get the correct type!  You don’t want a zipper for a bag, as it is attached together at both ends – you’d never be able to get your garment off!  Same thing with double ended zippers.  Take time to read the package and know what you are getting.  Also pay attention to length.  As I explain below, get the right size zipper, or a little longer.

The first thing I do is block the two fronts to the garment I’m attaching the zipper to.  Make sure the front is blocked to the correct measurements, and that your zipper will match those measurements, or be slightly longer.  If you need to, you can trim the top of the zipper to the length you want.  Make sure you use a file to eliminate any rough edges, and sew a new stopper so your zipper tab doesn’t come off.

Next, pin the zipper into place on the inside of the garment.  Make sure that you are not pulling or distorting the knit fabric – at all.  If you pull the fabric to stretch to the zipper, it can cause the zipper to pucker or wave.  After you’ve gotten things in place, I like to run a basting stitch along the zipper, as I don’t like to get poked with pins.  It also makes super-sure your zipper doesn’t shift around.

To do a basting stitch, take some waste yarn or thread, and use a running stitch, sewing the zipper to the fabric with big stitches.  When you’re done attaching the zipper, you can remove the basting stitch, so don’t worry if the basting stitch isn’t perfect.

Using a running stitch to baste the zipper to the fabric.


After I’ve finished basting (and this is another good reason to baste your work, because you can’t do this if the zipper is pinned), I check to make sure that the zipper can zip up and down without catching on any fabric.  Better to find this out now than after I’ve sewed everything together!  This is your opportunity to make any adjustments.

The basting stitch on the wrong side of your work.

Finally, you can sew the zipper to the piece.  Depending on the piece, sometimes I use the yarn the sweater was worked in.  Other times, if the yarn is delicate, loosely plied, or extremely fuzzy, I’ll use sewing thread in a color that is close to the color of the yarn.  Either way, I use the same technique.

Working from the back, I secure the yarn.  When I sew, I make sure that each time I’m going over only a single strand of yarn between two stitches.  Basically go into the purl bump if viewing from the back.  Mostly, I choose the space between the first and second stitches against the edge.

Working very slowly, I sew my way up one side, then up the other.  Be patient. Take your time. Check your work often.  Use small stitches.  Because the zipper is located at the front of the sweater, I’m super careful to make sure that my sewing doesn’t show.  Sometimes, if the fabric is wide, I’ll run a second set of stitches further out along the zipper band, so it doesn’t flop and lies nicely down.  You can see I did this from the picture below.

The zipper, sewn to the sweater with two rows of stitches.


When you’ve finished attaching the zipper to both sides of the fabric, I check my work.  Check again to make sure the zipper moves smoothly along the track.  Then, and only then, if I’m happy with what I’ve done do I remove the basting stitches.  Finally, weave in your ends.

Zipper in sweater


Crochetscene 2015: Riverbend Skirt

Riverbend is the final of the patterns I worked for Crochetscene 2015.  Like Bow Wrap and Crossed Arrow, I had a really good idea of this pattern long before I turned it into a proposal.  Unlike the other two, Riverbend’s genesis and maturing happened at a lot slower of rate.

Part of this was I was working on other projects, and part of it was wanting to let the genesis pattern have a bit of distance before I created something in the same vein.

Sketch for Riverbend

Riverbend became a design idea back when I was working on Victoria’s Riflebird.  Victoria’s Rifebird is a wrap that should be familiar – it has very similar shaping to Riverbend!  You could say they are siblings.  Once I had finished Victoria’s Riflebird, but before I wove in the ends, Sweetness, one of the girls I nannied at the time, wrapped the wrap around her waist and gave a swirl.  I realized then that a similar shape would work really well with a skirt – with some minor adjustments!

I love the idea of wrap skirts.  I like the versatility and the sizing flexibility.  When I was a kid one of my favorite skirts for about a year was a wrap skirt made of two layers of fabric.  Now, I have another wrap skirt that I wear at least once a week in the summer and the fall.  Riverbend is directly influenced by both those skirts.

Riverbend is also defined by the finishing details of this skirt: there’s a bold fun button in he same color of the wedges (a vintage one harvested from my great-grandmother’s collection), and another vintage button in the main color on the inside.

Riverbend, all finished and on one of my new models – this one being more full-hipped.

Riverbend is a wrap skirt, and sizing makes it super flexible.  The subtle a-line of the skirt makes it great in multiple colors for a summery cover-up for every-day skirt, or do it in solid colors for a more professional look.  The distinctive wedges are created using my special technique to work crochet short rows.  (Keep an eye out, there’s a class on that with Interweave coming soon!)  The ribbed fabric gives it a bit of a sexy silhouette – it hugs the hips just a bit before flaring out.  Unlike my original sketch, which had the skirt looking a lot more full, math and practicality made the finished project a little bit less flared.

Riverbend, on my model that’s a bit less full-hipped, you can see the difference in the way the skirt hangs.

Riverbend is currently available in the newest issue of Crochetscene 2015.  You can check out it, and my other three patterns, in the issue!  Also check out my Ravelry page, where you can read my personal notes and the stats about the time I spent on this project!

Crochetscene 2015: Crossed Arrow Vest

Photo Credit: Interweave/Harper Point Photography

This week I’m focusing on my three patterns released in Crochetscene 2015!  I had the honor of getting all three of my design submissions accepted – and it was so exciting to work on these three designs.  Today I’m focusing on Crossed Arrow, a Hunger-Games inspired vest that’s accessible to beginning crocheters.  With minimal seams and simple shaping, the most challenging part is the edging – and broomstick is an easy skill to learn!

My Sketch for Crossed Arrow

I had the concept of how the vest was put together from the start; although my drawn picture here only gives you a little bit of an idea.  I had been immersed in the future/punk look of a few different shows, and I had just come off of a bunch of fine work in both knitting and crochet – I was ready for a bulky vest that worked up quickly and looked a lot more complicated than it was.  Crossed Arrow was the result.

I’d also been wanting to create a couple of pieces featuring things like broomstick – things that would introduce crocheters to the skill without making the whole project about the skill.

I love that Crossed Arrow is simple – the vast majority of the project is single crochets through the back loop.  Occasionally you crochet to create an armhole, and in the beginning and the end you work increases or decreases for the neckline.  But mostly?  It’s just using one of the foundation stitches of crochet to a really great effect.

Hairpin lace edging on Crossed Arrow

Hairpin lace edging on Crossed Arrow

For me, it’s the details of the piece that make it – specifically, the broomstick lace edging.  Look at the picots!  Look how the rest over the edges!

Crossed Arrow is currently available in print or online in Crochetscene 2015.  You can also read my more personal notes about the pattern on Ravelry.

3 Essential Rules to Work on Granny Square Crochet Blankets

Tomorrow morning I’ll be winging off our a week long vacation with my family in Alaska, and then I’ll return to quickly packing up for three weeks of summer camps in Rockville, MD.  So I’ve been trying to wrap up a few long-term finishing projects.

Sometime soon I’m going to write a post on how to properly finish off a granny-square blanket so it doesn’t fall apart in 30 years. (Or really, any blanket for that matter.)  Still, it seems like all I’ve been doing lately is repairing granny squares.

It’s meditative work at the best of times, and dead boring at the worst.  I normally like to put on a book-tape or podcast and crank out the repairs.  This time around I took a few photos to share, and decided to add my 3 rules of working on granny square blankets.

Granny Square blanket with split seams

The first blanket, featured above, had two major places it was broken: the last row of the square didn’t have its ends woven in, and I needed to rework the last row and reattach.

Rule #1: Properly weaving in ends is essential in a blanket that you want to last.  Crocheting over them doesn’t cut it.

Repairing hole in Granny Square Blanket

Repairing hole in Granny Square Blanket

As a corollary to Rule #1, the closer an end is to the center, the more stress it takes.  REALLY weave in the ends at the center of a blanket.

Which brings me to my next rule.

Rule #2: include care instructions when you give a blanket to someone.  Don’t expect them to know how to care for the blanket and the fibers!

Let me show you some examples:

Center of granny square lost of love

Center of granny square lost of love

Slowly adding back the center of the Granny Square

Slowly adding back the center of the Granny Square

Granny square center replaced!

Granny square center replaced!

All the black that's  not a

All the black that’s not a “frame” for the granny square is replaced & repaired.

The blanket above is one that’s been well loved, but also subjected to light and heat damage.  The fibers are very very delicate, and I’m working to repair the largest holes so this can be gently loved again. Still, proper care of textiles can extend their life a hundredfold.

Finally, my last rule.

Rule #3: REALLY, REALLY weave in your ends.  Seriously.  Nearly 80% of the granny square repairs I do is in places where they ends have come unraveled, instead of the fibers degrading.  Weave in the ends.  Use a sharp needle.  Skim them in.

Are there things you can think of to extend the life of your afghans?  What are they?

Now available: Make a Crochet Rug Using Piping Cord and Crochet Motifs!

Matryoshka Baskets from Crochet World

I’ve been really enjoying playing with padded crochet lately, if you haven’t noticed.  Last year with Crochet World I published the Matryoshka Baskets, and this past week my Rag-ety Rug came out.  Now, this week I have another wonderful piece of news to share with you!

Remember how a couple of months ago I talked about filming classes with Interweave?  Well, the first of them are out, and I couldn’t be more excited!

Let me tell you about the class.

Titled Make a Crochet Rug Using Piping Cord and Crochet Motifs with Jennifer Raymond, this class covers all you’d need to know in order to make Stained Glass Rug.  While the pattern by itself stands alone, you do need a basic understanding of padded crochet to make the project work.

With my online class, not only do I show you the basics of padded crochet, but I also show you all my tricks I developed and learned while making the rug.  You’ll learn the best ways of finishing off your cord, the easiest ways to join the motifs, and how to adapt the pattern for other purposes.

Make a Crochet Rug Using Piping Cord and Crochet Motifs

Make a Crochet Rug Using Piping Cord and Crochet Motifs

As I mentioned before, this class focuses around Stained Glass Rug, which was featured on KDTV’s episode 1409. I love this pattern.  It’s infinitely customizable, as you can make the rug as large or small as you want it.  The padded crochet makes the rug both cushy under the feet, durable, and the project works up really fast!  There’s plenty of room for color play, in the form of using up scraps, creating color blocks, or making magic balls to use.  And I love how, just worked in the yarn I used for the original project, each piece looks a little bit like the stained glass you see in churches.

Make a Crochet Rug Using Piping Cord and Crochet Motifs with Jennifer Raymond is available for pre-ordering as a DVD, or you can download it right now onto your computer.

You should checkout the preview:

Have you ever worked padded crochet? What do you think of the preview?

Padded Crochet Tutorial

Padded Crochet Tutorial

In honor of Rag-ety Rug coming out this week from Crochet World, and my recent post about it coming out, I thought it was appropriate to finally post this tutorial, which I’ve been saving for quite a while.

What you’ll need:

  • A crochet hook
  • Some scrap yarn
  • Rags, upholstery cord, or something else nice and thick but flexible to crochet over.  Bulky yarn would work too.

A bit about padded crochet: this technique originally was used to crochet around thicker yarn to create different motifs.  It gives you a lot of flexibility because you don’t have to crochet into the previous row, you can also just crochet around your material.  You see this technique often used in  Irish Crochet.

To begin, work a foundation chain, and work single crochets into the chain.  This can be any width, as we’re working a practice swatch.  After you’ve finished those two rows, you begin by adding in your cord/rag/yarn.  You’ll be crocheting around it much like you do when you’re burying an end into your crochet work, except this will be much larger.

Adding in your cord/rag/yarn

Adding in your cord/rag/yarn

Begin by holding your cord/rag/yarn above the last row you worked.

Joining Yarn around padded crochet

Joining Yarn around padded crochet

In this case, I’m also joining the yarn for this row.  Insert your hook into the last stitch of the previous row, and draw up your yarn.

Attaching yarn, Padded Crochet, Step 2

Chain one, securing yarn around the cord/rag/yarn.  I like to hold my tail together with my working yarn for this first stitch, or no other reason than it makes me feel better, and makes me feel like things are more secure.  I’ve got no proof, though.

Begin working Single Crochets around cord/rag/yarn

Begin working Single Crochets around cord/rag/yarn

Now, begin working your crochet stitches into the stitch of the previous row, working the yarn around the cord/rag/yarn.  In this case, I’m working a variant of the v-stitch.

Some tips:

  • Make sure you’re letting your stitches lie flat.  If you make them tight, they’ll bunch up your cord/rag/yarn.
  • Every once and a while check to make sure that your piece is laying flat.  Because the cord/rag/yarn that you’re working over has a tendency to shift around, it can make things pucker, draw tighter or looser.  I like to measure ever few rows.
  • When you have to add more cord, there’s a few ways you can do it.  In my case, I sewed on my rags together, because it was a bit more tidy.  You can also just hold the end of one rag and the beginning of another together.
  • Make sure if you’re using rags they’re the same width, so your rug doesn’t have a lumpy look, or have irregular rows (unless that’s the effect you’re going for)!
Measure, measure, measure!

Measure, measure, measure!

Have you every worked padded crochet?  How’d it turn out?  What was the project?

New Pattern: Rag-ety Rug, a Padded Crochet Project

Rag-ety Rug by Jennifer Raymond

Rag-ety Rug, a Padded Crochet Project

I’m proud to announce that Rag-ety Rug, my pattern with Crochet World Magazine’s August 2015 issue, is officially out.  (Yes, I know it’s only June.  I’m not quite sure how Annie’s works their release schedule, but even though it’s June, you should be able to start finding the magazine on shelves in the next few weeks).

Rag-ety Rug uses one of my new favorite crochet techniques, padded crochet.  Like Stained Glass Rug and Matryoshka Baskets, Rag-ety Rug uses padded crochet.  Normally padded crochet is worked with smaller items (like in Irish Crochet Lacework), but I like to use padded crochet to make more modern, exploded lace pieces.

Rag-ety Rug was mostly worked on during a vacation to Atlantic Beach with Mr. Turtle’s Parent’s.  It seemed rather fitting: this rug, worked with denim scraps, fits in perfectly with beach decor.  The varied blues of the different denim scraps seemed to echo the blues of the ocean.

walking on Atlantic Beach in January

Walking on Atlantic Beach in January

There is a meditative quality to this rug, as each row the “v-stitch” nests into the following row.  I loved watching the rug gradually grow.  The cotton in the rug is from Lily’s Sugar ‘n Cream line, in a color called Stone Wash.  It was a perfect pairing for the denim.

Padded Crochet Rug from Annie's Crochet World

Rag-ety Rug, done in Padded Crochet, detail shot.

In my original pitch I imagined this rug in rainbow colors, for a children’s room or for someone who loves color.  I think it’d be fun to play around with textures too: perhaps with prints or strips or plaid?  The possibilities are endless!

What colors would you work this rug in?

My Easy Finishing Technique for Weaving in Bulky Yarn

Techniques for Weaving In Really Bulky Yarn

Today we have a quick little blog post that I’ve been meaning to do for a while, but haven’t quite gotten around to!  I thought it’d be the perfect thing to start out our week: a tutorial on weaving in really bulky yarns.  I think it’s a helpful finishing technique for both knitting and crochet.

What am I going to be talking about? Well, weaving in ends.  Now, I know weaving in ends isn’t everyone’s cup of tea, and I totally understand.  It’s one of the reasons I offer finishing services.  But for those of you who like to sweat the details, weaving in ends can be an important part of finishing a project.

Today’s little tutorial is specifically about weaving in really bulky yarns, which can be hard to pull through the fabric.  Now, this trick only works for plied yarns, but it’s a nice thing to have in your arsenal.

Onward!

  1. First, we’re going to want to take the tail that we plan to weave in above.  See how it’s plied together – that is, it’s got multiple strands all twined around each other?  We’re going to separate those out.  You’ll want to do it by twisting the yarn in the opposite direction it’s twisted together, so the individual strands start standing out from one another.  Once you’ve got one you can grab, pull it from it’s neighbors, until you’ve got them all separated like this:
    Yarn separated out into it's individual plies.

    Yarn separated out into it’s individual plies.

  2. Now that you’ve got the plies separated out, get a sharp-pointed needle and thread one of the plies onto the needle.  Like this:
    Thread one of the plies onto a sharp needle to weave in the end of the yarn.

    Thread one of the plies onto a sharp needle to weave in the end of the yarn.

  3. Make sure the other ends are out of the way, and now, weave in the end.  Do the same with the other strands of the yarn.
    Nearly there: All but one end woven in!

    Nearly there: All but one end woven in!

  4. Finally, trim your ends away as close as you can to your project without cutting anything.
    Trim your ends away, and admire your work! You've finished weaving in your ends!

    Trim your ends away, and admire your work!


Do you have a favored method of weaving in ends, or a finishing technique that you love to share with others?  Tell me about it in the comments!  I love hearing from you!

A weekend in Pictures: Davidson Reunion

Mr. Turtle and I got back from our Davidson College Reunion later last evening.  It was just enough time to unpack, read through emails, feed the cats, and start a load of laundry.  I swear, this traveling every weekend thing has to stop.

Tomorrow I’ll talk more about the reunion, as my thoughts settle.  Today, a few quick pictures of what I’m working on:

Swatching for my current design!

Swatching for my current design!

I’m working with some lovely yarn called chocolate. I’m trying not to get hungry every time I use it.

Working on the sleeve of the piece. Knitting bag in Davidson colors!

Working on the sleeve of the piece. Knitting bag in Davidson colors!

Davidson College has a lake campus, where Mr. Turtle spent many an afternoon as Commodore of the sailing team.  We went to revisit the lake campus, and I plopped myself by a tree near the water, and worked on the sleeve to this project.

All the revisiting members of 2010. I'm not there as I'm class of 2009.

All the revisiting members of 2010. I’m not there as I’m class of 2009.