MENU

Preparing a Hole For Swiss Darning in a White Knit Throw

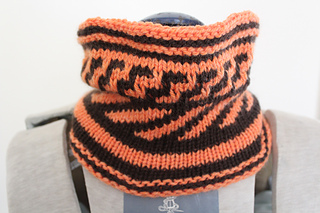
One of the first steps when I get a piece is an initial evaluation to make sure everything is ready to be worked on.  It always helps when clients secure stitches and mark the areas that need to be worked on.  In this paticular case, a hole had developed in a supremely soft knit afghan… clearly it needed repairing to be used this winter!  I feel like the end of 2020 has been a year of wanting to snuggle under a blanket, especially as in the Northern Hemisphere it’s getting cold.

hole in white knit throw held together with safety pins

hole in white knit throw held together with safety pins

[Read more…]

Reweaving and Grafting a Green and Gold Asymetrical Shawl

It seems like the entire fall has been consumed with white sweaters: I had three repairs of Irish Knit sweaters in a row, which is one of the more boring things to write about.  But my latest repair is a lovely green and gold shawl that I thought was paticularly interesting, and I thought I’d share it here in addition to writing about it on Instagram.

This piece had five rows of stitches ripped into a hole: it had caught on something (dryer? door?) and gotten the hole. Being that it was in the colors of the client’s daugther’s team, it needed to be repaired.

This is one of the repairs that is just a joy to work on: the client, D, had sent the piece to me with the loose stitches still on locking stitch markers.  She had taken my Darn It class with me at Rhinebeck, so she knew the drill: catch the stitches so they don’t drop and make the hole bigger.  It meant I could dive right into the repair without having to fish around ladering the stitches back into place.  (Which, have I mentioned lately that my Darn It class is both on Interweave and Craftsy?)

It was time to get to work.

Garter stitch is one of the prime times where I like to use a single long-ish strand of the repair yarn if I can.  While many of the orional techniques of doing swiss darning call for a new strand of yarn on each row, I find that leaves a lot of ends to weave in, and can make the fabric very dense in those areas.  Trying to keep the ends pretty short, I only opened up the hole a little, working duplicate stitch along the sides and then knitting across the hole before moving up to the next row.  I did that for the first few rows, and then grafted the last row together.

recently rewoven hole in garter stitch shawl in green and gold, threads are still visibleThen it was time to weave in the ends.


I feel like often most of the attention I give to pieces is the process of repairing the hole, which is important!  But, I find it equally as satisfying to weave in the ends – that’s when a hole is truly repaired.  I feel like sometimes garter stitch can be a little tricky to weave in all the ends, so I chose to split the yarn into smaller strands to try and hide the ends a little better and keep the fabric from getting too thick where the old and new yarn overlapped.

green and gold shawl with recently darned and rewoven hole

Finally, it was time to fuss with the tension to make sure that everything was laying flat and even.repaired hole in green and gold garter stitch shawl marked by waste yarn

A blast of steam to “convince” the newly woven in ends that they should stay where I put them, and this piece was ready to send in the mail.  A satisfying way to leave things!

The Largest Textile I’ve Blocked to Date: A Knit Lace Chuppah

detail of lace star in middle of chuppahA while back I was contacted by a young woman getting ready for her wedding.  She had a rather unusal request: she needed a lace knit chuppah for her wedding blocked.  Part of a traditional Jewish wedding is the chuppah: a canopy under which the couple stands during the wedding cerenony.  The chuppah has a lot of symbolism.  Some chuppahs can be very plain, but many of them are passed through the family, and are elaborate family herilooms made of lace and embroidery are not uncommon.

When I first spoke to the young lady, she admitted that she had gotten in touch with a few other finishers, and none of them could take on an item so large.  She estimated that the finished piece would be about 10 by 10 feet.  I have to admit, I went through the house with a measuring tape, measuring each room in my house to see if I could fit something so large.  Luckily, our kitchen with all the furniture out would work.  It was 14×14 feet – which would give me just enough room to be able to walk around it when the piece was laid out.

[Read more…]

Darn It! How to Repair your Knitting Online Workshop Available

I’ve been working on my new class from Interweave, Darn It! How to Repair your Knitting for several years.  Since I began offering repair courses, I’ve wanted to find a way to get this information to students who were not in my geographic area.  This started when I posted about getting a copy of Rena Crockett’s Flawless Knit Repair.  People from all parts of the globe would email asking how they could get a copy, or asking if I’d be willing to scan a PDF version of the book.  (I was never comfortable with that solution, as I make my living off of my copyright, and I’ve never been able to contact Crockett or her realitives to see if they would be OK with that action.)

But in the back of my brain I was trying to figure out how I could create my own, readily available version of Crockett’s book.  Becasue as much as Crockett’s book was instrumental in my own start into repairing things, I’d found some other methods of working that I wanted to share with people.  More than a year ago I teamed up with Interweave to try and create a course that would answer the need I’d seen.

I’m proud to announce that Darn It: How to Repair your Knitting is finally available!  This class covers a lot of ground: repairing knit fabrics, purl fabrics, cables, lace and (my favorite!) colorwork (which has some special challenges).  It breaks down, step-by-step, how to approach various reparis, and how to make them nearly invisible (if that’s your desire).

Let’s look at what the class includes:

In This Online Workshop You’ll Learn:

  • A variety of repair techniques including duplicate and Kitchener stitch
  • How to fix holes before they even happen
  • Step-by-step repairs for stockinette, Fair Isle, cables, and lace knitting
  • The secret to weaving in ends invisibly
  • Tips for sourcing repair yarn and mimicking original yarns in older or heirloom pieces

Lesson Outline:

  • Intro
  • Darning vs. Reweaving
  • A Stitch In Time: Finding Holes Before They Happen
  • The Duplicate Stitch
  • Repairing Stranded Colorwork
  • Kitchener Stitch
  • Repairing Cables
  • Mending a Hole in Stockinette
  • Weaving in Ends
  • Repairing Lace
  • Conclusion

Skill Level:

Any! Students should have basic knitting skills and some knowledge of knitting cables and simple lace.

Optional Materials for Practice Swatches:

Small amounts of worsted-weight yarn in several colors for practice swatches and repair; Size 7 or 8 knitting needles; locking stitch markers; crochet hook; tapestry needle and sharp-tipped needle; Size 7 or 8 double-pointed knitting needles

Repairing Cables Article in Interweave Knits Fall 2018

And the releases keep coming!  I’m proud to announce I have an article in the Interweave Knits Fall 2018 issue on repairing and reweaving cables in knitwear.

My piece appears on page 64.  You can also find a copy of the article on the Interweave Knitting Page.

The article offers tips and tricks to repairing cables.  I’ve added in some expert tips about where I source my yarn.  I think the editorial staff at Intwerave did a great job laying out the article and making it the best it can be!

All About Yarn Online Workshop

I’m proud to announce the release of my class All About Yarn with Interweave.  This class has been a long time in coming!  It’s a version of one of my most popular topics to talk about: why yarns act the way they do.  I’ve been working to get this information to a wider audience, and I feel that this fits that niche.  Let me tell you a little bit more about the class:

 Ever find what you think is the perfect yarn for the perfect project, only to find that they are not perfect together at all? Ever fret over substituting one yarn for another? Join Jennifer Raymond and discover why a yarn that is luscious for lace can be a fail when it comes to cables. Look at your stash with fresh eyes, and visit your LYS knowing how to choose and use the right yarn for whatever you want to make. Prepare to learn All About Yarn.

In this Online Workshop you’ll:


  • Learn about the 3 building blocks of all yarns–ply, weight, and fiber content—and how they work together.
  • Determine the weight of any yarn, from handspun to those mystery yarns in your stash.
  • Explore a whole menagerie of fiber animals–from angora to yak–along with cotton, linen, silk and more.
  • Gain new confidence in choosing and using yarns, whether for a new pattern or for your own design
  • Get tips on how to care for your finished projects.


Lesson Outline:


  • Introduction
  • Meet Your Instructor
  • Understanding Ply:


  • Singles
  • 2 Ply Yarns
  • 3 & 4 Ply Yarns
  • A Weighty Matter: Yarn Weights Explained
  • Yarn Weight Standards
  • Wraps per Inch
  • A Small Detour: Worsted vs. Woolen Yarns
  • Fiber: Protein, Cellulose, and Other Types of Fiber
  • Quick Guide: Types of Wool
  • Quick Guide: Other Animal Fibers
  • Quick Guide: Cotton, Linen, & Silk
  • Quick Guide: Synthetic Fibers
  • Fiber Care


  • Wrapping Up


Skill Level: Beginner on up. Though aimed at knitters, this workshop is also appropriate for crocheters or any maker interested in yarn.

Materials required: None! Though you may find it helpful to rummage through your yarn stash while watching.


About the Instructor:
Jennifer Raymond is a knitter, crocheter, and spinner based in Ashland, Virginia, with more than 20 years of stitching experience. A teacher and designer, she also has a business repairing and restoring heirloom knit and crochet pieces.

Make Do and Mend: Recent Repair Projects

I’ve been working and plugging away at a number of repair projects, and while I’ve been posting them to Instagram, I thought I’d highlight a few here.  We’ve got one crochet piece and one knit piece.

The knit piece features a stocking that was hung over the fireplace with care – but was hung a little too close to the flames!

a christmas stocking with a hole burned through it

a christmas stocking with a hole burned through it

Not only did the warmth of the fire burn through the stocking, but it melted one of the stocking stuffers to the fabric, causing the bottle to leak all over the fibers.  It was a mess!

A side note: this is a really good reason to use wool when making anything that will get anywhere near heat – wool does not melt or burn like acrylic or cotton.

repaired christmas stocking ready to go back to its owners

repaired christmas stocking ready to go back to its owners

This stocking needed an overhaul – I pulled things out at the ankle and re-knit the foot.  I’m pretty pleases with the color matching – not perfect, but pretty close!


The other project I wrapped up was a crochet afghan that had developed a hole.  It was a nice diversion, since the last few repairs I’ve done of crochet afghans have been plain single crochet.

IMG_20170518_125831237

The first step was isolating the crochet stitches that were in danger of unraveling.  Because this pattern is a gathered stitch, things are a little more tricky – there isn’t a one-to-one ratio of stitches.

IMG_20170518_130232107

Then there’s the process of re-crocheting the area. I had a choice here: I didn’t have any of the blanket yarn I could harvest, so I could either use a closely matching yarn (which is tough to find with cream colored things), or I could crochet the piece in a slightly tighter gauge so I would have enough yarn to do the repairs (and weave in ends).

IMG_20170518_131004860

This is a strategy that works well over a small area – in this case, this one pinwheel (marked by the teal thread). Over larger areas this would cause the area to pucker.


And that is most of what I’ve been working on!  What projects have you gotten off the needles/hook?

Mastering the Master Hand Knitter Program

IMG_20170517_154215159_HDRI’ve been considering doing the Master Knitter program for a while now.  Rather halfheartedly, because I wasn’t really sure where I would find the time, and I wasn’t sure of the benefit the designation would give me.  However, after Unwind, Mr. Turtle decided it was time to give me the push and sign me up for the Master Hand Knitter program.  Then I’d be committed.  The theory being, is that even at 30 years of age (with a child now!) I’m often still perceived as being younger and thus less experienced. (Ageism, anyone?)  The Master Hand Knitter certification would be a way for me to have outside validation that I know my stuff – and hopefully open more doors for teaching and other opportunities.

So I’ve been working on the swatches and reports for the first level, and it’s an interesting process.  Let me be clear before I write the next part: I have the utmost respect for the TKGA Master Hand Knitter Program.

Saying that, I’m finding doing the swatches and the work utterly boring and frustrating and counter-intuitive to my personality. Hint: I’m not that great a rule-following, and I tend to think I know better than the directions.

Part of this may improve with time as I get to the more difficult levels.  But part of me wishes that there was a way to “test out” of the lower levels – these swatches of garter stitch, stockinette, and basic lace are driving me BONKERS.  I understand that you need to follow the directions exactly – so that they can tell that you can follow directions, so that you can demonstrate that you can do various skills like yarn-overs and decreases without twisting stitches.

The whole thing is terribly tedious.

Then, I need to write reports about various techniques, citing sources and answering questions.  I need to be able to write directions on how to do the various skills to demonstrate that I can explain things clearly.

And the whole time I feel like this work is pulling me away from things I would rather do with my leisure or work time.  I’m trying to keep my eye on the prize – that big shiny pin and the proof that I’m able to do this work.  But… I’m finding it hard.  Part of it is I’m not entirely convinced that the time I spend on the Master Hand Knitter Certification will actually have any affect on my marketability.  And part of it is I feel like my accomplishments should be able to speak for themselves, instead of doing what feels like busywork.

But!  Continuing education is a good thing.  And who knows, maybe I’ll get my ego checked a little bit, and find things that I need to improve on.

Anyone else looked at or done the Master Hand Knitters Program?  What were your thoughts?

Coming to Fruition

Shamrocks and St. Patrick's dayNearly a year ago, in preparation for Little Turtle’s arrival, I made a dress.  Based off of my Rosemary and Bay pattern, this version was for my own child,much anticipated at that point.  I made the dress with a Shamrock and a bit of a St. Patrick’s day flair, since part of my family is Boston Irish, and I love the green shamrock motif.  It seemed lucky to make a dress for my future daughter with a shamrock on it.  Last week I got to put her in it, and I couldn’t be more pleased with the fit.

First of all, it’s taken me nearly 10 months to realize if I kept the sticker on the paper, I could get Rebecca to hold it in a way that looks like she is holding up a sign… doh!

But let me get back to the dress!

I’ve written about this dress before, HERE.  But I didn’t share the details.  The greenish yarn is from Mountain Colors, and is their Twizzle.  I’d originally gotten enough to make myself a vest, but then decided instead to use it to make a slouchy hat (which Michael then washed and accidentally felted so…).  This is made from some of the scraps.  The yoke, hem and waistband area ll made in Mountain Colors Twizzle.  The body is knit in cream, and is from Willow.  It’s Willow Yarns Attire Light.  This yarn had some faults in it, so there were more ends to weave in than usual.

When I made the dress, I accidentally reversed the directions halfway through, so the “seam” is smack dab in the middle of the dress, underneath the shamrock.  I’m not too pleased with it, but I’m not going to rip it all out so… I doubt anyone really notices when it is on Rebecca.

wp-1490471532313.jpeg


Classes with Tinking Turtle

Golly, we’ve got a lot going on at the Turtle-Wrangling Ranch!  It must be spring, as my class schedule is picking up as I teach at Fiber Festivals and local venues.  Check out some of the highlights:


wp-1489607241853.jpegDances With Wool is located southwest of Richmond, VA in Midlothian.  I’ve got a bunch of classes I’ll be teaching there in the next few weeks:

  • Ravelry 101 (March 18) – Learn how to use the ever popular Ravelry website!
  • Stripes Three Ways (March 18) – We’ll cover three different types of colorwork, with a fun little twist!
  • Finishing Essentials (March 18) – This class is a must-take if you’re looking to learn to put a crochet or knit object together.

wp-1489607231169.pngFibre Space is one of my all-time favorite stores to teach in (partially because I love all the places to eat lunch in Alexandria… shhh!).

  • Padded Crochet (March 19) – I don’t teach this skill or this class often, so take it while it’s available!
  • Bind Offs (March 19) – We had such a great response to our Cast-Ons class, this one covers finishing your projects with intentional bind offs!

wp-1489607224330.jpegNext weekend I’ll be in North Carolina for the Carolina Fiber Fest. This’ll be my second time teaching at this fiber festival, and it’s at a new location!  I’ll be teaching:

  • Duct Tape Dress Forms – The first time I’ll be teaching it since my maternity leave – it was too hard on my body while pregnant.
  • Hairpin Lace Scarf in a Day – this crochet technique is great for quick projects!
  • Stripes Three Ways – This class is popular, and you’ll see why – it teaches some great colorwork techniques.